23.5
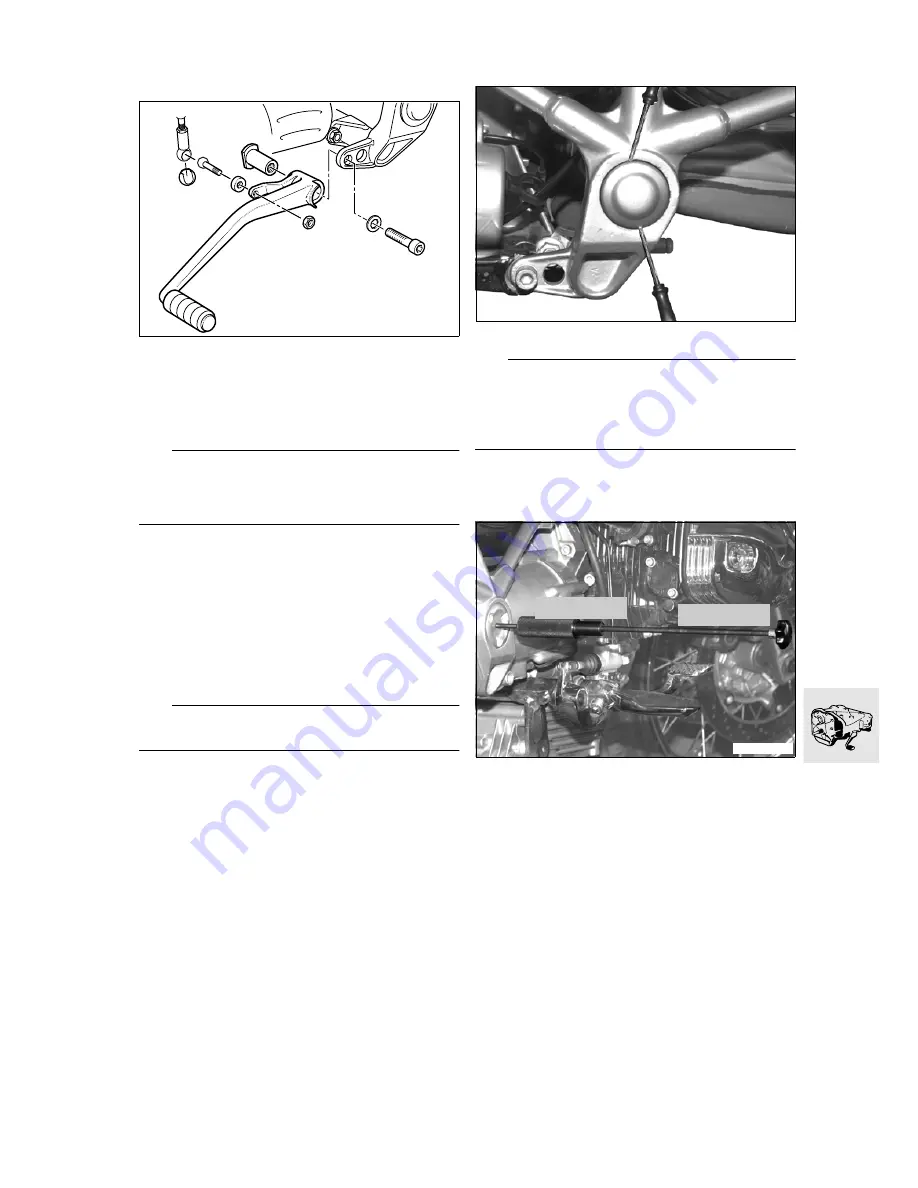
Removing and installing gear pedal
X
Tightening torque:
Gear pedal to frame ..................................... 41 Nm
Removing gearbox
e
Caution:
Switch off ignition.
Disconnect earth (ground) lead from battery.
Insulate earth (ground) lead.
•
Attach stand,
BMW No. 00 1 520
, to motorcycle.
•
Remove seat.
•
Remove side trim.
•
Remove fuel tank.
•
Remove rear wheel.
•
Detach rear brake caliper.
•
Detach ABS sensor.
•
Detach speedometer signal sensor.
•
Detach wire protection at swinging arm.
•
Tie up swinging arm with a suitable strap.
•
Remove suspension strut.
L
Note:
Press to rear at top.
•
Pull swinging arm upwards with strap.
•
Removing exhaust manifold.
•
Remove silencer (muffler).
•
Detach plug at oxygen sensor.
•
Remove rear wheel drive unit.
•
Detach brake hose holder.
•
Press off left swinging arm bearing cap.
e
Caution:
When installing again, make sure that the O-ring is
in good condition.
The opening must face down so that water can drain
out.
•
Loosen the left swinging arm.
•
Take out the screws at the right swinging arm
bearing.
•
Using pull rod,
BMW No. 00 8 581
, and impact
weight,
BMW No. 00 8 582
, pull out the swinging
arm bearing.
•
Remove the left swinging arm bearing.
•
Remove rear swinging fork.
•
Remove the rubber intake pipe sleeves.
•
Remove brake fluid reservoir from holder.
•
Remove the holder.
•
Detach the right plug holder plate.
•
Pull off the NTC air plug.
•
Detach the gear pedal at the pivot.
•
Separate the throttle potentiometer and throttle
angle positioner plugs at the left plug holder
plate.
•
Disconnect both fuse boxes at the plug holder
plate.
C230180
C330030
C330040
00 8 581
00 8 582
Summary of Contents for R 1200 C
Page 1: ...BMW AG Motorcycle Division After Sales R 850 C R 1200 C Repair Manual ...
Page 4: ......
Page 18: ...00 10 ...
Page 40: ...11 4 ...
Page 47: ...11 11 Sectioned drawing of engine ...
Page 48: ...11 12 Lubricating oil circuit ...
Page 49: ...11 13 Coolant circuit ...
Page 50: ...11 14 ...
Page 61: ...11 25 Removing cylinder head RS110110 M6 x 30 M6 x 30 M6 x 30 M10 x 70 ...
Page 100: ...11 64 ...
Page 102: ...12 2 ...
Page 104: ...12 4 ...
Page 112: ...12 12 ...
Page 114: ...13 2 ...
Page 116: ...13 4 ...
Page 120: ...13 8 ...
Page 122: ...16 2 ...
Page 124: ...16 4 ...
Page 128: ...16 8 ...
Page 130: ...18 2 ...
Page 132: ...18 4 ...
Page 134: ...21 2 ...
Page 136: ...21 4 ...
Page 140: ...21 8 ...
Page 142: ...23 2 ...
Page 144: ...23 4 ...
Page 166: ...23 26 ...
Page 168: ...31 2 ...
Page 170: ...31 4 ...
Page 180: ...32 2 ...
Page 182: ...32 4 ...
Page 188: ...33 2 ...
Page 190: ...33 4 ...
Page 206: ...33 20 ...
Page 210: ...34 4 ...
Page 226: ...34 20 Removing and installing brake lines Removing and installing front brake line C340020 ...
Page 227: ...34 21 Removing and installing rear brake line C340030 ...
Page 230: ...36 2 ...
Page 232: ...36 4 ...
Page 240: ...36 12 ...
Page 242: ...46 2 ...
Page 244: ...46 4 ...
Page 254: ...51 2 ...
Page 257: ...52 1 Contents Page 52 Removing and installing seat 3 52 Seat ...
Page 258: ...52 2 ...
Page 260: ...52 4 ...
Page 262: ...61 2 ...
Page 263: ...61 3 61 Technical data R 850 C R 1200 C Battery Amp h 19 ...
Page 264: ...61 4 ...
Page 268: ...61 8 Wiring harness View from left C619020 1 2 3 ...
Page 269: ...61 9 1 C619021 ...
Page 270: ...61 10 2 C619022 ...
Page 271: ...61 11 3 C619023 ...
Page 272: ...61 12 Wiring harness View from right 1 2 3 C619030 ...
Page 273: ...61 13 1 C619011 ...
Page 274: ...61 14 2 C619012 ...
Page 275: ...61 15 3 C619013 ...
Page 276: ...61 16 ...
Page 278: ...62 2 ...
Page 280: ...62 4 ...
Page 282: ...62 6 ...
Page 284: ...63 2 ...
Page 286: ...63 4 ...
Page 288: ...63 6 ...


