


Page | 6
a) Maintain a firm grip on the power tool and position
your body and arm to allow you to resist kickback forces.
Always use auxiliary handle, if provided, for maximum
control over kickback or torque reaction during start-up.
The operator can control torque reactions or kickback
forces, if proper precautions are taken.
b) Never place your hand near the rotating accessory. The
accessory may kickback over your hand.
c) Do not position your body in the area where power
tool will move if kickback occurs. Kickback will propel
the tool in the direction opposite to the wheel’s move-
ment at the point of snagging.
d) Use special care when working corners, sharp edges
etc. Avoid bouncing and snagging the sanding pad.
Corners, sharp edges or bouncing have a tendency to
snag the rotating accessory and cause loss of control or
kickback.
GENERAL
• This tool should not be used by people under the
age of 16 years
• This tool is not intended for use by persons (in-
cluding children) with reduced physical, sensory
or mental capabilities, or lack of experience and
knowledge, unless they have been given supervi-
sion or instruction concerning use of the tool by a
person responsible for their safety
• Ensure that children do not play with the tool
• This tool is not suitable for wet sanding
• Always disconnect plug from power source before
making any adjustment or changing any accessory
BEFORE USE
• Before using the tool for the first time, it is recom-
mended to ead the complete manual
• Always check that the supply voltage is the same as
the voltage indicated on the nameplate of the tool
• Do not work materials containing asbestos (asbestos
is considered carcinogenic)
• Dust from material such as paint containing lead,
some wood species, minerals and metal may be
harmful (contact with or inhalation of the dust may
cause allergic reactions and/or respiratory diseases
to the operator or bystanders); wear a dust mask and
work with a dust extraction device when perating.
Certain kinds of dust are classified as carcinogenic
(such as oak and beech dust) especially in conjunc-
tion with additives for wood conditioning; wear a
dust mask and work with a dust extraction device
when operating.
• Follow the dust-related national requirements for the
materials you want to work with.
• Use completely unrolled and safe extension cords
with a capacity of 15 Amps.
AFTER USE
• After switching off the tool, never stop the rotation of
the accessory by a lateral force applied against it.
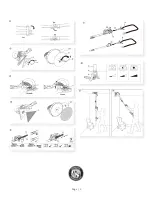
Shaft (Fig. 2)
• Fold the front and back part together (2a).
• Push the folding lock E to the right position and keep
the tip adjacent to the handle .(2b)
• Press the folding lock E towards the handle until the
end. (2c) Unfold the handle by pushing the folding lock
to the inside. Replace sanding pad
Replace sanding pad (Fig. 3)
• Insert the hex wrench (size 5) into the hexagonal
screw bolt on the sanding block
• Hold the sanding pad firmly, and then turn the wrench
counter clockwise to dismount the pad.
• Install new sanding pad by tightening the bolt.
Warning:
Only install the specified sanding pad on the
machine. In order to ensure optimal performance, the
machine should be run at slightly lower speed for sev-
eral minutes to make the grinding pad fit the sealing
surface perfectly. During this process, the white foam
particles willcome out from the sanding head. How-
ever, this won’t damage the machine.
Attaching and changing sanding disc (Fig. 5)
• Place the sanding disc in the center of the sanding pad
and press on. The holes in the sanding disc must be
in alignment with the extraction holes in the sanding
pad.
• For round sanding pad only: conduct a test run to
check that the sanding disc is clamped in the center.
Extension shaft (optional) (Fig. 6)
• Use the extension shaft (o) according to the intended
operation for higher work surfaces.
• Loosen the sleeve on the dust extraction outlet (I) of
the upper shaft (F) but do not remove the sleeve from
the outlet.
• Align the rear handle (o1) with the main handle (B)
and insert the sleeve (o3) on the extension shaft (o)
into the outlet (I) with a twist motion all the way to the
stop.
• Adjust the length of the extension shaft (o) if neces-
sary. Pay attention to the marking “max 1.65m” on the
extension shaft. Tighten the sleeve (I) after assembling/
adjusting the extension shaft.
Dust suction (Fig. 7)
• Loosen locking knob for length adjustment (I) by turn-
ing it in the direction of the unlocking symbol on the
tool handle
Summary of Contents for BNR1839
Page 3: ...Page 3...


