


Page | 7
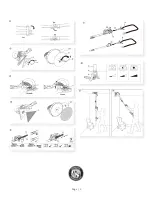
• Insert Vacuum hose P into the end of the tool handle
as illustrated
• Tighten Locking knob for length adjustment I by turn-
ing it in the direction of the locking symbol on the tool
handle
• Connect the Vacuum hose with the Ø 47 mm adapter
P4 directly to an industrial vacuum cleaner (remove
vacuum cleaner hose first)
• You may also connect vacuum hose with one of the
3 adapters to an industrial vacuum cleaner without
removing the vacuum cleaner hose
Tool standard/airflow control (Fig. 8)
• Tool handle P1 prevents the hose from damage when
putting the tool aside during work breaks
• Control the airflow by sliding suction power adjust-
ment ring (P3) over the opening in tool connector (P2)
• The vacuuming power is at its lowest level when the
opening is fully visible or when switching the machine
on and off
• Turn on/off the drywall sander by switch (J) Electronic
speed control
• Adjust the speed by turning the speed wheel (G), user
can choose different speeds for different sanding sur-
faces.
• Constant speed control will keep the machine running
at the same speed as selected.
• Do not overload by excessive pressure.
SANDING OPERATIONS
Once the machine and vacuum cleaner are set up and
all safety measures and equipment are in place, begin by
turning on the vacuum cleaner and then the machine.
(If you are using a vacuum cleaner with integrated switch-
ing, then simply turn the machine on.)
Round sanding head (Fig. 9)
• Begin sanding and carefully contact the work surface
as lightly as possible-just enough to keep the sanding
head flat against the surface.
• The pivot point in the sanding head allows the sanding
disc to follow the contours of the work surface.
• The best technique is to use overlapping sweeps and
keep the head in constant motion. Never stop too long
in any one place or there will be swirl marks. With ex-
perience it will be very easy to create excellent results.
Triangular sanding head⑩(Fig. 10)
• The triangular sanding head does not rotate, but vi-
brates.
• As the triangular sanding head can revolve on bear-
ings, it can sand right into the corners of the wall /
ceiling.
• In the corners reduce the contact pressure, otherwise
there will be excessive load on the tips of the triangu-
lar sanding disc.
• Heavily worn corners of the triangular sanding head
can easily be replaced
Ensure that the sanding disc you are using is suited to the
task, Overly coarse grit paper may remove material too
quickly to control. Overly fine grit paper will clog more
often.
Take care to avoid sharp projections and nails, etc. This
will wipe out the sandpaper and probably damage the
sponge pad as well.
MAINTENANCE / SERVICE
• Store the tool in its protective case in a dry and
locked-up place, out of reach of children.
• Always keep tool and cord clean (especially ventilation
slots).
• Do not attempt to clean ventilation slots by inserting
pointed objects through openings.
• Disconnect the plug before cleaning.
ENVIRONMENT
Do not dispose of electric tools, accessories and packaging
together with household waste material
In observance of any directive on waste of electric and
electronic equipment and its implementation in accor-
dance with national law, electric tools that have reached
the end of their life must be collected separately and re-
turned to an environmentally compatible recycling facility
BN Products-USA, LLC.
3450 Sabin Brown Road
Wickenburg, AZ 85390
(800) 992-3833 • mail@bnproducts.com
www.bnproducts.com
Summary of Contents for BNR1839
Page 3: ...Page 3...


