3
Bobike Balance Bike is a training bicycle that helps little kids learn how
to steer and balance. It allows children to build the confidence they will
need once they are ready for a more traditional bicycle with pedals - no
training wheels required!
This item is considered a toy and it must always be used under parental
supervision.
In this manual, you will find all the information needed to assemble your
balance bike.
Carefully read the manual for a safe and correct installation of the
Bobike Balance bike
.
BOBIKE BALANCE BIKE
• BOBIKE BALANCE BIKE is only suitable for carrying children with a
maximum weight of 25 Kg (and children with recommended ages
ranging from 2 to 5 years of age - with the weight as the decisive variable).
• Bobike Balance bike weight: 3 kg / 6,61 lb.
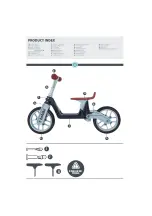
• Bobike Balance bike has comfortable hand rubber grips (E).
• Bobike Balance bike has EVA shock absorbing wheels (A + A1) with Ø240
mm.
• Bobike Balance Bike features an ergonomic and adjustable saddle (H)
that grow with a child and allow you to adjust the saddle height in 3
different positions - 320/335/350 mm.
• Bobike balance bike has a built-in steering limiter also allows children to
maintain control of how much they turn.
• Bobike balance bike is according to the STANDARDS CE - EN71: 2011.
It’s important that you read this owner’s manual before you start to
assemble your balance bike. Reading and following the information
and instructions in this manual are essential to your child’s safety. WE
RECOMMEND THAT YOU CONSULT A PROFESSIONAL BICYCLE MECHANIC
IF YOU HAVE DOUBTS OR CONCERNS AS TO YOUR ABILITY TO PROPERLY
ASSEMBLE YOUR BALANCE BIKE.
TECHNICAL FEATURES
X.
Bobike balance bike
A.
Rear
wheel
A1.
Front wheel
B.
Rear wheel pivot
C.
Frame
D.
Handlebar
E.
Rubber
grips
F.
Fork
tube
G.
Front
fork
H.
Saddle
I.
Bolt + smal connector
J.
Bolt + large connector
K.
Allen key nº4 x 2
TABLE OF CONTENTS OF PRODUCT
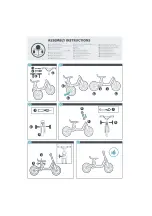
ADULT ASSEMBLY IS REQUIRED. This balance bike requires assembly by
a capable adult. This instruction has been designed in a step by step
order for correct and easy assembly, please follow the sequence. Time for
assembly should be approximately 10 minutes.
It is the responsibility of the parents of the rider to be certain that all
assembly instructions are followed even if the balance bike has been
assembled by the seller or a professional assembly company.
1.
Start to remove all parts of the shipping carton. Check to make sure no
parts are loose on the bottom of the carton. Carefully remove all other
packaging material from the bicycle. This includes zip ties, plastic bags or
wrapping material to protect the bike. Keep them out of reach of children.
Suffocation hazard.
2.
Rotate rear wheel pivot (A+B) out as far as it will go. Pivot (B) will align
with the frame (C).
3.
Insert the larger Connector Bolt (J) fix screw set through the hole above
the rear pivot arm (B). Tighten securely using the 2 Allen keys (K) included.
ASSEMBLY INSTRUCTIONS
• Before allowing your child to ride, it is extremely important to be sure
that all screws and bolts are firmly fastened. Do not allow children to ride
this product if fasteners are loose or damaged. Check fasteners before
each ride.
• Front and rear EVA wheels should rotate smoothly, and that there are
no visible defects.
• Check if all parts of the balance bike are functioned correctly and are
not faulty.
• It’s very important to adjust correctly the saddle height for optimum
comfort and safety of the child. Children are seated so that their little legs
can reach the ground comfortably.
• The rider must be at least 2 years of age. The balance bike is recommended
for children between 2 - 5 years old. This balance bike is not allowed to be
used for a child less than 2 years old.
• Make sure that the weight of the child does not exceed the maximum
capacity of the bicycle, 25 KG / 55,12 LB. Check the weight of the child
before using the balance bike and check this at regular intervals.
• The balance bike can get hot if under the sun for a long time. Make sure
that they are not too hot before seating the child.
• Before you allow your child to ride this balance bike, check that all parts
are installed as per this instruction manual.
INSTRUCTION FOR USE
WARNING
: Do not allow your child to ride without adult supervisions. Use
of the balance bike is recommended in controlled conditions an adult
must accompany the child’s training, instructing them to ride safely to
prevent falls, accidents, and injury.
WARNING
: Protective equipment should be worn. Not to be used in traffic.
WARNING
: Always use a safety helmet when riding this balance bike. The
use of a safety helmet properly fitting, should be worn at all times when
riding your Bobike balance bike. The correct helmet should be approved
by the EN1078 standard, comfortable, lightweight, have good ventilation,
fit correctly and cover the forehead.
WARNING
: This toy has no brake.
• Always wear shoes when riding this balance bike - it is braked with the
feet. Always check that children’s shoes are fastened properly.
• Elbow and knee pads are also recommended.
• Dress the child in proper clothes according to weather conditions.
• Do not allow any part of the child’s body or clothing, shoelaces, etc, to
come in contact with moving parts of the balance bike because can be
harmful to the child or cause accidents.
WARNING
! This balance bike cannot be used on public roads. Do not
allow them to ride in the streets, near cars or other motor vehicles. These
balance bikes are intended for use by children in safe areas that are in
good condition and free of traffic.
• Your child should ride in a large, open, level area.
• Check the conditions of the riding surface. If the surface is wet or has
sand, small rocks or loose debris on the surface, it could cause your child
to lose control of the balance bike.
• Avoid the following hazards: drain gates, potholes, ruts, soft road edges,
gravel, leaves (especially when they are wet), uneven pavement, railroad
SAFETY INSTRUCTIONS
Check the wheels (A) are tight. Ensure no bolts on the wheels are loose
and that the wheels (A+A1) rotate freely and smoothly.
4.
Insert the handlebar (D) assembly over the fork tube (F) protruding from
the frame. Insert the smaller Connector Bolt (I) fix screw set through the
hole in the handlebar assembly and the fork tube (F). Tighten securely
using the 2 Allen keys (k) included. Check the handlebar tightness.
5.
Adjust saddle (H) height by loosening the seat bolt located under the
seat back. When the desired height is reached, retighten seat bolt securely.
You can adjust the saddle height in 3 different positions - 320/335/350
mm. Check the saddle tightness.
6.
Your balance bike is ready to use.
EN
Summary of Contents for BALANCE BIKE
Page 1: ......
Page 2: ......
Page 3: ...B C H E D F G K I J REQUIRED TOOLS A A1...
Page 4: ...B A A A1 C B A K J D F K K I H K J I D 1 1...
Page 40: ...36 2 2 5 2 25 55 12 Bobike EN1078 Bobike 10 1 2 C 3 J 2 K A 1 4 D F F 2 K 5 320 335 350 6...
Page 41: ......
Page 42: ......


