7
8
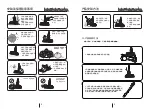
Item Installation Methods
Application Instruction
1.Please take the handle and the major body
from the packing box.
4.Item Installation Methods
Please follow the below instruction
1)When cleaning,please absorb the water
completely, and then twist all water out.
5.Application Instruction
2)Fix the cloth pads on rotating plates.
A er matching the center of
pad A and rota ng place B,
presspads slightly t
o fi
x.(a
s fi
g)
As fig.
,the two
sides of pads
are twisted to
move water out
When installing,please connect with power ,may cause the product barrier or electric
shock.
3)When the center of pads and rotating
plate match well, fix the pads.
5)Connecting power, step the button on
the main body, LED will be bright.
7)When using, press the water spray
button for water spraying.(with full water
inside)
8)When there is no water spraying out,
please power off and ref1ll into water.
6)Hold the handle, press the button.The
battery must be inserted into the handle.
4)Before cleaning, please confirm there
is no foreign objects on the floor(the
foreign objects may cause the barrier or
accidents of product.
2.Slide the bottom end of Telescopic pipe
onto the polisher head until pipe button clicks
into place. When fixing well, you will hear
“clicking”sound,After connecting, please
pull tightly to ensure. Whether the installation
is good.
3.Open the battery cover in the back part of
handle
,
put in 2*3AAA, 1.5v battery
,
close the
battery cover .Connect handle with telescopic
pipe
,
Insert handle into pipe until pipe button
clicks into place.When fixing well, you will hear
“clicking”sound. After connecting
,
please pull
tightly to ensure. Whether the installation is good.


