background image

25

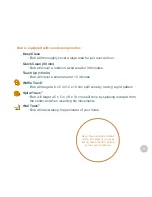
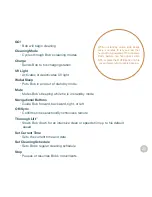
Bob is equipped with six cleaning modes: 

      Deep Clean


Bob will thoroughly cover a large area for just over an hour

      Quick Clean (30 min)


Bob will cover a medium-sized area for 30 minutes

      Touch Up (15 min)


Bob will cover a small area for 15 minutes

      Waffle Track


Bob will target a 6 x 5 in (15 x 13 cm) spill zone by tracing a grid pattern

      Spiral Track


Bob will target a 5 x 5 in (13 x 13 cm) spill zone by spiraling outward from 

              the center and then reversing his movements

      Wall Track


Bob will travel along the perimeter of your home

Deep Clean is Bob’s default 

mode. To select it, you may 

simply press the GO! button 

on his cover or remote.

Summary of Contents for PetHair Plus WPP56001

Page 1: ...OWNER S MANUAL How to employ your intelligent floor cleaner bObsweep PetHair Plus Model WPP56001...

Page 2: ...he Quick Start Guide and this manual thoroughly Welcome to the bObsweep family and happy cleaning If you have any questions or concerns feel free to contact our helpful team at support bobsweep com or...

Page 3: ...ructions Cleaning Schedule 18 31 Troubleshooting Checkup Test 58 4 Cleaning Modes Box Contents Anatomy Parts Maintenance 23 38 6 Warranty FAQs 83 Sensors Get Bob Ready to Clean 54 26 11 FullCommand Re...

Page 4: ...the plug not the cord Do not mutilate or incinerate the battery as it will explode at high temperatures Leaks from battery cells can occur under extreme usage or temperature conditions If the liquid...

Page 5: ...ications or change could void the user s authority to operate the equipment This equipment has been tested and found to comply with the limits for a Class B digital device pursuant to part 15 of the F...

Page 6: ...re Main Brush 4 Charging Adapter 5 FullCommand Remote Control 6 blOck Plus 7 Flat Head Screwdriver 8 2 Side Brushes 1 Spare 9 Cleaning Tool 10 Pack of Screws 11 Mop Attachment 12 2 Microfiber Mopping...

Page 7: ...7 1 2 4 3 Top View 1 Bumper 2 Transmitter 3 Cover Buttons 4 Display Screen Anatomy...

Page 8: ...10 12 6 7 5 11 9 3 8 Bottom View 1 Charging Plates 2 Front Wheel 3 Edge Sensors 4 Side Brush 5 Main Brush 6 ON OFF Switch on side 7 Charging Inlet on side 8 Dustbin 9 UV Lamp 10 Battery 11 Left Wheel...

Page 9: ...9 1 2 3 1 FullCommand Remote 2 blOck Plus 3 Charging Station...

Page 10: ...fault setting 2 CLEANING MODE Select Bob s cleaning mode 3 CHARGE Send Bob to his charging station 4 MUTE Mutes and un mutes the beeping sound Bob makes when entering and in standby mode 5 CHECKUP Put...

Page 11: ...Get Bob Ready to Clean Install Side Brush 12 Let Bob Charge 13 Sync Charging Station 15 Sync Remote 16 Bob s First Clean 17...

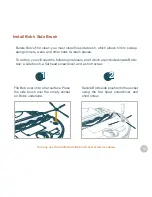
Page 12: ...aterials all of which are included inside Bob s box a side brush a flat head screwdriver and a short screw Flip Bob over onto a flat surface Place the side brush over the empty socket on Bob s undersi...

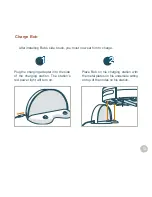
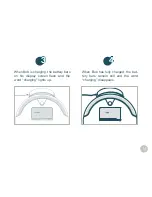
Page 13: ...rging station The station s red power light will turn on After installing Bob s side brush you must now set him to charge Charge Bob 1 Place Bob on his charging station with the metal plates on his un...

Page 14: ...rack check up charging Oops I feel there s something funny going on with my Edge Sensors Touch Sensors Left Wheel Main Brush Obstacle Sensors Dustbin Right Wheel Power System cleaning cleaning mode de...

Page 15: ...ill holding down the SYNC button flip Bob s power switch ON Bob will chirp twice to let you know the sync was successful 1 2 3 Bob will automatically return to his charging station when his battery re...

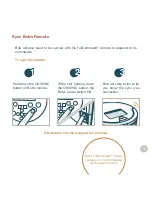
Page 16: ...Bob s Remote If Bob does not chirp repeat the process Hold down the OK SYNC button on Bob s remote Bob will chirp twice to let you know the sync was successful 1 2 3 While still holding down the OK SY...

Page 17: ...n Brush Obstacle Sensors Dustbin Right Wheel Power System cleaning cleaning mode deep clean quick clean 30M touch up 15M waffle track spiral track wall track Bob is now ready to clean Press the GO but...

Page 18: ...Charging Bob Station Placement 19 Auto Charging 20 Manual Charging 21 Conserving Battery 22...

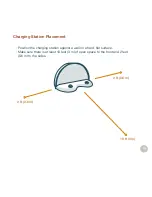
Page 19: ...2 ft 0 6 m 10 ft 3 m Position the charging station against a wall on a hard flat surface Make sure there is at least 10 feet 3 m of open space to the front and 2 feet 0 6 m to the sides Charging Stat...

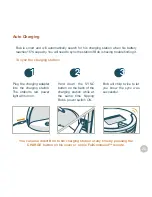
Page 20: ...also direct Bob to his charging station at any time by pressing the CHARGE button on his cover or on his FullCommand remote Auto Charging Plug the charging adapter into the charging station The statio...

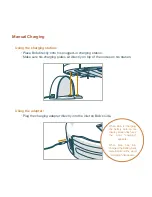
Page 21: ...tly on top of the nodes on his station Using the adapter Plug the charging adapter directly into the inlet on Bob s side Manual Charging When Bob is charging the battery bars on his display screen fla...

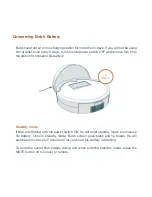
Page 22: ...battery Standby mode If Bob is left idling with his power switch ON he will enter standby mode to conserve his battery Once in standby mode Bob s screen goes blank and he beeps He will also beep once...

Page 23: ...Cleaning Modes...

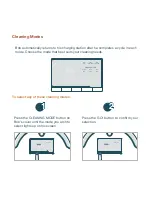
Page 24: ...clean 30M touch up 15M waffle track spiral track wall track check up charging Oops I feel there s something funny going on with my Edge Sensors Touch Sensors Left Wheel Main Brush Obstacle Sensors Du...

Page 25: ...r a small area for 15 minutes Waffle Track Bob will target a 6 x 5 in 15 x 13 cm spill zone by tracing a grid pattern Spiral Track Bob will target a 5 x 5 in 13 x 13 cm spill zone by spiraling outward...

Page 26: ...FullCommand Remote Control Remote Buttons 27 Syncing the Remote 29 Navigational Arrows 30...

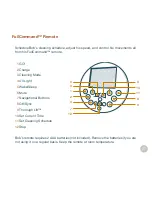
Page 27: ...te 1 GO 2 Charge 3 Cleaning Mode 4 UV Light 5 Wake Sleep 6 Mute 7 Navigational Buttons 8 OK Sync 9 Thorough Lift 10 Set Current Time 11 Set Cleaning Schedule 12 Stop Bob s remote requires 2 AAA batter...

Page 28: ...ht or left OK Sync Confirms time selection Synchronizes remote Thorough Lift Slows Bob down for an intensive clean or speeds him up to his default speed Set Current Time Sets the current time and date...

Page 29: ...e is able to obey its commands To sync Bob s remote Syncing Bob s Remote Hold down the OK SYNC button on Bob s remote While still holding down the OK SYNC button flip Bob s power switch ON 1 2 Bob wil...

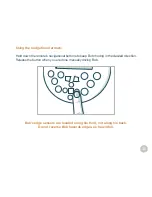
Page 30: ...remote s navigational buttons to keep Bob moving in the desired direction Release the button when you are done manually driving Bob Bob s edge sensors are located along his front not along his back Do...

Page 31: ...Cleaning Schedule Set Current Date Time 32 Set Cleaning Times Day 34 Auto Resume 36...

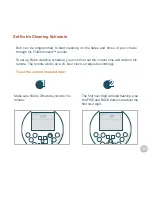
Page 32: ...schedule you must first set the current time and date on his remote The remote works on a 24 hour clock so adjust accordingly To set the current time and date Set Bob s Cleaning Schedule Make sure Bob...

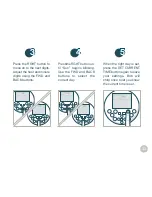
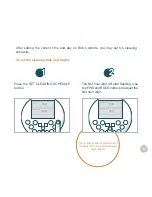
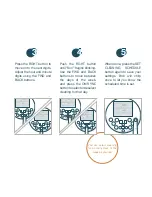
Page 33: ...s using the FWD and BACK buttons 3 PresstheRGHTbuttonun til Sun begins blinking Use the FWD and BACK buttons to select the correct day 4 When the right day is set press the SET CURRENT TIME button aga...

Page 34: ...eaning schedule To set the cleaning time and day s Press the SET CLEANING SCHEDULE button 1 The first hour digit will start flashing Use the FWD and BACK buttons to adjust the first hour digit 2 The r...

Page 35: ...blinking Use the FWD and BACK buttons to move between the days of the week and press the OK SYNC button to select or deselect cleaning for that day 4 When done press the SET CLEANING SCHEDULE button...

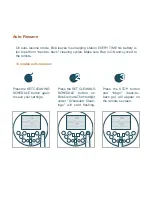
Page 36: ...is ON and synced to the remote To enable auto resume Auto Resume Press the SET CLEANING SCHEDULE button again to save your settings 1 Press the SET CLEANING SCHEDULE button on Bob sremote Thefirstdig...

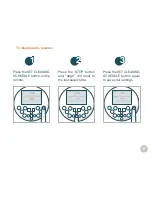
Page 37: ...sable auto resume Press the SET CLEANING SCHEDULE button on the remote 1 Press the STOP button and bbgo will reset to the last saved time 2 Press the SET CLEANING SCHEDULE button again to save your se...

Page 38: ...Parts Maintenance Filter 46 Main Brush 48 Side Brush 50 Battery 52 Mop 39 blOck Plus 41 Dustbin 44...

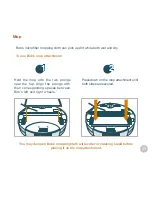
Page 39: ...p Hold the mop with the two prongs near the top Align the prongs with their corresponding spaces between Bob s left and right wheels 1 Press down on the mop attachment until both sides are secured 2 Y...

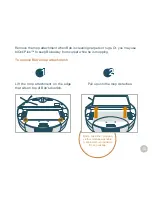
Page 40: ...k Plus to keep Bob away from carpet while he is mopping To remove Bob s mop attachment Lift the mop attachment on the edge that sits on top of Bob s dustbin 1 Pull up until the mop detaches 2 Bob s mi...

Page 41: ...left side and another from its front You may use one or both barriers depending on your preference As with Bob s charging station and remote you will need to sync blOck Plus before using it for the f...

Page 42: ...n Now the power light on the front side of blOck Plus will turn on stay still for 10 seconds and then slowly blink every 3 seconds This means blOck s front barrier is ON and ready to sync 2 Hold down...

Page 43: ...disappear Front barrier Press the up arrow button The red power light on the front side of blOck Plus will turn on Press again to turn off The power light will disappear blOck Plus will remain ON for...

Page 44: ...44 To empty the dustbin Dustbin Push the center button on Bob s back to release the dustbin Then slide the dustbin out 1 Open the transparent gate to empty the bin 2...

Page 45: ...ipe the dustbin with a dry cloth or brush it with the cleaning tool 3 When done replace the transparent gate and slide the dustbin back into Bob 4 Do not wash the dustbin or fill it with water or any...

Page 46: ...e the dustbin s ceiling These filters capture fine particles and allergens and prevent them from escaping the dustbin To remove the filters Filters Eject the dustbin by pressing the button on Bob s ba...

Page 47: ...rs 1 HEPA Filter For sub micron particles 2 Electrostatic Filter For fine particles 3 Mesh Filter For larger particles Use the cleaning tool to brush dust off the filters It is recommended that you ch...

Page 48: ...b s main brush using a flat head screwdriver 1 Use the cleaning tool to remove debris from both ends of the brush as well as Bob s brush compart ment 2 You may use a pair of scissors to cut away any h...

Page 49: ...49 To reinstall the brush Replace the brush cap and insert the opposite end of the brush into the square indentation inside Bob 1 Lower the brush into place and re tighten the screw 2...

Page 50: ...to sweep along corners and walls When Bob is first delivered to you his side brush is not installed To do so Use the flat head screwdriver and short screw included in Bob s box to secure the side brus...

Page 51: ...rush on a weekly basis To do so Remove the side brush using a flat head screw driver 1 Use the cleaning tool to brush off hair tangled around the side brush as well as the socket where the side brush...

Page 52: ...52 To replace Bob s battery Battery Remove the battery cover on Bob s underside using a Phillips head screw driver 1 Lift the battery out of it s compartment and unplug the connecting wires 2...

Page 53: ...station Plug in the new battery and slide it into the empty compartment 3 Re tighten the screws on the battery cover 4 Storing Bob If you are not using Bob for an extended period of time unplug his c...

Page 54: ...Sensors Cleaning Sensors 55 Deactivate Edge Sensors 56 Reactivate Edge Sensors 57...

Page 55: ...nsors are located along his bumper and his edge sensors are located on his underside Regularly cleaning these sensors ensures that Bob keeps working at his best To do so Wipe the wall and edge sensors...

Page 56: ...ensors Deactivate Edge Sensors Flip Bob s power switch ON Hold down the CHECKUP button on Bob s cover The 4 bars above Check Up will begin to flash on Bob s screen 1 After the 4 bars flash 7 times and...

Page 57: ...lashing and dis appear release the CHECKUP button Bob s edge sensors are active again 2 To reactivate Bob s edge sensors Hold down the CHECKUP button on Bob s cover The 4 bars above Check Up will begi...

Page 58: ...Troubleshooting Home Checkup Troubleshooting 59 Home Checkup Test 70 Cleaning Behavior 80 Cleaning Challenges 81...

Page 59: ...issue If Bob s problem persists after attempting the suggested solutions you may want to perform a home checkup test see next section You may also contact our customer care center at 1 888 549 8847 o...

Page 60: ...nsors Bob s four oval shaped edge sensors are located on his underside near his bumper What to do Clean the sensors using a clean dry cloth or compressed air Oops I feel there s something funny going...

Page 61: ...olored or patterned carpeting you may need to deactivate them To deactivate Bob s edge sensors Hold down the CHECKUP button on Bob s cover The 4 bars above Check Up will begin to flash on Bob s screen...

Page 62: ...er to clear out any obstructions Use compressed air to clear out dust and debris trapped inside the bumper Press on both ends of the bumper until you hear a tiny click If the bumper is not clicking on...

Page 63: ...Wheel What to do Use the cleaning tool or compressed air to remove any dust or debris that may be jamming the left wheel If that does not solve the problem run a checkup test and see how the wheel pe...

Page 64: ...cissors to cut hair or thread wrapped around Bob s brush or a pair of tweezers to remove congestion from the notches where the main brush is held Bob s main brush is not designed to clean shag carpet...

Page 65: ...65 Wall Sensors What to do Use a clean damp cloth to wipe away any debris from the strip on Bob s bumper Gently tap on the bumper and use compressed air to clear it of debris...

Page 66: ...nd empty it Gently wipe the two metal connectors on the bottom of the dustbin with a dry cloth If the two metal connectors seem damaged they may need to be replaced Lastly clean the metal contact poin...

Page 67: ...Wheel What to do Use the cleaning tool or compressed air to remove any dust or debris that may be jamming the right wheel If this does not solve the problem run a checkup test and see how the wheel p...

Page 68: ...erly function What to do Make sure Bob is OFF Open Bob s battery compartment and unplug the battery Wait 30 seconds then reinstall the battery Plug the charging adapter directly into the inlet above h...

Page 69: ...ting portion of my owner s manual and have been having trouble after step 4 could you further assist me If after attempting these solutions Bob is still displaying a trouble message he may need a repl...

Page 70: ...t in the US and Canada or email us at support bobsweep com Our hours are Monday Friday 9 am 5 pm PST To put Bob in checkup mode Home Checkup Test Flip Bob s power switch OFF 1 While holding down the C...

Page 71: ...tem cleaning cleaning mode deep clean quick clean 30M touch up 15M waffle track spiral track wall track Step One Edge Sensors The 4 bars above the word Check Up should be lit on Bob s display Lift Bob...

Page 72: ...le track spiral track wall track Step Two Wall Sensors Use a thick flat and white surface to imitate a wall and drag it around Bob s bumper The 5 bars below the word Check Up should light up one at a...

Page 73: ...Sensors Dustbin Right Wheel Power System cleaning cleaning mode deep clean quick clean 30M touch up 15M waffle track spiral track wall track Step Three Touch Sensors Press the left side of Bob s bumpe...

Page 74: ...n Bob s cover Place Bob with his front facing the red light on his charging station about 1 foot 30 cm away Keep blOck Plus away from Bob so its signal does not interfere with the test The words Deep...

Page 75: ...l track Step Five blOck Plus Both the front and left barriers of blOck Plus must be synced and turned ON for this step of the checkup test Unplug the charging station so its signal does not interfere...

Page 76: ...e Sensors Dustbin Right Wheel Power System cleaning cleaning mode deep clean quick clean 30M touch up 15M waffle track spiral track wall track Step Six Display Screen Press the GO button on Bob s cove...

Page 77: ...er Press the CLEANING MODE button on Bob s cover Both the side brush and the main brush should start rotating and you should feel air flowing from the back of the dustbin If Bob s main brush is having...

Page 78: ...eels should drive forward Flip Bob over and you should see his UV lamp lit Do not look directly into the UV lamp Press the CHARGE button once more Bob s wheels should drive backwards and his UV lamp s...

Page 79: ...eshooting portion of my owner s manual and have been having trouble after step 4 could you further assist me If Bob completes the checkup test without any issues then his internal parts are working pr...

Page 80: ...lean your home within the course of a full cycle just check his dustbin for the evidence It is best to let Bob work in his own way even if his movements appear odd Moving him around manipulating his m...

Page 81: ...ges and stairs because dark colored carpet absorbs most light it may seem like empty space to Bob s sensors If Bob displays that there is something funny going on with his edge sensors then you may ne...

Page 82: ...is is because Bob wants to cover every spot in your home and will try his hardest to overcome any obstacle As long as Bob does not display a trouble message on his screen let him continue cleaning and...

Page 83: ...Warranty FAQs Warranty Information 84 FAQs 85...

Page 84: ...mopping cloths Postal charges are not cov ered by the warranty To purchase additional coverage plans go to owners bobsweep com click on PetHair Plus and find coverage plans Even after Bob s 2 year wa...

Page 85: ...still and the word charging disappears 4 How often should I empty the dustbin Bob s dustbin has a 1000 mL capacity three times larger than most robotic vacuum cleaners on the market This means you may...

Page 86: ...charged the battery bars remain still and the word charging disappears 7 Why is Bob beeping Bob beeps as he is entering standby mode and once every 2 minutes while in standby mode To conserve battery...

Page 87: ...brush out as this can damage it It is best to clean Bob s brushes about once a week to prevent buildup 10 Bob gets stuck under my furniture or travels over wires that tangle up his brush How can I sto...

Page 88: ...atically begins cleaning after he has fully charged To disable auto resume press the SET CLEANING SCHEDULE button on Bob s remote Then press STOP bbgo will reset to the last time saved Press SET CLEAN...

Page 89: ...d his screen turned off What do I do next It s possible Bob is on standby mode If this is the case press any button on his cover or remote to wake him If this doesn t work try flipping Bob s power swi...

Page 90: ...End User License Agreement...

Page 91: ...Bobsweep or vi distribute sublicense or transfer the source code form of Your Software and derivatives thereof to any third party except as provided in this Agreement YOUR SOFTWARE Use and distributi...

Page 92: ...reement TERMINATION This Agreement becomes effective on the date you accept this Agreement and will continue until terminated as provided for in this Agreement You may terminate this Agreement volunta...

Page 93: ...and bObsweep Inc All rights reserved...

Reviews: