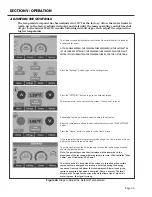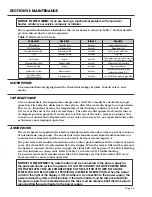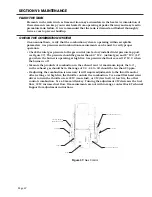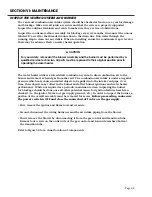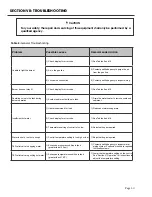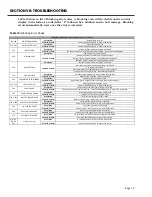
Table 11 should be referenced when troubleshooting the powered anode system. If the status
LED is off or flashing red, a problem has occurred and service is required. When the LED is a
constant green, the system is operating properly.
Note: The tank must be filled with water
prior to connecting the water heater to the power supply. The powered anode system
will only work properly if the tank is filled with water.
SERVICING THE FLAME ROD AND IGNITOR
If an A01 lockout error code is present there has been a problem with lighting the burner.
Two possible causes for this error are a dirty or faulty flame rod or a faulty ignitor.
Each component can be checked for proper operation.
The spark igniter is powered with an independent spark generator and requires a strong
ground directly wired to the power block. Under quiet conditions a faint clicking noise can be
heard from the top of the tank for the duration of the 3 second ignition time.
Do not handle
the igniter while it is sparking. Maintain a direct connection between the igniter
bracket and ground when troubleshooting.
If removing the igniter from the tank to
troubleshoot use an insulated needle nose pliers to secure a grounding wire to the bracket,
and hold the igniter away from any metal, combustible materials, and items prone to damage
by electricity or high temperatures. To confirm that the igniter is operating properly shut
off the main gas supply, remove the igniter from the tank and let the water heater send an
ignition signal. Watch for a visible spark at the tip of the electrode.
If the ignitor is working properly and the burner lights but goes out right away, check the
flame rod. The rod may be dirty or it could be damaged and a replacement will be required.
Start by turning off power to the water heater and remove the flame rod. Inspect the ceramic
insulator for cracks (replace if cracked). Clean the rod with fine steel wool and reinstall. Turn
on power to the water heater and wait for the next call for heat or temporarily increase the
setpoint to initiate burner operation. During the next ignition attempt, the flame signal meter
(in microamps, “uA”) will be displayed. When the flame signal meter is green, the current is
within an acceptable range. A minimum flame signal of 1.25 uA is required to avoid a flame
failure. If the flame signal is 0 uA when a flame is present during the ignition period, the
flame rod needs to be replaced.
Page 53
SECTION VII: TROUBLESHOOTING
Table 11: Powered Anode Troubleshooting
Table 14 should be referenced when troubleshooting the powered anode system. If the status
LED is off or flashing red, a problem has occurred and service is required. When the LED is a
constant green, the system is operating properly.
NOTICE: The tank must be filled with
water prior to connecting the water heater to the power supply. The powered anode
system will only work properly if the tank is filled with water.
SERVICING THE FLAME ROD AND IGNITOR
If an A01 lockout error code is present there has been a problem with lighting the burner.
Two possible causes for this error are a dirty or faulty flame rod or a faulty ignitor.
Each component can be checked for proper operation.
The hot surface ignitor can be checked with a visual inspection through the burner assembly
sight glass. Before the gas valve opens in the ignition sequence, the ignitor will warm-up
for 20 seconds. During this time, an orange glow will be visible through the sight glass. If
accessing the sight glass is not feasible, two simple checks can be made with a multimeter.
First, ignitor resistance may be measured at the end of the ignitor wiring terminal. Turn off
power to the water heater and disconnect the ignitor wire harness from the wire harness with
the two orange wires. Insert the multimeter probes into the ignitor wire harness terminal.
At normal room temperature, the ignitor resistance will be approximately 38 ohms. After a
heating cycle, the resistance will be in the range of 38 - 80 ohms (depending on when the
measurement is taken after the cycle). Besides resistance, the continuity of the ignitor circuit
can be checked. With the multimeter probes still in the terminal, switch the meter to check
for continuity. If continuity is not indicated, the ignitor must be replaced.
If the ignitor is working properly and the burner lights but goes out right away, check the
flame rod. The rod may be dirty or it could be damaged and a replacement will be required.
Start by turning off power to the water heater and remove the flame rod. Inspect the ceramic
insulator for cracks (replace if cracked). Clean the rod with fine steel wool and reinstall. Turn
on power to the water heater and enter the Installer Menu on the control display (see next
subsection for instructions). Arrow down until the third screen that displays the flame signal.
During the next ignition attempt, a flame signal (in microamps, “uA”) will be displayed.
Under normal operation, the flame signal will be between 2 - 5 uA during a successful ignition
period. As the fan speed increases the flame signal will become stronger and eventually be in
the 5 - 7 uA range. A minimum flame signal of 1.25 uA is required to avoid a flame failure.
If the flame signal is 0 uA when a flame is present during the ignition period, the flame rod
needs to be replaced.
Page 50
SECTION VII: TROUBLESHOOTING
Table 14:
Powered Anode Troubleshooting
LED status
Problem
Solution
OFF
The water heater is not connected to the main power
supply.
Ensure that the water heater is plugged in.
Flashing
Red
Error occurred during start-up.
Reset power to the anode power supply by
disconnecting
the main power supply to the water heater.
The tank is not filled with water.
Disconnect water heater from main supply and fill tank
with water.
Poor electrical connection between anode power
supply and anode rod.
Check the insulation on all connecting harnesses for
bare spots. Check the connections at the power supply
and anode terminals.
Defective seal in adode bushing; anode rod is no
longer insulated from tank.
With an ohmmeter, check for electrical continuity
between the powered anode terminal and the bushing.
If there is continuity, replace the anode rod.

