background image

11

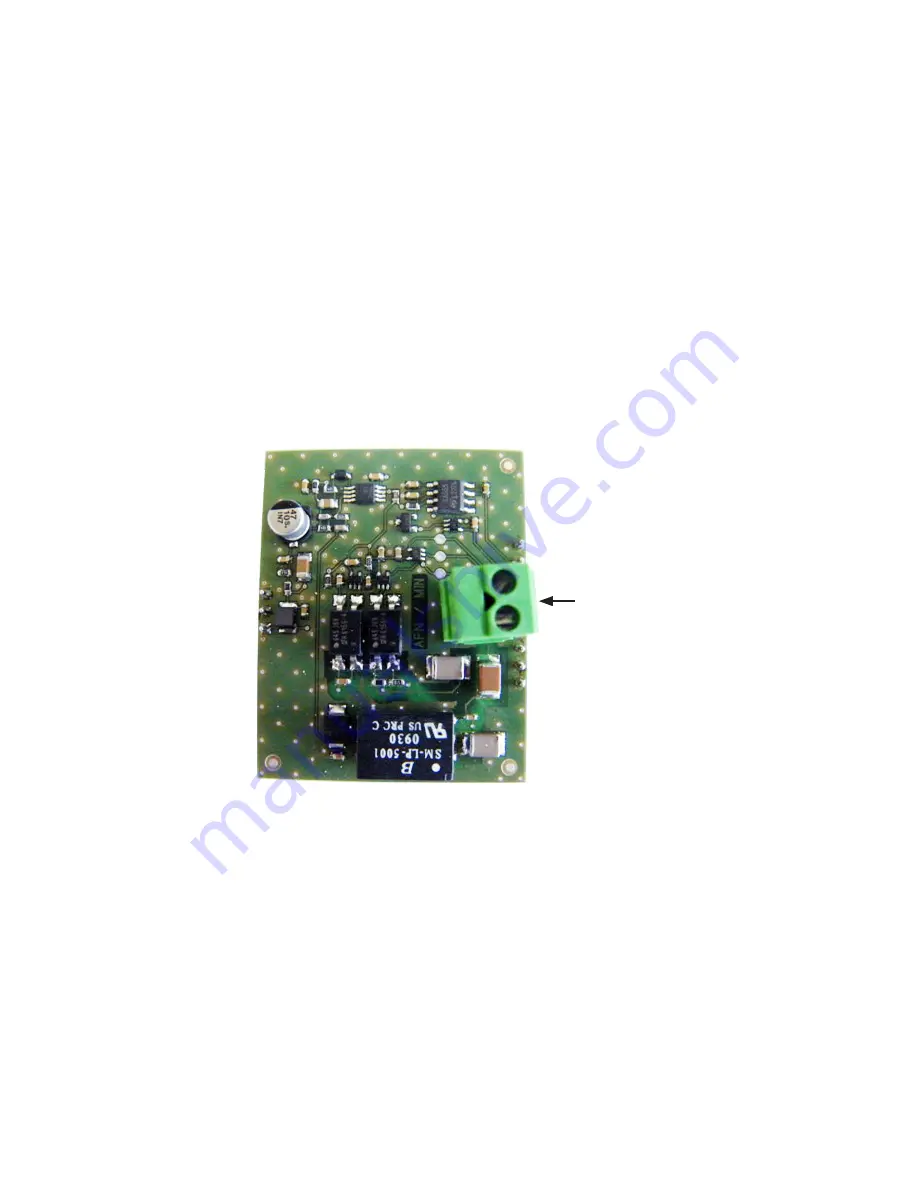
III.4 Installation on an AFNOR network

Connect the cable as shown in the diagram below (non-polarised inputs).
The  clock  sets  itself  to  the  right  time  after  receiving  several  coherent  time 

messages.  Between  successive  synchronisations,  the  time  base  changes 

normally in accordance with the internal base.
If  the  clock  is  in  COD  mode  (see  page  29),  the  time  displayed  is  the  time 

received. If the clock is in LOC mode (see page 29), the time displayed takes 

into account the time differences chosen in the time menu (time difference and 

summer/winter.

AFNOR input

Summary of Contents for HMS LED

Page 1: ...LED DISPLAY Upon receipt always check the product for damage during shipment If any is found you may file a damage claim with the carrier BODET SA BP1 49340 TREMENTINES Fax 02 41 71 72 01 Usine de Trémentines Système de Management certifié Réf 606408 S www bodet time com ...

Page 2: ... 15 III 9 Installation of the temperature humidity probe 15 III 10 Installation of hard wired temperature sensor 16 III 11 Installation of HF temperature sensor 17 III 12 Repeater for double sided clock 18 III 13 Configuration of DIP switches 18 III 14 Clocks in series 18 III 15 Matching of an HF remote control 19 IV Settings menu 19 IV 1 Main menu 21 IV 2 CHRO menu count up and count down setting...

Page 3: ...ng to sunlight clouds night time independently per face CAUTION Installation and maintenance of this equipment should only be carried out by qualified personnel Since the HMT LED is connected to a mains supply or 115V it must be installed in compliance with standard IEC 364 The mains supply for the clock must include a neutral phase circuit breaker 16A maxi rapidly accessible upstream from the sup...

Page 4: ...ss to other elements switching power supply CPU card modules by removing the glass Pull the glass laterally 5 to 10 cm then lift it and pull it to take it out from the profile at the bottom the clock II 2 Wall fixing Fix the clock with the 4 screws Ø6 not supplied HMT HMS LED 15 20 and 25 or the 6 screws Ø8 not supplied HMT HMS Led 45 and the appropriate plugs Make use of the 4 oblong holes behind...

Page 5: ...ten the 4 screws in contact with the vert bracket single face cover and then lock the 4 nuts on the double face support 4 For a vertical bracket only attach the cover of the bracket on the side of the double face support with the two 5 mm screws detail B Stainless steel screw M5X16 Stainless steel 5 mm collar nut Single face cover Cover for vertical bracket Double face support A A A B B D D Stainl...

Page 6: ...the double face support to the bracket with the four 8 mm screws detail C Remember to insert the cables in the bracket 7 Open the clock remove the glass and unscrew the wall attachment parts 8 Attach the clock to the double face support on the 4 screws ST F M5 40 detail D Place the 6 mm washers detail D flat on the double face support and not inside the clocks to move the clocks sufficiently far a...

Page 7: ...ss steel nut HM5 Double face assembly 1 For double face assembly only fit the cable grommet cover supplied in standard version under the double face support attaching it with the 2 screws at the bottom detail A 2 Attach the cover of the bracket on the side of the double face support only with vertical bracket with the two 5 mm screws detail B see single face assembly 4 3 Place the 4 screws D at 16...

Page 8: ...d not inside the clocks to move the clocks sufficiently far away and facilitate insertion of the cables Screw in the 2 nuts at the top D without tightening move the clock away and insert the cables 8 Attach the second clock master clock on the other side of the double face support with the same 4 screws ST F M5 40 D Screw in the 2 nuts at the top D without tightening move the clock away and insert...

Page 9: ...nal strips on the lower part of the board temperature sensor humidity sensor radio GPS and DHF antenna etc must always be placed on the lower part of the board see G The connection cables for the option boards ASCII Afnor minute NTP and for master slave communication must be placed on the upper part of the board see H G H CPU card Mains supply Switching power supply D A B C F E Repeater connection...

Page 10: ...2 France Inter DCF antenna When connected to a FI or DCF antenna the clock is set automatically to the right time However it is still possible to set the clock manually following the instructions given page 24 In case of difficult reception the signal acquisition can last many hours The signal is usually well received during the night Connect the antenna on the terminal C of the electronic card Th...

Page 11: ... coherent time messages Between successive synchronisations the time base changes normally in accordance with the internal base If the clock is in COD mode see page 29 the time displayed is the time received If the clock is in LOC mode see page 29 the time displayed takes into account the time differences chosen in the time menu time difference and summer winter AFNOR input ...

Page 12: ...by one minute on reception of the next impulse from the master clock If in spite of the time setting you still have a time difference of 30 seconds 1 2 minute or 1 minute minute reverse the connection of the line Connect the cable as shown in the diagram below Then move on to the programming in the technician menu page 28 Note to avoid cutting off the network when a receiver clock is disconnected ...

Page 13: ...n of the time from the master clock memorising the address of the transmitter In the event of interference or absence of reception it continues to function with its time base If need be transmitter channel change new installation etc it is possible to reset the clock to Initialisation mode in the technician menu The receiver is supplied installed inside the clock Check that the receiver is correct...

Page 14: ...onds Make the connections directly on the terminal strip as shown in the diagram below or use the adapter supplied enabling connection on an RJ45 connector Note the adapter is a cable equipped with a 5 point terminal strip at one end for connection to the board and an RJ45 connector at the other end for connection to the network This adapter must imperatively remain inside the clock to benefit fro...

Page 15: ...idate and display datas received from the card Nota When several probes are installed the priority becomes as follow HF probe then wired temperature probe and wired temperature humidity probe III 9 Installation of the temperature humidity probe The probe must be installed indoor and away from possible sources of electrical interferences Fix the probe with its support in a place that is not under s...

Page 16: ...d draughts for further information refer to the meteorological standards Air temperature sensor attachment point If possible avoid placing the resin part in contact to prevent thermal conduction The sensor is set in the factory to 20 C It may be necessary to adjust this setting in accordance with the length of the cable 30 metres maximum Place an accurate thermometer near the sensor Adjust the tem...

Page 17: ...pointing downwards for obvious waterproofing reasons By default the HMT LED clock and the transmitting sensor are configured on channel 1 If necessary change channels by adjusting the position of the DIP switches on the sensor in accordance with the channel selected on the clock complying with the following table The channel of the receiver clock is configured in the TECH menu see page 32 1 Insert...

Page 18: ...T clocks in series to configure DIP switches 3 to 5 III 14 Clocks in series It is possible to connect up to 8 clocks in a serial link Use the DIP switches to program one clock as the master then all the others as slaves with a different slave number for each clock See table above Connect the serial cable on the serial connector of each clock See photograph above Repeater Master Clock type Dip 1 Di...

Page 19: ...s carried out in the same way as matching Note each time the clock is switched on an already matched remote control is inactive for 30 seconds IV Settings menu To define the HMT LED settings use the two buttons on the front panel of the single sided HMT LED or the HF radio control console Access to the programming keys by removing the right side of the master unit Caution do not introduce metallic...

Page 20: ...r and press again to stop it R pushbutton Short press to select the next menu or parameter In timing mode press to reset the chronometer when it is stopped Hold down for 1 s to access a value programming menu M pushbutton Hold down for 1 s to access the programming menu chrono time info prog tech test T pushbutton Hold down for 1 s to perform a display test and display the EPROM version number Gen...

Page 21: ...t the time difference and summer winter time change options modify the time base select the temperature unit Celsius or Fahrenheit select the temperature display mode add an offset value to the temperature and humidity and lastly select the HF transmitter channel Caution This menu is intended to be used by technicians only TEST to test the display unit to check that each LED operates correctly and...

Page 22: ... the R button Press the S button to validate Then enter the minutes with the R button Press the S button to validate b If MS enter the minutes with the R button Press the S button to validate Then enter the seconds with the R button Press the S button to validate Note the value entered corresponds to the maximum value to be reached in count up mode and to the initial value in count down mode 5 If ...

Page 23: ... the chronometer taken into account see Sel push button inside clock only on page 16 for the functioning of the chronometer You must not forget to program the alternation of the timing using the PROG menu see page 20 By selecting the Chro menu and validating the Up or Down selection all the possible programmed alternating displays will be blocked Only the timer is active By selecting dAy the alter...

Page 24: ...0 starts when the S button is released 6 The year blinks 2000 to 2099 Modify with the R button 7 Press the S button to validate the year and to go on to the adjustment of the number of the day in the month 8 The number for the day of the month blinks from 0 to 31 Modify with the R button 9 Press the S button to validate the number and to go on to the adjustment of the number for the month 10 The n...

Page 25: ...ith the HF remote control 1 Go to the INFO menu see page 15 2 The Ph level value flashes 0 to 14 Modify with the R button 3 Press the S button to validate 4 The chlorine level value flashes 01 to 99 Modify with the R button 5 Press the S button to validate The readout returns to normal mode ...

Page 26: ...tting of the second alternation parameter 6 The second alternation parameter flashes h t d o u P c F or Modify with the R button 7 Press the S button to validate the parameter and move on to setting of the third alternation parameter 8 The third alternation parameter flashes h t d o u P c F or Modify with the R button 9 Press the S button to validate the parameter and move on to setting of the las...

Page 27: ... the operating mode of the relay 18 The readout returns to normal mode h time display t temperature d date o chlorine display u humidity display c count up or count down display If selected disables all alternating displays except when counting up or down in days F numerical value fixed or programmed by PC serial link P Ph display none Example of setting h t d _ display of time then temperature th...

Page 28: ...onisation mode 6 The synchronisation mode flashes Independent Ind Radio rAd GPS GPS AFNOR AFn Minute Min 1 2 minute 1 2M DHF dHF or NTP ntP see page 30 for further explanations on each type of time distribution Modify with the R button 7 Press the S button to validate the synchronisation mode 8 If you select ntP program the end of the multicast address 239 192 xxx nnn Select the address between Bo...

Page 29: ...ose a pre recorded zone for time differences and summer winter time changes or choose programmable mode Prog with the R button If Ind Min or 1 2M is selected this menu does not appear Central Europe zone Eur France Germany etc GMT 01 hour Winter to summer time last Sunday in March at 2 a m Summer to winter time last Sunday in October at 3 a m Western Europe zone Eu_1 Great Britain Portugal Republi...

Page 30: ...utton d The minutes for the time difference blink 00 or 30 Modify with the R button e Validate the time difference with the S button PrG programmable mode mode to enter summer winter and winter summer time change dates and time difference a If the PrG menu is chosen press the S button to validate b The number of the month for the winter summer time change blinks Modify with the R button c Validate...

Page 31: ...th the R button 00 or 30 Validate with the S button 14 The time base correction value blinks in steps of 50 ms Modify with the R button The time difference is taken into account whatever synchronisation mode is used including radio 15 Press the S button to validate the difference and to go on to the choice of synchronisation temperature unit 16 The temperature unit either degrees Celsius C or Fahr...

Page 32: ...s the S button to validate the temperature unit and move on to setting of the correction to be made to the humidity reading 27 The figure flashes 9 to 9 Modify with the R button 28 Press the S button to validate The display returns to normal mode IV 7 TEST menu test and version display 1 Enter the TEST menu see page 15 2 All the LEDs should light up 3 Press the S or T to go on to the next test 4 A...

Page 33: ...o to the numerical value menu 2 The first digit flashes modify with the R button 3 Press the S button to validate and move on to the second digit 4 The second digit flashes modify with the R button 5 Press S again to validate and move on to the center Led module 6 The module blinks select or with the R key 7 Press the S button to validate and move on to the fourth digit 6 The third digit flashes m...

Page 34: ... every second setting of these receivers to the right time is carried out automatically and rapidly on connection on the clock line The AFNOR code does not transmit interference and is not affected by other electrical interference 24V minute impulse receiver mode Min The receiver clocks are connected to a distribution line and activated by means of electrical impulses transmitted every minute by t...

Page 35: ...ing temperature 20 C to 50 C Protection index IP 54 IK 07 Time base accuracy 0 2 sec day Appendix for time differences Select the reference country for summer winter time changes and time difference according to the city whose local time is to be displayed CITY Zone Reference zone Time difference GMT LOS ANGELES USAP United States Canada 08 MEXICO USAC United States Canada 06 CHICAGO USAC United S...

Page 36: ...36 1760 740 552 620 1200 500 317 385 935 400 242 310 31 31 31 92 5 90 5 90 5 1500 800 317 385 90 5 HMT LED 45 HMT LED 25 HMS LED 25 HMT LED 15 20 HMS LED 15 ...

Reviews: