background image

4

FYRKAT

A very warm welcome outside!

What do we associate more with spring and summer than eating outside? And what is more perfect than 
the pleasure of a really first-class barbecue? Whatever you like best – a hearty steak, a juicy sausage or 
grilled veggies – with the BODUM

 ®

 Picnic Gas BBQ «FYRKAT» you have made the right choice for a sociable 

summer. A barbecue is probably the only culinary event at which the proverb «Too many cooks spoil the 
broth» does not apply: When barbecuing, many cooks are at work. If you are not too easily seduced by 
rich sauces, barbecued food is not only extremely tasty but also healthy and light, especially if you use 
lean meat, fish and vegetables.
We wish you bon appétit!

All we would like to do now is to ask you to read these instructions carefully as they contain important 
safety and hazard warnings as well as useful barbecuing tips, and – of course – to wish you a wonderful 
summer.

With best wishes from the BODUM

 ®

 Design Team

ASSEMBLY INSTRUCTIONS

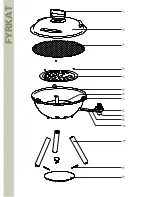
GRILL SET UP

1 Handle
2 lid
3 Grilling grate
4 M4 screw (3 units)
5 Flame tamer
6 Grilling bowl
7 locking clip
8 regulator  
9 Burner
10 Support leg (3 units)
11 Grease tray fastening (3 units)
12 Grease tray
13 Air opening
14 Connection between burner & regulator  
15 Connection between gas canister & regulator 

FIGURE A 

Place the grilling bowl (6) carefully upside down on a level surface and attach each of the three support legs (10) to 

the grilling bowl (6). Use a pre-fitted M6 screw for each support leg and screw in the support leg (10) until securely 

fastened. tighten all of the grill screws, so that all parts are secure.

FIGURE B

Place the grease tray (12) upside down in the centre of the three support legs (10). Fit the three grease tray fastenings 

(11) onto the support legs (10). the grease tray fastenings (11) can be slid over the support legs (10) with ease by press-

ing the two eyelets together. the grease tray (12) is now clamped in place by the support leg (10) and the grease tray 

fastening (11). Ensure that the grease tray (12) is positioned at a distance of approx. 6 cm from the grilling bowl (6).

FIGURE c

After attaching the support legs (10) & grease tray (12) to your BODUM

®

 Picnic Gas BBQ, position the BBQ grill on a 

firm, level surface. Place the flame tamer (5) on the three support plates intended for this purpose, and mount these 

on the stays using the M4 screws (4) provided. tighten all of the grill screws sufficiently, so that the flame tamer (5) 

is secure.
Once assembly is complete, place the grilling grate (4) on the grilling bowl (6).
In order to transport your BODUM

®

 Picnic Gas BBQ, place the lid (3) on the grilling bowl (6) and clamp it firmly in 

place using the three locking clips (7). Carry the BBQ by the handle (1). the BBQ must never be transported whilst hot. 

Always leave it to cool off completely. Always switch the regulator (8) to OFF prior to transportation.

Summary of Contents for FYRKAT 11450

Page 1: ...FYRKAT 11450 FYRKAT Instruction for use ENGLISH Mode d emploi FRANÇAIS Instrucciones de uso ESPAÑOL Picnic gas Grill ...

Page 2: ...2 FYRKAT 4 3 1 2 5 ...

Page 3: ...Instruction for use 3 A B C D 5 4 3 ...

Page 4: ...bowl 6 carefully upside down on a level surface and attach each of the three support legs 10 to the grilling bowl 6 Use a pre fitted M6 screw for each support leg and screw in the support leg 10 until securely fastened Tighten all of the grill screws so that all parts are secure Figure B Place the grease tray 12 upside down in the centre of the three support legs 10 Fit the three grease tray faste...

Page 5: ...he nozzles and connections are not damaged Butane propane are not crude gas Any modification of the grill for use with crude gas and any attempt to use this butane propane grill with crude gas is dangerous and will result in the warranty being voided A dented or rusty gas canister can be hazardous and should be checked by your gas supplier Never use gas canisters with a damaged valve Gas may still...

Page 6: ...e C 2 Mix soap with water 3 Moisten the connections listed above with the soap solution 4 Turn the gas regulator in a counter clockwise direction to ON 5 Check for any leaks If bubbles form or if a bubble starts to become larger a leak is present If a leak is present turn the regulator 8 to OFF and tighten the canister connection more firmly Turn the regulator 8 back to ON and check once again usi...

Page 7: ...ed at all times when barbecuing foods You save up to one third of cooking time com pared with a conventional oven because hot air is constantly flowing around the food during grilling The barbecue food must be turned once halfway through grilling Here are the reasons for grilling with a closed lid No flames flaring When the lid is closed flames cannot flare up Fast barbecuing The BODUM Picnic Gas ...

Page 8: ... Raccord entre la bouteille de gaz et le régulateur FIGURE A Avec précaution placez la cuve de cuisson 6 partie inférieure vers le haut sur une surface plane et fixez chacun des trois pieds de support 10 sur la cuve de cuisson 6 Utilisez une vis M6 pré montée pour chaque pied de support et vissez le pied de support 10 jusqu à ce qu il soit correctement fixé Resserrez toutes les vis du barbecue afi...

Page 9: ...ue les buses et les raccords ne sont pas endommagés Le butane le propane ne sont pas des gaz bruts Toute modification apportée au barbecue en vue de l utiliser avec du gaz brut ainsi que toute tentative d utiliser ce barbecue au butane propane avec du gaz brut peut s avérer dangereuse et entraîne une annulation de la garantie Une bouteille de gaz bosselée ou rouillée peut être dangereuse et devrai...

Page 10: ... Humidifiez les raccords indiqués ci dessus à l aide de la solution savonneuse 4 Tournez le régulateur de gaz dans le sens inverse des aiguilles d une montre sur ON MARCHE 5 Vérifiez la présence d une fuite Si des bulles se forment ou si une bulle grossit vous êtes en présence d une fuite S il existe une fuite tournez le régulateur 8 sur OFF ARRÊT et resserrez davantage le raccord de la bouteille ...

Page 11: ...barbecue Vous économisez un tiers de temps de cuisson par rapport à un four traditionnel car l air chaud circule constamment autour de la nourriture pendant la cuisson La nourriture cuite au barbecue doit être retournée une fois à mi cuisson RAISONS POUR LESQUELLES UTILISER LE BARBECUE AVEC UN COUVERCLE FERMÉ Pas d embrasement lorsque le couvercle est fermé les flammes ne peuvent pas s intensifier...

Page 12: ...GURA A Ponga el recipiente 6 boca abajo con cuidado sobre una superficie plana y coloque cada una de las tres patas de apoyo 10 en el recipiente de la barbacoa 6 Utilice un tornillo M6 premontado para cada pata de apoyo y enrosque la pata 10 hasta que quede bien firme Apriete todos los tornillos de la barbacoa de manera que todas las piezas queden firmemente aseguradas FIGURA B Coloque la bandeja ...

Page 13: ...e de que las boquillas y las conexiones no estén dañadas El butano y el propano no son gases sin refinar Cualquier modificación de la barbacoa para su uso con gas sin refinar así como cualquier intento de usar esta barbacoa a gas con gas sin refinar representan un peligro y darán lugar a la anulación de la garantía Una bombona oxidada o abollada puede ser peligrosa y debería ser revisada por la em...

Page 14: ... Humedezca las conexiones indicadas arriba con la solución jabonosa 4 Gire el regulador del gas en sentido contrario a las agujas del reloj a la posición ON 5 Compruebe si hay alguna fuga Si se forman burbujas o si una burbuja empieza a aumentar de tamaño existe una fuga Si detecta una fuga gire el regulador 8 a la posición OFF y apriete con más firmeza la conexión entre la bom bona y el regulador...

Page 15: ...rada en todo momento mientras se utiliza el aparato En comparación con un horno convencional con la barbacoa ahorrará hasta un tercio del tiempo necesario para cocinar ya que el aire caliente está en constante circulación en torno a los alimentos Déle la vuelta a los alimentos una sola vez hacia la mitad del tiempo de cocción MOTIVOS PARA MANTENER LA TAPA CERRADA DURANTE EL USO Ausencia llamaradas...

Reviews: