background image

ECO-SERIES REAR BUMPER 

2015-2016 FORD F150 

Page 7 of 7 

Passenger Side Installation Pictured


Rear 

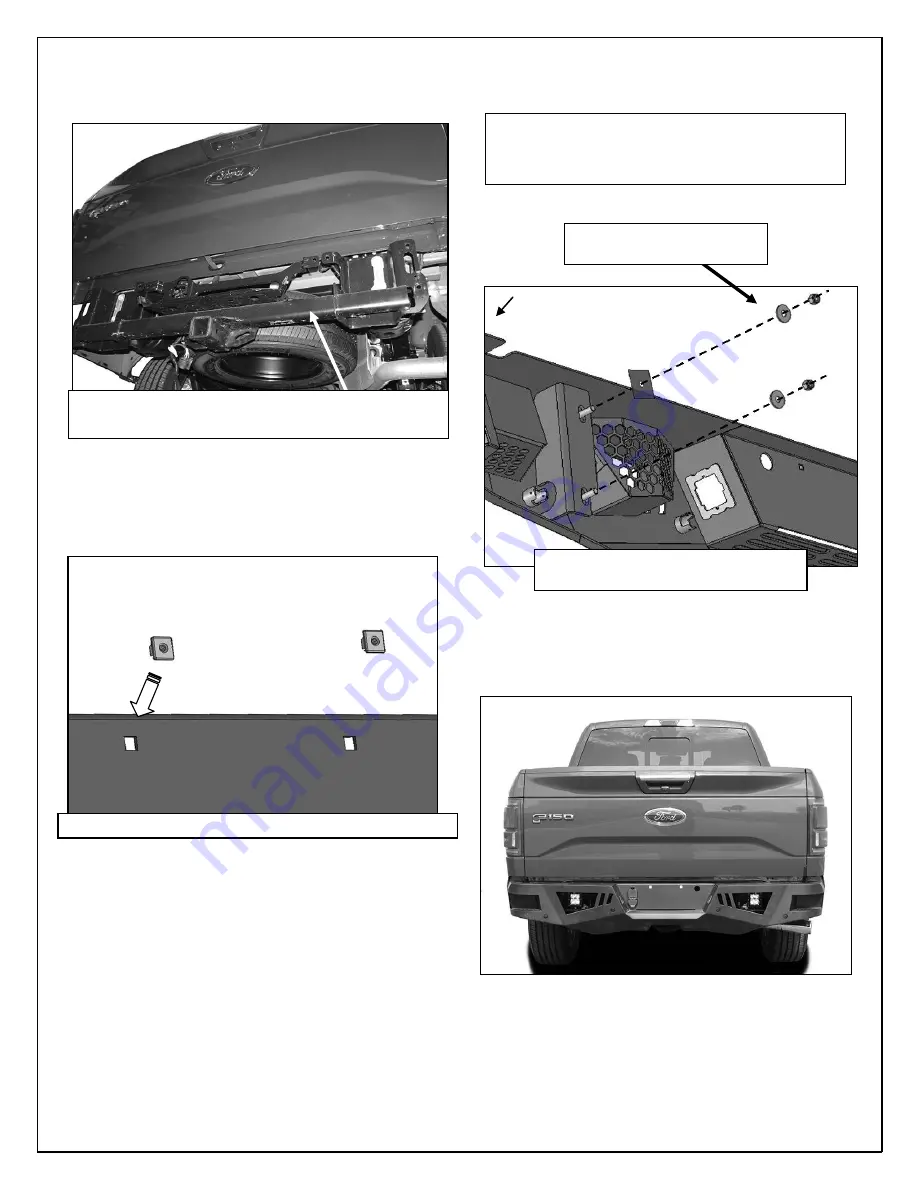
(Fig 15) Reinstall integrated receiver hitch/bracket 
assembly on models with “HD Towing” package 

(Fig 16) Attach Bumper directly to 
integrated hitch bracket (see Fig 13) 

Complete Installation 

(Fig 17) Push plastic plugs into holes for license plate 
 

(2) 10mm Flat Washers 
(2) 10mm Nylon Lock Nuts 

WARNING! 

Do not crawl under bumper 

unless the bumper is properly supported on 
blocks or stands or the bumper may fall. 


Summary of Contents for FD-2962

Page 1: ...015 2016 FORD F150 accommodated factory hitch receiver PART FD 2962 Body Armor 4x4 272 Corporate Terrace St Corona CA 92879 951 808 0750 Customer Service hours M TH 7 30am to 4 30 PM Pacific Time Friday 8 AM Noon Pacific Time ...

Page 2: ...r NOTE Bumper is designed to be compatible with larger 7 wire universal trailer harness plug only 2 Place blocks or jack stands under the bumper to support it during mounting bolt removal Once the bumper has been safely supported remove the factory hardware attaching the bumper to the end of the frame and remove the bumper assembly Figures 3A 3B 4 WARNING Assistance is required to hold the bumper ...

Page 3: ...ic Retainer onto the bolt plate to hold it in position Figure 9 b Select 1 10mm Double Bolt Plate and 1 10mm Plastic Retainer Insert the Double Bolt Plate into and through the back of the mounting tab on the LD1 Bumper Figure 10 Thread the Retainer down onto the Bolt Plate to help hold it in position c Attach the passenger right Mounting Bracket assembly to the 10mm Double Bolt Plate with 2 10mm F...

Page 4: ...h in plugs to attach the license plate to the Bumper Figure 17 13 Do periodic inspections to the installation to make sure that all hardware is secure and tight To protect your investment wax this product after installing Regular waxing is recommended to add a protective layer over the finish Do not use any type of polish or wax that may contain abrasives that could damage the finish Mild soap may...

Page 5: ... to lights WARNING Do not remove bumper bolts unless the bumper is properly supported on blocks or stands or the bumper may fall Fig 6 Use flat blade screwdriver to carefully pry tab to hold light in place Fig 3B Remove the factory hex nuts attaching bumper assembly to frame STD tow package model pictured no receiver hitch Rear Fig 4 Passenger side of frame Rear Rear ...

Page 6: ...ck sensor in place 2 4mm Screws Fig 9 Attach factory bolt plate to passenger right Mounting Bracket 14mm Plastic Retainer Factory double bolt late used on models w o receiver hitch and max tow frame mounted receiver hitch Factory triple bolt plate used with HD tow package with integrated receiver hitch Fig 10 Insert 10mm Double Bolt Plate into and through back of mounting tab on back of Bumper Fig...

Page 7: ...olt Plate in position Note OE triple bolt plate in place 10mm Plastic Retainer Fig 12 Use 10mm Plastic Retainer to hold Bolt Plate in position Note OE double bolt plate in place 10mm Plastic Retainer 2 10mm Flat Washers 2 10mm Nylon Lock Nuts Fig 13 Attach Brackets to ends of frame with factory hex nuts triple bolt plate illustrated Reuse 3 factory hex nuts Reuse 2 factory hex nuts Fig 14 Attach B...

Page 8: ... assembly on models with HD Towing package Fig 16 Attach Bumper directly to integrated hitch bracket see Fig 13 Complete Installation Fig 17 Push plastic plugs into holes for license plate 2 10mm Flat Washers 2 10mm Nylon Lock Nuts WARNING Do not crawl under bumper unless the bumper is properly supported on blocks or stands or the bumper may fall ...

Reviews: