background image

USING YOUR BIKE


Using your bike will provide you with several benefits. It will improve your physical fitness, tone your muscles and in 
conjunction with a calorie controlled diet, help you lose weight.


WARM-UP PHASE


The  purpose  of  warming  up  is  to  prepare  your  body  for  exercise  and  to  minimize  injuries. Warm  up  for  two  to  five 
minutes  before  strength-training  or  aerobic  exercising.  Perform  activities  that  raise  your  heart  rate  and  warm  the 
working muscles. Activities may include brisk walking, jogging, jumping jacks, jump rope, and running in place.


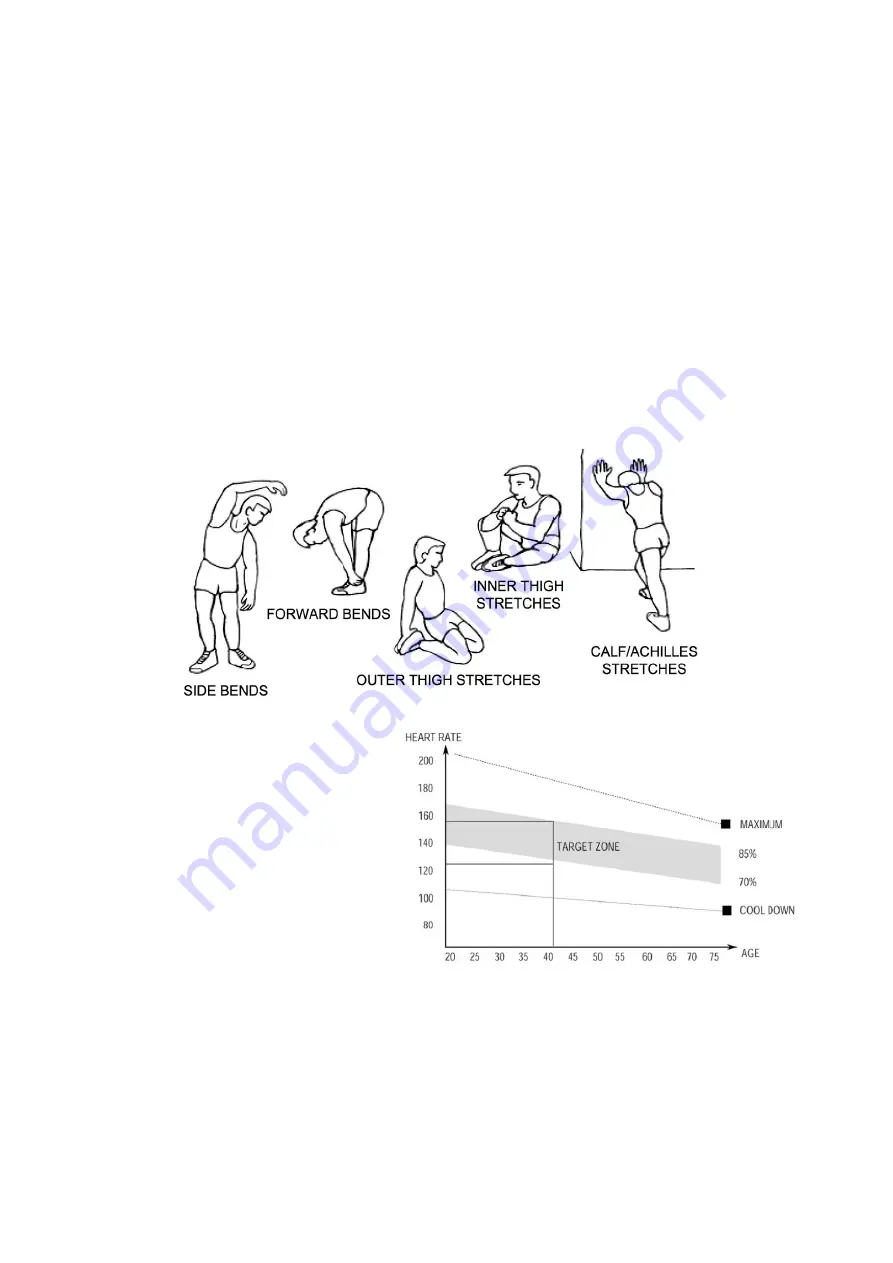
STRETCHING 


Stretching  while  your  muscles  are  warm  after  a  proper  warm-up  and  again  after  your  strength  or  aerobic  training 
session  is  very  important.  Muscles  stretch  more  easily  at  these  times  because  of  their  elevated  temperature,  which 
greatly reduces the risk of injury. Stretches should be held for 15 to 30 seconds.


DO NOT BOUNCE.


Remember always to check with your physician before starting any exercise program.


EXERCISE PHASE


This is the stage where you put the effort in. After 
regular  use,  the  muscles  in  your  legs  will  become 
more  flexible. Work at your  own  pace and be sure 
to maintain a steady tempo throughout. The rate of 
work  should  be  sufficient  to  raise  your  heartbeat 
into the target zone shown on the graph below. 
 

COOL-DOWN PHASE


The purpose of cooling  down is to return the body 
to its normal or near normal, resting state at the end of each exercise session. A proper cool-down slowly lowers your 
heart rate and allows blood to return to the heart. 


Summary of Contents for DUAL BF8613HA1

Page 1: ...DUAL Crosstrainer with seat art BF8613HA1 MANUAL ...

Page 2: ...EXPLOSIVE DIAGRAM ...

Page 3: ...4 Round cap 2 14 Inner hex pan head screw M8x40 4 45 Ball cap S13 2 15 Inner hex pan head screw M8x20 6 46 Connecting joint 2 16 Carriage bolt M8 45 4 47 Flat washer d8 2 17 Tension 1 48 Nylon nut M8 2 18 Arc washer D5 1 49 Crank 2 19 Cross pan head screwM5X55 1 50 Alloy spacer Ф14 12 5 Ф10 1 4 20 Flat washer Φ8 2 Φ32 2 4 51 Hex bolt M10X50 2 21 Hex bolt M8x15 2 52 Saddle post 1 22 Round cap 2 53 ...

Page 4: ... frame 1 with Carriage bolt 11 Arc washer 12 and Acorn nut 13 Step 2 Connect the Sensor wire 31 well with Extension wire 30 and then connect the Tension cable 32 well with wire of Tension controller 17 as shown Fix the Handlebar post 2 to the Main frame 1 with Allen screw 15 Arc washer 12 ...

Page 5: ...flat washer 20 and Waving washer 61 Please do not tighten them this time C Connect Swing bar 4L R with Pedal Support 3L R using Hex bolt 26 Flat washer 47 and Nylon nut 48 Tighten the Hex bolt 21 26 and Inner hex pan head screw 15L Finally Cover the Nut caps 35 45 29 D Fix the Pedal support 3R and Swing bar 4R to Crank 49 and Handlebar post 2 in the same way E Fix the Pedal 9L R to the Pedal suppo...

Page 6: ...p 5 Lock the handle bar L R onto swing bar 4L R with carriage bolt 16 arc washer 27 and acorn nut 13 Connect the extension wire 30 with computer 10 Then fix the computer onto bracket board of handlebar post 2 with cross pan head screw 33 Lastly Insert the round plug of pulse wire 36 into the bottom of the computer 10 ...

Page 7: ...sses wrench Tight the Saddle Horizontal tube 57 onto saddle tube 52 with Knob 53 and flat washer 54 Then insert into post tube of main frame 1 Adjust the holds and fix with Pon pin 59 Note Please kindly insure that saddle 58 is already fix tightly onto saddle horizontal tube 57 ...

Page 8: ...the scan mode press the MODE key when the pointer on the function you want which begins blinking FUNCTIONS 1 TIME Press the MODE key until pointer lock on to TIME The total working time will be shown when starting exercise 2 SPEED Press the MODE key until the pointer advance to SPEED The current speed will be shown 3 DISTANCE Press the MODE key until the pointer advance to DISTANCE The distance of...

Page 9: ... aerobic training session is very important Muscles stretch more easily at these times because of their elevated temperature which greatly reduces the risk of injury Stretches should be held for 15 to 30 seconds DO NOT BOUNCE Remember always to check with your physician before starting any exercise program EXERCISE PHASE This is the stage where you put the effort in After regular use the muscles i...

Page 10: ...безопасност на машината може да бъде поддържано само ако редовно се проверяват износващите се части Лостове и други механизми за регулиране на уреда не трябва да пречат на свободното движение по време на тренировка 12 Тренировъчното оборудване не трябва да се използва като играчка 13 Не стъпвайте по корпуса на уреда само върху степенките предназначени за тази цел 14 Не носете отпуснати дрехи Носет...

Page 11: ... 12 и куха гайка 13 Стъпка 2 Свържете проводника за датчика 31 стабилно с удължителния проводник 30 и след това свържете обтягащия проводник 32 стабилно с проводника от контролера за обтягане 17 както е показано на илюстрацията Фиксирайте лоста за кормилото 2 към основната рамка 1 с болт с шестограм с отверстие в главата 15 дъговидна шайба 12 ...

Page 12: ... Моля още не ги затягайте Ъ Свържете люлеещото се рамо 4L R с опората за педала 3L R като използвате болт с шестостенна глава 26 плоска шайба 47 и найлонова гайка 48 Затегнете болта с шестостенна глава 21 26 и вътрешен шестогранен винт с плоско изпъкнала глава 15L Накрая наложете отгоре кухите гайки 35 45 29 D Фиксирайте опората за педала 3R и люлеещото се рамо 4R към курбела 49 и лоста за кормило...

Page 13: ... L R върху люлеещото се рамо 4L R посредством каретен болт 16 дъговидна шайба 27 и глуха гайка 13 Свържете удължителния проводник 30 с компютъра 10 След това фиксирайте компютъра върху пластината на скобата на лоста за кормилото 2 с винт с полукръгла изпъкнала глава с кръстообразен шлиц 33 Най накрая вмъкнете кръглата тапа на проводника за пулса 36 в долната част на компютъра 10 ...

Page 14: ...ете хоризонталната тръба за седалката 57 върху тръбата на седалката 52 чрез винта с обла глава 53 и плоска шайба 54 След това вмъкнете в тръбата на лоста на основната рамка 1 Нагласете стиските и фиксирайте с притягащо устройство 59 Заб Моля внимателно се уверете че седалката 58 е фиксирана плътно върху хоризонталната тръба 57 ...

Page 15: ...ODE в продължение на 3 секунди 3 MODE За да изберете SCAN или LOCK ако не желаете режима на сканиране натиснете клавиша MODE когато показалецът сочи върху желаната от вас функция която започва да мига ФУНКЦИИ 1 Време Натискайте клавиша MODE докато показалецът не спре на TIME Общото време на трениране ще се покаже при започване на упражнението 2 Скорост Натискайте клавиша MODE докато показалецът на...

Page 16: ...ки и торбички от полиетилен Електрооборудване Каиши от полипропилен Уредът не трябва да се изхвърля заедно с домашния боклук За връзка с фирми за рециклиране на отпадъците се обърнете към вносителя ВНОСИТЕЛ ЗА БЪЛГАРИЯ СПОРТЕН СКЛАД БГ Соларшоп ЕООД гр Пазарджик ул Димчо Дебелянов 5 тел 0888 827 355 E mail info sportensklad bg www sportensklad bg ВНОСИТЕЛ ЗА БЪЛГАРИЯ СПОРТЕН СКЛАД БГ Соларшоп ЕООД...

Reviews: