Customer Service 1-888-707-1880
5 Maurice Pincoffs Canada Inc.
©
2009
ASSEMBLY INSTRUCTION
This manual is designed to help you easily assemble, adjust and use this machine. Please
read this manual carefully. For the sake of familiarizing yourself with the parts identified in
the instruction, first study the overview drawing.
Set all parts in a clear area on the floor and remove the packing material. Refer to the
parts list for help to identify the parts.
It will take two people to assemble your unit.
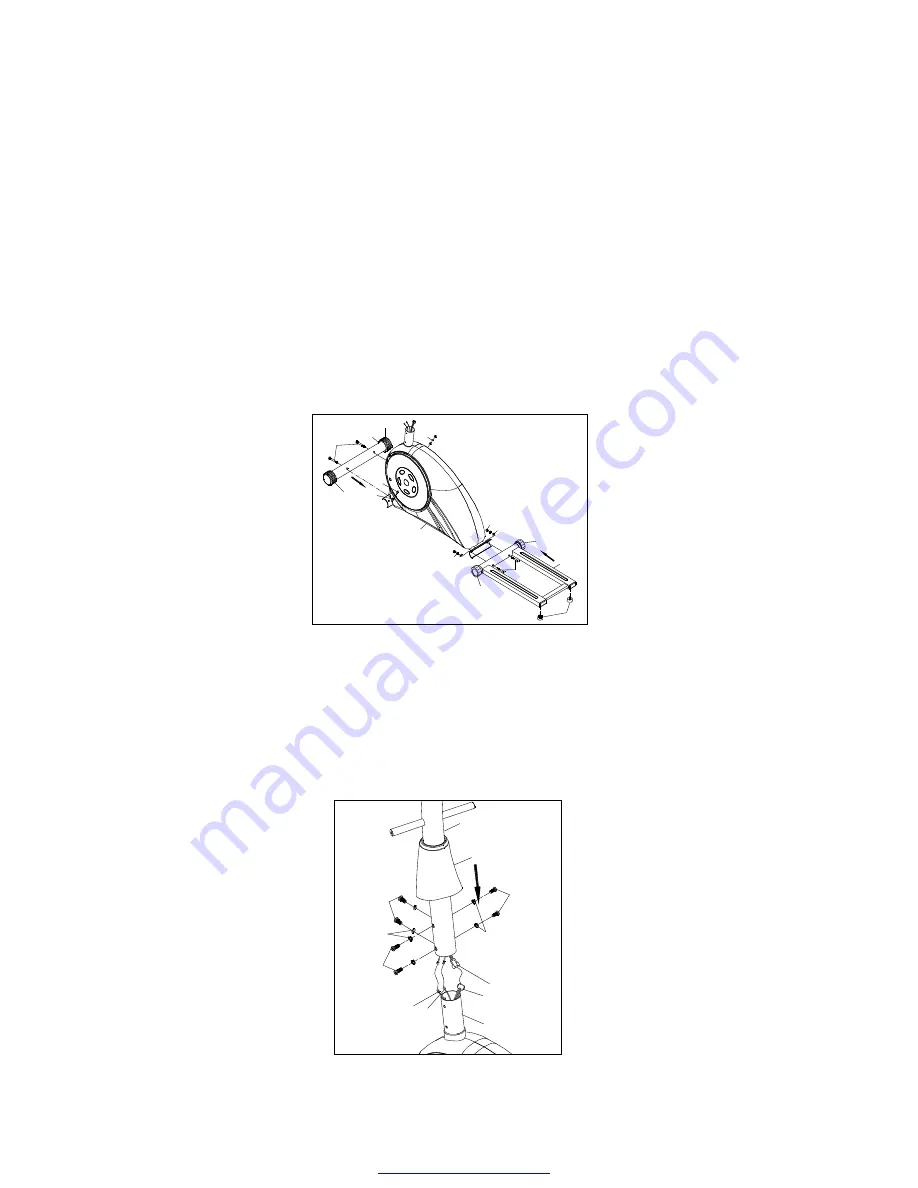
Step 1
1. Attach the levelling knobs
(46)
to the rear stabilizer rail
(2)
.
2. Attach rear stabilizer rail
(2)
with levelling end caps
(47)
to the welded cross bar
bracket of the main frame
(1).
Secure with two curved washers
(26)
, two spring
washers
(18)
, two carriages bolts
(48)
and two cap nuts
(27)
.
3. Attach the front stabilizer
(80)
with transportation wheels
(76)
to the front welded
bracket of the main frame
(1).
Secure with two carriage bolts
(75)
, two curved washers
(26),
two spring washers
(18)
and two cap nuts
(27).
NOTE:
Make sure you fasten the bolts securely to avoid shaking and discomfort when
cycling.
75
26
27
27
26
48
18
18
80
2
1
46
47
76
76
47
Step 2
1. Slide the upright post cover
(78)
on to the upright post
(10)
from the bottom end of
upright post.
2. Connect the extension wire
(88)
to the motor w/cable
(83).
3. Connect the extension wire
(88)
to the sensor w/wire
(85).
4. Connect the extension wire
(88)
to the power wire
(87)
5. Attach the upright post
(10)
into the main frame
(1).
Secure using six allen head
bolts
(74)
and six spring washers
(18)
. Note: Be careful not to pinch the wires.
6. Slide the upright post cover
(78)
down to the
bottom of upright post
(10)
.
74
78
10
1
87
88
85
83
74
74
18
18
PDF created with pdfFactory trial version
www.softwarelabs.com


