16
4
56
56
19
19
17
18
42
42
14
13
12
15
64
64
76
76
88
99
114
41
86
111
106
36
41
88
85
111
70
70
84
106
111
21
46
105
111
56
56
102
102
15
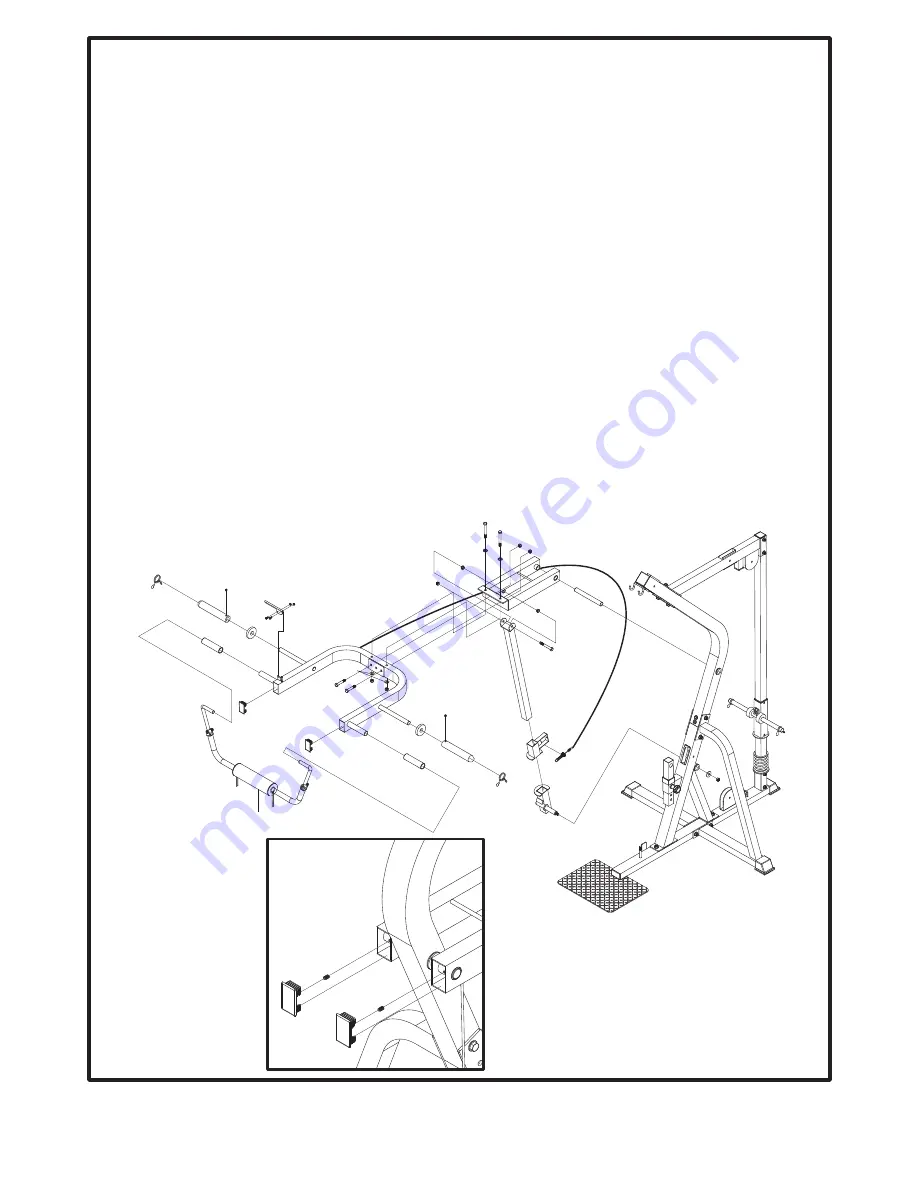
1.Attach Press Support (15) to Top Central Frame (5) by inserting Axle for Press (21) through
matching holes. Tighten to Axle using 5/16” X 1/4” Sunken Screw (102) as shown in Fig. 1.
Attach 45 X 75 End Plugs (56) to Press Support.
2.Attach Press Slider Block (12) to Main Central Frame (4), using one 1/2” Washer and one
1/2” Nylon Nut (111) as shown.
3.Slide Chrome Adjuster (14) through Press Arm Adjuster (13) and Press Slider Block (12), and
then attach top end of Chrome Adjuster (14) to Press Support (15), using one 1/2” X 3-3/4”
Bolt (85), and one 1/2” Nylon Nut (111).
4.Slide threaded end of Adj. Cable (46) through the holes in the bottom of Press Support (15)
and screw it into the threaded receptor in the Press Arm Adjuster (13).
NOTE: Unscrew the nut at the end of the threaded receotor. Slide one washer off threaded
receptor. Insert threaded receptor into hole in Press Arm Adjuster and re-attach washer and
screw. Adjust the nuts on either side to approximately half way down the screw. Attach Press
Arm (16) to Press Support (15), using two 1/2" x 2-3/4" Hex Bolts (86), four 1/2" Washers and
four 1/2" Nylon Nuts (111) (horizontally), and two 1/2" x 4" Hex Bolts (84), four 1/2" Washers,
and four 1/2" Nylon Nuts (vertically).
5.Slide 1" Rubber Doughnut (64) and Olympic Sleeve (37) (if you plan to use Olympic plates)
onto each side of Press Arm. If you plan to use standard plates (1" holes), do not attach the
Olympic Sleeves. Slide Spring Clip (76) onto Olympic Sleeve (37).
STEP 2 Bench Press Arm Assembly
Figure 1
-5-


