background image

en

Leg Harness

I N S TA L L AT I O N   A N D   U S E R ’ S   I N S T R U C T I O N S

ART NOS. LH600S, LH600M & LH600L


WARNING! 

Product should be installed and 

fitted by a qualified rehab technician.
For installation, this product should be mount-

ed with:
• Flat-mount end-fittings 

• Cinch-mount end-fittings 

•  Cam buckle (1” suitable for users up to 75kg, 

1-1/2” and 2” suitable for all users)

Optional Bodypoint belt mounting hardware 

may be used for mounting to wheelchairs and 

seating systems.

USE:


WARNING! 

This product should only be 

used for positioning a person in a wheelchair 

or work chair.  It is NOT intended for use as a 

transportation safety device, as a personal re-

straint device, or in any other application where 

its failure could result in injury. Misuse of this 

product is unauthorized and unsafe.


WARNING! 

Accidental release of this 

product can allow the user to slip down or fall 

from the wheelchair. If the user’s movements 

or cognitive abilities could lead to accidental 

release, a caregiver must be present at all times 

during its use.  Ensure that all caregivers know 

how to unfasten the product. Failure to do so 

may delay release in an emergency.


WARNING! 

As with any new seating sup-

port, this product may change the way a person 

sits. Users must continue to practice regular 

pressure relief activities and skin integrity 

checks, not only where this product contacts 

the user, but also in primary pressure-bearing 

areas such as the sacrum, legs, and buttocks. 

If increased skin redness or irritation occurs, 

discontinue use and consult your physician or 

seating specialist. Failure to do so may result in 

serious injury, such as pressure ulcers.

MAINTENANCE: 

Check periodically for 

signs of wear in the stitching, webbing, and 

pads. If significant wear is found, contact your 

supplier for qualified repair or replacement by 

Bodypoint. Under no circumstance should this 

product be altered or repaired by unqualified 

persons – health and safety depend on it!

 CLEANING:

 Machine wash, hot, 

60°C (140°F). Do not bleach. Tumble dry, low 

temperature, or drip dry. Do not iron. (Placing 

the product inside a cloth bag during washing 

helps prevent scratches to the product and the 

machine.)

WARRANTY: 

This product carries a limited 

lifetime warranty against defects in workman-

ship and materials arising under normal use by 

the original consumer.  Contact your supplier or 

Bodypoint for warranty claims.
For more information on Bodypoint products, 

and a list of distributors outside the USA go to 

www.bodypoint.com.

These instructions provide important information for the safe use and maintenance of 

all Bodypoint Leg Harness. Give these instructions to the user or their caregiver and 

review them to ensure that they are understood.

558 First Ave. S., Suite 300  |  Seattle, WA 98104  |  206.405.4555  |  800.547.5716  |  www.bodypoint.com

BPI048-en 2018.9

MDSS GmbH

Schiffgraben 41

D-30175 Hannover

Germany


A

N

SI


|


RESNA


IS

O


T E

S T E D

Summary of Contents for Leg Harness

Page 1: ...is product contacts the user but also in primary pressure bearing areas such as the sacrum legs and buttocks If increased skin redness or irritation occurs discontinue use and consult your physician o...

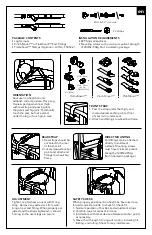
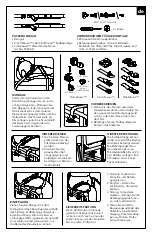
Page 2: ...f the seat rail 2 Locate desired anchor point and attach end fittings to wheelchair frame DIRECT MOUNTING End fittings can be attached directly to solid seat surfaces Mounting screws must have minimum...

Page 3: ...no s lo en los lugares de contacto del producto sino tam bi n en las zonas de presi n principales como el sacro las piernas y las nalgas Si se produce un mayor enrojecimiento o irritaci n de la piel...

Page 4: ...Coloque el punto de fijaci n deseado y fije los accesorios a la estructura de la silla de ruedas MONTAJE DIRECTO Los accesorios pueden fijarse directamente a super ficies de asiento s lidas Los torni...

Page 5: ...t veiller la sant de la peau non seulement en ce qui concerne les zones de contact mais aussi les zones essentielles de pression comme le sacrum les jambes et les fesses En cas d irritation ou de roug...

Page 6: ...point d an crage voulu et attacher les raccordements au cadre du fauteuil roulant MONTAGE DIRECT Les raccordements peuvent tre attach s directement aux surfaces solides du si ge Les vis de montage do...

Page 7: ...en d r produkten r i kontakt med anv ndaren utan ocks p prim ra tryckytor som korsben ben och bak Om kad rodnad eller irritation uppst r avbryt anv ndningen och kontakta l kare eller beh rig personal...

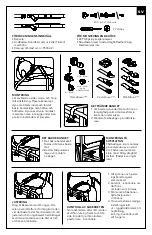
Page 8: ...est m f stpunktens l ge och montera beslaget MONTERING P SITSPLATTAN F stbeslagen kan monteras p undersidan av en solid sits F stskruvarna m ste klara minst 90 kg dragh ll fasthet F stskruvar ing r in...

Page 9: ...astaan niist kohdista joissa laite koskettaa k ytt j vaan my s kovimman pain een alaisista alueista kuten ristiluu takareidet ja pakarat Jos lis ntynytt ihon punoitusta tai rsytyst havaitaan keskeyt t...

Page 10: ...a kiinnit kiinnittimet py r tuolin runkoon SUORA ASENNUS Kiinnittimet voidaan liitt suoraan kiinteisiin istuinpin toihin Asennusruuvien pito voiman tulee olla v hint n 90kg 200lbs Ruuvit eiv t sis lly...

Page 11: ...f r die wichtigsten Druckauflagebereiche wie das Kreuzbein die Beine und das Ges erfolgen Wenn eine verst rkte Hautr tung oder Hautirritationen auftreten verwenden Sie das Produkt nicht weiter und kon...

Page 12: ...Sie den gew nschten Bef estigungspunkt und befestigen Sie die End beschl ge am Rahmen des Rollstuhls DIREKTE BEFESTIGUNG Die Endbeschl ge k nnen direkt an festen Oberfl chen des Sitzes befestigt werde...

Page 13: ...essione e controllare l integrit della cute non solo nei punti di contatto del prodotto con l utente ma anche in zone soggette a pressione quali quella sacrale gli arti inferiori e i glutei Se si veri...

Page 14: ...sedile 2 Localizzare il punto di ancoraggio desiderato e fissare gli attacchi delle estremit al telaio della sedia a rotelle MONTAGGIO DIRETTO Le estremit possono essere fissate direttamente a superfi...

Page 15: ...res e verifica es de integridade da pele n o s onde este produto entra em contacto com o utilizador mas tamb m em reas princi pais de press o como o sacro pernas e n de gas Se surgir vermelhid o ou ir...

Page 16: ...onto de fixa o desejado e ligue as extremidades de apoio estrutura da cadeira de rodas MONTAGEM DIRECTA As extremidades de apoio podem ser ligadas directa mente a superf cies s lidas do assento Os par...

Page 17: ...tar det st rste trykket slik som korsryggen beina og rumpeballene Hvis det oppdages at huden blir r d eller irritert m bruken stanses og legen eller kvalifisert personell m r df res Hvis ikke dette gj...

Page 18: ...ringspunkt og fest sluttstykkene til rammen p rullestolen DIREKTE MONTERING Festestykkene m festes direkte til faste overflater p setet Monteringsskruene m ha en minimum strekkstyrke p 90 kg 200lbs F...

Page 19: ...kun p det omr de hvor dette produkt har kontakt med brugeren men ogs p de prim re trykb rende omr der s som sakrum korsbenet benene og bagdelen Hvis der forekommer get r dme eller irritation oph r bru...

Page 20: ...forankringspunkt og fastg r endebeslagene til k restolsrammen DIREKTE MONTERING Endebeslagene kan s ttes direkte p faste s deover flader Monteringsskruerne skal mindst kunne holde til et tr k p 90 kg...

Page 21: ...n op de huid is noodzakelijk niet alleen waar dit product in contact komt met de gebruiker maar ook in primaire druk belastende gebieden zoals het heiligbeen benen en zitbeenknobbels Als er rode huid...

Page 22: ...te sluitingen aan op het rolstoel frame RECHTSTREEKSE MONTAGE De achterste sluitingen kunnen rechtstreeks worden bevestigd aan solide stoe loppervlakken De beves tigingsschroeven dienen minimaal 90kg...

Page 23: ...to nejen tam kde tento v robek p ich z do kontaktu s u ivatelem ale I v oblas tech kter prim rn nesou tlak jako je k ov kost nohy a h d Pokud se objev zv en zarudnut nebo podr d n poko ky p esta te v...

Page 24: ...jnice sed tka 2 Najd te po adovan kotvic bod a p ipevn te koncov prvky k r mu kole kov ho k esla P M MONT Koncov prvky lze p ipevnit p mo k povrchu sed tka Mont n rouby mus m t minim ln nosnost v tahu...

Page 25: ...po kodovanost ko e ne samo tam kjer se ta izdelek dotika uporabnika temve tudi na primarnih obmo jih pritiska kot so kri nica noge in zadnjica e se pojavi pove ana rde ina ko e ali razdra enost izdele...

Page 26: ...na zadnji del pre ke sedala 2 Dolo ite eleno sidri no to ko in priklju ke namestite na okvir invalidskega vozi ka NEPOSREDNA NAMESTITEV Priklju ke lahko namestite neposredno na trde sedalne povr ine...

Page 27: ...2 5 08CM 2 BODYPOINT BODY POINT 60 C 140 F BODYPOINT BODYPOINT WWW BODYPOINT COM Bodypoint 558 First Ave S Suite 300 Seattle WA 98104 206 405 4555 800 547 5716 www bodypoint com BPI048 ja 2018 9 MDSS...

Page 28: ...CINCH MOUNT FLAT MOUNT FRAMESAVER FS032 2 2 90KG 200 ja 3 16 1 4 5 6mm 2 Phillips 1 2 1 2 90KG 200 D 1 2 3 4 Cinch Mount FrameSaver Flat Mount 7 8 22mm 1 25mm 3 4 19mm Art No HW303 19SHIM...

Page 29: ...2 5 08CM 2 BODYPOINT BODYPOINT 60 C 140 F BODYPOINT BODYPOINT WWW BODYPOINT COM Bodypoint 558 First Ave S Suite 300 Seattle WA 98104 206 405 4555 800 547 5716 www bodypoint com BPI048 zh 2018 9 MDSS...

Page 30: ...CINCH MOUNT FLAT MOUNT FRAMESAVER FS032 2 2 90KG 200LBS zh 3 16 1 4 5 6mm 2 Phillips 1 2 1 2 90KG 200LBS D 1 2 3 4 Cinch Mount FrameSaver Flat Mount 7 8 22mm 1 25mm 3 4 19mm Art No HW303 19SHIM...

Reviews: