SX-16 Nightsun
®
Searchlight System
Maintenance Manual
Document 031734-1/Revision A
031734-1 Revision B
January 27, 2014
4.9.3
Preparation for Painting
After removing any corrosion:
•
Sand the area lightly with medium grit sandpaper (120 or 220 grit), then wipe the area clean
of sanding residue.
•
If the primer or other paint requires any further surface preparation, follow the manufacturer’s
instructions.
•
If entire arm is going to be repainted, remove the Gearboxes and other attachment hardware
from the arm.
•
Mask the identification tag to preserve its information.
4.9.4
Priming and Painting
After sanding and priming the area as required, follow the paint manufacturer’s instructions. Use an
aircraft rated exterior primer and flat black or semi-gloss black paint.
•
For aluminum Gimbals, use a primer rated for aluminum.
•
For steel Gimbals, use a primer rated for steel.
4.9.5
Return Gimbal to Service
Follow the instructions to reassemble the Gimbal and Searchlight on the aircraft.
•
Replace the Gimbal arm on the aircraft (
Gimbal Installation Procedure
section of this
manual), and verify that the motor service loops and cable ties are in place (
Service Loops
section of this manual).
•
Replace the Searchlight.
•
Reattach all safety cables to the Gimbal assembly, Searchlight, and aircraft.
•
Perform a full system functional check.
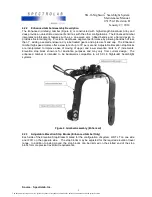
4.10 Replacement of the Gimbal Arms
Replacement of the Gimbal arm is a relatively simple procedure. It does not require special tools or
training. Nonetheless, a certified aircraft mechanic who is familiar with the practices, processes, and
visual inspection techniques to be used on flight hardware should conduct the replacement. The
aircraft mechanic should verify that all hardware is in sound, flight-worthy condition upon completion
of this procedure.
4.10.1 Identification Tag
When Gimbal arms are replaced, a new identification nameplate will be provided by Spectrolab. This
ensures the traceability of the new hardware. When new Gimbal arms are ordered, make sure to
enclose a notice with the old serial number and Gimbal part number.
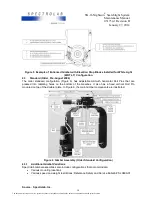
4.11 Removal Procedure for Gimbal with current Azimuth Stop Configuration (After August
2004)
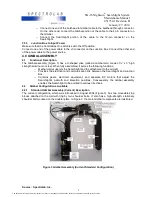
To remove the old Gimbal arm:
•
Remove the Searchlight from the existing Gimbal.
•
Prepare to remove the existing Gimbal arm:
o
Observe the orientation of the Azimuth (upper) Gearbox to aircraft mounting. Make
pencil marks so that you can install the Gearbox to the same position relative to the
new Gimbal arm when reinstalled.
o
Note the orientation of the drive motor with respect to the Gimbal arm so that it can
be installed in the same position with the new Gimbal arm.
o
Observe the routing of the cables, service loops, and the position of the cable ties so
that you can replicate them later.
o
Remove any cable ties that hold the Gimbal motor wires in place, and again take
note of their location.
o
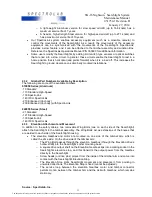
Examine the two moveable stop blocks attached to the Azimuth ring, and examine
the stationary shoulder bolt that is attached to the Gimbal arm.
o
Make sure that there is no more than 2° of backlash on the elevation Gearbox and on
the Azimuth Gearbox. If either Gearbox has more than 2° of backlash, adjust or
repair the Gearbox before installing them on the new Gimbal arm.
Source: Spectrolab, Inc.
22
The document reference is online, please check the correspondence between the online documentation and the printed version.

