background image

1

Configuring the Nyquist VoIP Intercom 

Module

Bogen’s plenum-rated Nyquist Voice over Internet Protocol (VoIP) intercom modules 

transform any low-impedance analog speaker into a full-featured Power-over-Ethernet 

(PoE) IP speaker. The modules use the latest technology to deliver superior audio quality, 

making them perfect for IP paging and audio distribution. The built-in talkback capability 

allows these modules to be used in VoIP intercom applications.
These 10-watt single-channel intercom modules are available with (NQ-GA10PV) or with

-

out (NQ-GA10P) an HDMI video output, depending upon the application needs. They 

also offer a CAN bus interface to work with the NQ-E7020 Digital Call Switch and a Form-

C relay for controlling third- party devices. Additionally, when paired with Bogen’s 

ANS500M microphone module (optional), these intercom modules can be turned into an 

ambient noise sensor to help maintain paging and background music intelligibility in 

high-noise environments.
If an HDMI video device is attached, this device can display messages and images sent by 

a Nyquist server, as well as a digital or analog clock. These messages can be used for 

scheduled announcements, emergency instructions, automatically triggered messages, 

simple ad-hoc messages, or many other purposes. If a Nyquist server is not present, the 

device will display an analog clock and compatibility information about supported reso

-

lutions. For further information on displaying and scheduling messages, see the “

Manag

-

ing GA10PV Display Messages”

 section of the 

Nyquist System Administrator Guide

.

The Nyquist server or system controller can automatically discover and configure the 

VoIP intercom module, but you can also manage the device, and manually configure 

some settings, through the VoIP Intercom Module’s web-based user interface (web UI). 
A short press of the appliance’s 

Reset

 button reboots the device. If you press the 

Reset


button for 10 seconds, the appliance returns to the factory default configuration settings. 

Returning to the default configuration settings does not change the appliance’s firmware. 

The following sections describe settings and configurations that can be applied to this device 

which are not controlled by the Nyquist server.

 For information about using Nyquist’s auto

-

matic configuration process, refer to the 

Nyquist System Administrator Guide

.

To access the appliance’s UI:

1

Access the appliance’s web UI by doing one of the following:

a)

On your web browser, enter the IP address for the appliance as the URL.

b)

From the Nyquist web UI navigation bar, select 

Stations

, select 

Stations Status

navigate to the device that you want to configure, and then select the 

Link

 icon.

Note: Do not use third-party Chrome browser extensions with the Nyquist user interface.

Summary of Contents for NYQUIST NQ-GA10P

Page 1: ...VoIP Intercom Module ConfigurationGuide NQ GA10P NQ GA10PV 2021 Bogen Communications Inc All rights reserved 740 00068B 211116 ...

Page 2: ...st VoIP Intercom Module 1 Using the Dashboard 3 Standalone Operation 4 Updating Firmware 4 Network Settings Tab Parameters 6 Configuration Settings Tab Parameters 9 Standalone Operation Configuration Settings 11 Accessing Log Files 14 ...

Page 3: ...res Figure 1 Nyquist Appliance Login 2 Figure 2 Intercom Module Dashboard 2 Figure 3 Firmware Update Page 5 Figure 4 Network Settings 7 Figure 5 Appliance Configuration Settings Standalone enabled 11 Figure 6 Logs 15 ...

Page 4: ...ashboard Fields 3 Table 2 Appliance Dashboard Buttons 3 Table 3 Firmware Update settings 6 Table 4 Network Settings 7 Table 5 Configuration Settings Standalone disabled 9 Table 6 Configuration Settings Standalone enabled 11 Table 7 Logs 15 ...

Page 5: ...If a Nyquist server is not present the device will display an analog clock and compatibility information about supported reso lutions For further information on displaying and scheduling messages see the Manag ing GA10PV Display Messages section of the Nyquist System Administrator Guide The Nyquist server or system controller can automatically discover and configure the VoIP intercom module but yo...

Page 6: ...in page enter username and password and then select Login The default username is admin the default password is bogen The dashboard for the selected appliance appears Figure 1 Nyquist Appliance Login Figure 2 Intercom Module Dashboard ...

Page 7: ...ays the dashboard Configuration Settings Accesses the Configuration Settings page where you can view and set various options If Standalone Operation is not enabled you can also receive configuration settings from a Nyquist server Network Settings Accesses the Network Settings page where you can view and set network settings such as the static IP address Firmware Update Accesses the Firmware Update...

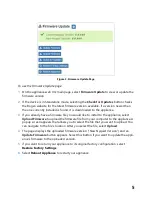
Page 8: ... be used to play music audio paging and related functions Updating Firmware When you select Firmware Update from the appliance s web UI the Firmware Update page appears From this page you can determine which Nyquist firmware version the appliance is using and if an update is available You can also load a firmware release install the loaded firmware restore the configuration to factory defaults and...

Page 9: ...ppliance select Upload Firmware to upload the firmware file from your computer to the appliance A popup screen appears that allows you to select the file that you want to upload You can navigate to the file s location After you select the file select Upload 4 The page displays the uploaded firmware version New Nyquist Version and an Update Firmware button appears Select this button if you want to ...

Page 10: ...ified in New Nyquist Version Installs the loaded firmware A reboot may be required after installation Upload Firmware Prompts the user to specify a firmware file which will then be loaded though not installed onto the appliance Note To obtain the firmware file for a specific ver sion please contact Bogen Customer Service Check for Updates Available only when the appliance is configured for Standal...

Page 11: ...s the IP address assigned to the appliance Netmask Identifies the subnetwork subdivision of an IP net work Gateway Identifies the address or route for the default gate way VLAN ID Identifies the Virtual Local Area Network VLAN for this appliance Values range from 0 to 4094 VLAN Priority Identifies the priority of the network traffic on the VLAN Priority can range from 0 through 7 ...

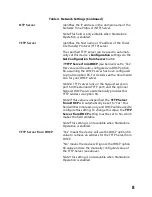
Page 12: ... on the Nyquist server on port 69 the standard TFTP port and the optional Nyquist DHCP service automatically provides this TFTP address via option 66 Note If this value is unspecified the TFTP Server from DHCP will automatically be set to Yes this field will become read only and DHCP will be used to configure this setting To change this value the TFTP Server from DHCP setting must be set to No whi...

Page 13: ... the Save Configuration Settings and or Save Multicast Addresses buttons to save your changes The following table describes the Configuration Settings tab settings when Standalone Operation is not enabled for this device DHCP Enabled Indicates if the device is enabled to use DHCP to retrieve its IP configuration Reboot Appliance Indicates that this appliance should reboot when the Save button is c...

Page 14: ...ume and station list used for the multicast audio stream of one or more zones Port Number Shows the port number of the appliance Port Type Shows the device type to which the port connects Account ID Shows the SIP account IP address associated with the device preceded by the extension of the device associ ated with this port Local Port Shows the port used for SIP Username Shows the username or exte...

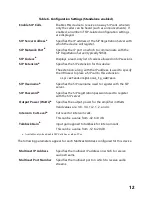
Page 15: ...ndalone enabled Table 6 Configuration Settings Standalone enabled Device Type Displays the type of this device Device Name Provides a name for this device Web Username Specifies a web username for this appliance Web Password Specifies a web password for logging into the appliance Web Confirm Password Re enter the password used to log into the appliance Time Zone Specifies the time zone in which th...

Page 16: ...the IP address is used to specify the URI used to place a SIP call to this extension sip extension local_ip_address SIP Usernamea Specifies the SIP username used to register with the SIP server SIP Passworda Specifies the SIP registration password used to register with the SIP server Output Power Watts a Specifies the output power for the amplifier in Watts Valid values are 1 8 1 4 1 2 1 2 and 4 I...

Page 17: ...paging quality A wideband audio codec operating at 48 56 and 64 kbps OPUS Music quality An audio codec format designed for speech and general audio supporting low latency constant and variable bitrate encoding 6 to 510 kbps and five sampling rates from 8 to 48 kHz Channels Channel s on which the audio streams will be output One or more of the following values Speaker Cut Level dB Specifies the cut...

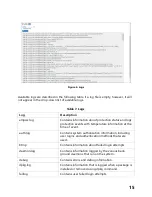
Page 18: ... UI s main page select Logs 2 From the drop down menu select the log that you want to view Multiple versions of the same log and zipped copies of the log may be available 3 To export the file select Export A link to a txt file appears in the browser s lower left corner Multicast Addresses should be ordered by priority highest priority first If multiple streams are active on the same channel simult...

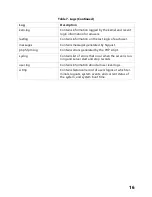
Page 19: ...information at the time of event auth log Contains system authorization information including user logins and authentication methods that were used btmp Contains information about failed login attempts daemon log Contains information logged by the various back ground daemons that run on the system debug Contains errors and debug information dpkg log Contains information that is logged when a packa...

Page 20: ...ist php5 fpm log Contains errors generated by the PHP script syslog Contains list of errors that occur when the server is run ning and server start and stop records user log Contains information about all user level logs wtmp Contains historical record of users logins at which ter minals logouts system events and current status of the system and system boot time Table 7 Logs Continued Log Descript...

Reviews: