background image

Programming

4.

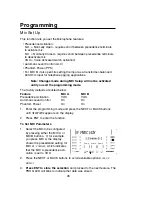
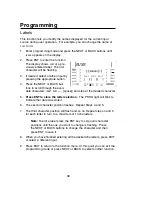
The display shows 

A ALC ON

indi-

cating that MIC A ALC status is
ON.

5.

Press the NEXT or BACK but-
tons to select 

ON

or 

OFF

6.

Press ENT to store the selection.

7.

The display shows 

A PPS OFF

indi-

cating that the MIC A phantom
power is OFF.  If Mic B is set as
a TEL input (see below), 

PPS

will

not be shown since it does not
apply to tel inputs.

8.

Press the NEXT or BACK but-
tons to select 

ON

or 

OFF

.

9.

Press ENT to store the selec-
tion.

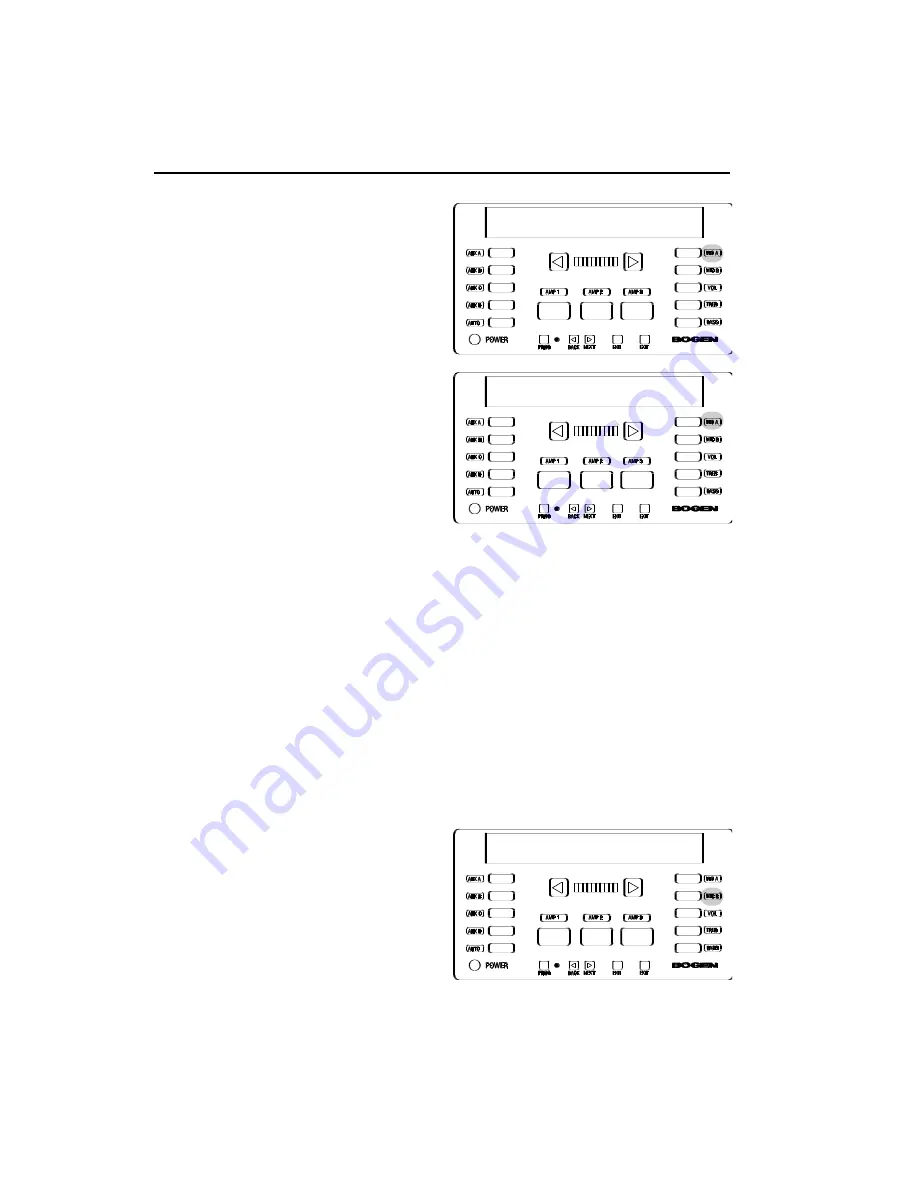
At this point, the display again shows the precedence display.

Press EXIT to return to the function menu or press the MIC B button to
configure MIC B.

Note:

During mic configuration, you can switch between MIC A or MIC

B.  For example, when the display shows 

PPS

(phantom power) for MIC

A, you can press MIC B and set the phantom power feature for MIC B.
The same holds true for the 

PREC

and 

ALC

features. 

To Set MIC B for TEL Operation

Located between the ALC and PHAN features is the MIC B TEL setup fea-
ture:

1.

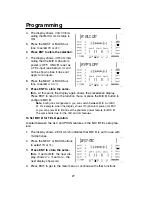
The display shows 

B IN-MIC

which indicates that MIC B is set for use with

microphones. 

2.

Press the NEXT or BACK buttons

to select 

MIC

or 

TEL

.

3.

Press ENT to store the selec-
tion.

If set for MIC, the next dis-

play shows 

PPS

.  If set to 

TEL

, the

next display shows 

PREC

.

4.

Press EXIT to get to the main menu or continue with other functions.

B IN-MIC

A ALC ON

A PPS OFF

27

Summary of Contents for PM-3000

Page 1: ...User s guide ...

Page 2: ...l near any heat sources such as radiators heat registers stoves or other apparatus including amplifiers that produce heat 9 Do not defeat the safety purpose of the polarized or grounding type plug A polarized plug has two blades with one wider than the other A grounding type plug has two blades and a third grounding prong The wide blade or the third prong are provided for your safety If the provid...

Page 3: ...Models PM 3000 PM 3180 User s Guide Part No 54 5003 02 9707 ...

Page 4: ...ly performed or adhered to could result in damage to the unit or personal injury Do not proceed beyond a warning label until the indicat ed conditions are fully understood and met Warning Changes or modifications to this unit not expressly approved by the party responsible for compli ance could void the user s authority to operate the equipment Note This equipment has been tested and found to comp...

Page 5: ...uide Owner s Information Model Number Serial Number_________________________ Date of Purchase______________________ Place of Purchase_____________________ Address______________________________ ____________________________________ iii ...

Page 6: ...d Remote Controller 14 Wiring Information 15 Outputs for Model PM 3000 15 Outputs for Model PM 3180 16 Aux Inputs 17 Aux Input Trim Controls 17 Audio Process Link Wiring PM 3180 Only 17 Mic Inputs 18 User Operation 19 The ProMatrix Control Panel 19 Programming 22 Enter Program Mode 22 Programming Menu 23 Assignment 24 Mic Set Up 26 Presets 28 Volume Limit 30 Inhibit 32 Aux Mute 33 Amplifier Link P...

Page 7: ...ng kit lets you customize installation by locating the control panel remotely from the amplifier chassis up to 250 feet when in wall wiring is used Front Panel Mounting Kit Part No RMPWMK3 The rack kit permits installation of the amplifier chassis in standard equip ment racks Rack Panel Kit Part No RPK79 Conventions This users guide covers the ProMatrix amplifier model PM 3180 and the ProMatrix Pr...

Page 8: ...ach channel Here is an application example for a typical restaurant bar establish ment using the PM 3180 amplifier The 20 watt amp channel plays to the entrance area waiting room the 60 watt amp channel to the dining area and the 100 watt amp channel to the bar lounge The area served by each amp channel hears program material according to the priority level for the inputs assigned to the amp chann...

Page 9: ...control panel with soft touch buttons to select a channel provide manual override selection of input source control volume treble and bass program unit functions Preset power up volume level of each input for each channel Password protected programming mode Preset bass and treble response of each input on each channel the same input can have different EQ settings on different channels Preset maxim...

Page 10: ...e only the telephone cable supplied Use of any other cable may damage the unit To attach the control panel to the chas sis position the panel as shown Line up the tabs on the control panel with the slots on the chassis Push in on the grooved areas on each side of the plas tic panel and push the control panel onto the chassis to engage the locking tabs To mount the control panel in a remote locatio...

Page 11: ...al amp or other signal processing equipment Refer to page 15 for wiring balanced or unbalanced outputs For the PM 3180 connect loads between COM and the desired output tap 8Ω 25V or 70V If connecting a 4 ohm load refer to the Wiring Information section on page 16 for information on the 4Ω link 4 Connect unbalanced music input sources The lines from the sources to the amplifier should be terminated...

Page 12: ...ction of these instructions Page 22 to set priority levels Input Priority Level MIC A 1 MIC B 2 AUX A 3 AUX B 4 1 highest 6 lowest AUX C 5 AUX D 6 The microphone input settings are listed below Microphone Feature Default Options MIC 1 Precedence VOX N O N C VOX ALC ON ON OFF Phantom ON OFF ON MIC 2 Precedence VOX N O N C VOX ALC ON ON OFF MIC TEL MIC MIC TEL Phantom ON OFF ON See the Programming s...

Page 13: ...less infrared remote controller Understanding the Control Panel The ProMatrix unit consists of 3 channels but only one control panel Therefore you must select the channel that the panel will effect Once the unit is powered a number of indicators will light and the alphanumeric panel will display status information The illuminated AMP 1 indicator means that it is the current amp channel the one tha...

Page 14: ...ve amp chan nel VOL and a 2 digit volume level number 00 25 The number and pointer changes in response to the arrow buttons After 5 seconds of no adjustment the control panel display will again show the current input VOL remains the current control and can be adjusted at any time simply by pressing an arrow key To Control Bass or Treble Select the desired function by pressing the BASS or TREB butt...

Page 15: ...the AUTO LED will flicker 90 on 10 off to indicate that one or more of the other amp channels is under manual control To identify which amplifier is under manual control Press each AMP button until the AUTO indicator and input indicator AUX A B etc flash together To Return to Auto Switching Find the amp channel that is under manual control Press the AUTO button once The current input based on prio...

Page 16: ...x A to 25 this can be done without a load if desired 5 Rotate the Aux A Input Trim control while watching the Amp 3 output level meter Adjust the trim control so that the red LED is briefly flash ing only on loud music peaks 6 Repeat steps 3 4 and 5 for the other Aux inputs Since the inputs are common to all three amplifier channels the trims only need be set for one of the amp channels 7 For PM 3...

Page 17: ...nced input jacks RCA type for program sources 5 AUX INPUT TRIM Variable attenuators for adjusting input source levels 6 BALANCED OUTPUTS Balanced Preamp output screw terminals for each channel 7 UNBALANCED OUTPUTS Unbalanced preamp output RCA jacks 8 GROUND LIFT Disconnects output grounds from chassis ground 9 REMOTE Jack for use when mounting amplifier front control panel in a remote location 10 ...

Page 18: ...e activation 4 AUX INPUT Unbalanced input jacks RCA type for program sources 5 AUX INPUT TRIM Variable attenuators for adjusting input source lev els 6 AUDIO PROCESS LINKS Permits the connection of external signal processing equipment 7 REMOTE Jack for use when mounting amplifier front control panel in a remote location 8 Amplifier output screw terminals 9 VOLTAGE SELECT Voltage selector switch 10...

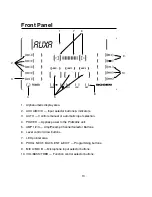
Page 19: ...put selection 4 POWER Applies power to the ProMatrix unit 5 AMP 1 2 3 Amp Preamp Channel Selector Buttons 6 Level control Arrow buttons 7 LED pointer area 8 PROG NEXT BACK ENT EXIT Programming buttons 9 MIC A MIC B Microphone input selector buttons 10 VOL BASS TREB Function control selector buttons 1 4 5 8 9 10 7 6 2 3 AUXA 13 ...

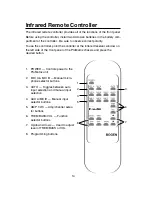
Page 20: ...rared receiver window on the left side of the front panel of the ProMatrix chassis and press the desired button 1 POWER Controls power to the ProMatrix unit 2 MIC A MIC B Manual micro phone selector buttons 3 AUTO Toggles between auto input selection and manual input selection 4 AUX A B C D Manual input selector buttons 5 AMP 1 2 3 Amp channel selec tor buttons 6 TREB BASS VOL Function selector bu...

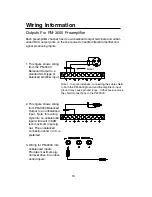
Page 21: ...put 2 This figure shows wiring from PM 3000 Balanced Output to an unbalanced input Note this wiring style into an unbalanced input will result in 6dB less maximum input sig nal The unbalanced connection shown in 3 is preferred 3 Wiring for PM 3000 into unbalanced inputs Provides maximum sig nal level drive into unbal anced inputs 1 2 3 Note 1 In some instances connecting the cable shield to both t...

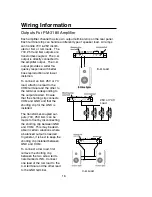
Page 22: ...h one lead to the COM terminal and the other to the terminal corresponding to the output desired Ensure that the shorting clip connects COM and GND and that the shorting clip for the LINK is installed The transformer coupled out puts 70V 25V 8 Ω can be made to float by disconnecting the shorting clip between GND and COM This may be desir able in certain situations where a balanced output is needed...

Page 23: ...Vrms and is adjusted using the AUX TRIM controls Aux Input Trim Controls See page 10 for adjustment procedure Audio Process Link Wiring PM 3180 Only Typical Audio Process Link wiring is illustrated below See page 32 in the Programming section to deactivate the internal connection between the pre amp out and power amp in so that the external equipment can be inserted Unbalanced audio source CD Tape...

Page 24: ...s available 1 2 3 If Mic A has a push to talk switch use these termi nals for the switch connection see Mic Precedence Setup in the Programming Section Push to talk switch pair Normally open or normally closed see Mic Precedence Setup in Programming Section T R X Switch closure available on some page ports Mic B Shield PBX Page Port or Paging Adapter 18 MBS 1000 ...

Page 25: ...TREB which can be adjusted by pressing the arrow buttons If the arrow keys are not touched for 5 seconds the unit defaults to the VOL control you have to first select BASS or TREB to use these con trols When the ProMatrix is in User Mode the user can perform the following functions Apply power Select a channel Adjust volume and tone for all inputs on the selected amp channel Manually select an inp...

Page 26: ...oost 3 After 5 seconds of no adjustment the alphanumeric display will return to the previous display and show only the current input Note The volume and tone controls for a particular amplifier can be programmed so that they do not respond to the control panel or infrared remote buttons If this programming has been performed the word INHIBITED will appear on the alphanumeric display when the contr...

Page 27: ...r manual control When the manually selected amp is again made current both the AUTO and selected input LEDs will flash To Return to Auto Switching Make the amplifier under manual control the current amp by pressing the appropriate AMP button Press the AUTO button The current input based on priority will appear on the display and its indicator LED will light The AUTO LED will light steady Important...

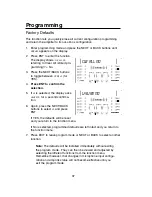
Page 28: ...r ENT will exit the password entry function 3 Repeat Step 2 for the second and third digits Note There is no way to correct an error when entering the password If an error is made simply press PROG or EXIT and then start over 4 Once the complete password is entered the display shows the first menu selection ASSIGNMENT 5 To program the function shown press ENT To select a different func tion press ...

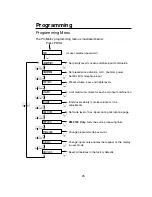
Page 29: ...ume bass and treble levels Vollimit Limit maximum volume for each amp input combination Inhibit Inhibit users ability to make volume or tone Aux Mute Set mute level of Aux inputs during microphone page Amp Link PM 3180 Only Sets the audio processing links Password Change program mode password Labels Change input source names that appear on the display Defaults Reset all features to the factory def...

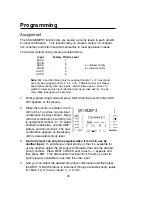
Page 30: ...hen the function title ASSIGN MENT appears on the display 2 When the function is entered the A1 AUX A Amp 1 and Aux A amp input combination is always shown along with that combination s current priori ty assignment number 3 To select another combination use the AMP buttons and Input buttons The new combination appears on the display with its associated priority level 3 A priority level can only be...

Page 31: ...gned consecutively For example an installer could assign only 2 inputs to an ampli fier channel and give one the highest priority 1 and the other the lowest 6 If the priority 1 input went inactive the amplifier would switch to the input with the next lowest priority 6 At least one input source must be assigned to each amp channel for proper operation 7 Once you have finished assigning priorities f...

Page 32: ...The factory defaults are listed below Feature MIC A MIC B Precedence Activation VOX VOX Automatic Level Control On On Phantom Power On On 1 Enter the programming mode and press the NEXT or BACK buttons until MICROPHONE appears on the display 2 Press ENT to enter the function To Set MIC Parameters 1 Select the Mic to be configured by pressing either the MIC A or MIC B buttons If for example you pre...

Page 33: ...s the MIC B button to configure MIC B Note During mic configuration you can switch between MIC A or MIC B For example when the display shows PPS phantom power for MIC A you can press MIC B and set the phantom power feature for MIC B The same holds true for the PREC and ALC features To Set MIC B for TEL Operation Located between the ALC and PHAN features is the MIC B TEL setup fea ture 1 The displa...

Page 34: ...Enter programming mode and press the NEXT or BACK buttons until PRESETS appears on the display 2 Select the desired control VOL BASS or TREB by pressing the corre sponding button 3 Select the amplifier and input you wish to adjust by pressing the appro priate selector buttons 4 Press ENT to enter the function The display shows the current amp input combination and pre set level for the selected co...

Page 35: ...s the current amp channel input combination and preset level 7 to 7 corresponding to the amount of cut or boost 0 is the default Press the arrow buttons to increase decrease the tone control The level num ber will increase or decrease and the pointer will move left or right in response to the changes made Remember to press ENT after setting each level 7 Once all levels are set press EXIT to return...

Page 36: ...stments since the installer will normally want to listen to the output in order to make the adjustment 1 Enter programming mode and press the NEXT or BACK buttons until VOL LIMIT appears on the display 2 Press ENT to enter the function 3 Select the amplifier and input you wish to limit by pressing its selector buttons The display shows the current amp input and its current volume limit setting The...

Page 37: ... 8 Once all levels are set press EXIT to return to the function menu At this point you can exit the programming mode or press the NEXT BACK buttons to select another function Note 1 If the Volume Limit is set below the Preset volume level the Volume Limit will control the power on output level Note 2 Unassigned inputs for an amp can still have their Volume Limit set This is allowed since an input ...

Page 38: ...s the current amplifier and the inhibit status for the selected control You should hear program over the speakers 5 In the illustration at right VOL is the selected control Press the NEXT or BACK buttons to toggle between VOL ON and VOL OFF ON means that the volume function inhibit is on and no user volume control is available on AMP 1 Likewise for the other functions 6 Press ENT to store the sele...

Page 39: ...be adjusted to 25 no muting 3 Select the desired amp channel input combination and also a paging mic 4 Make a page with the microphone or telephone input and use the arrow buttons to adjust the Aux source to the desired level If the Aux Mute level is set to 00 the program will be completely muted Note The mic level for adjusting this feature is set at its preset level for the mic and amp combinati...

Page 40: ... and link status the default is Amp 1 Link In 3 Select the desired amp by press ing the appropriate AMP button 4 Press the NEXT BACK buttons to toggle the status between IN and OUT 5 Press ENT to store the selection The PROG light will blink to indicate that data was stored 6 Repeat steps 3 4 and 5 for additional links 7 Once the Amp Link function has been set press EXIT to return to the function ...

Page 41: ...ering the third numeral the first numeral will begin to flash again You can go through the digits as many times as you wish or you can exit this function and save the currently displayed password Note Make sure to press ENT for each changed digit before exiting otherwise the original digit will remain resulting in a password different from the one planned Note If you forget the password enter the ...

Page 42: ... at the desired character 5 Press ENT to store the letter selection The PROG light will blink to indicate that data was stored 6 The second character position flashes Repeat Steps 4 and 5 7 The third character position will flash and so on Repeat steps 4 and 5 for each letter in turn to a maximum of 10 characters Note To edit a label press the ENT key to skip over character positions until the one...

Page 43: ...display asks U SURE NO for a second confirma tion 6 Again press the NEXT BACK buttons to select YS and press ENT If YES the defaults will be reset and you return to the function menu If No is selected programmed defaults are left intact and you return to the function menu 7 Press EXIT to leave program mode or NEXT or BACK to select another function Note The defaults will be installed immediately w...

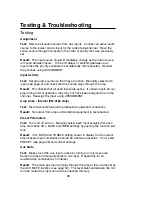
Page 44: ... they may not have been assigned to an amp channel Reassign the input using ASSIGNMENT Amp Links Internal PM 3180 Only Test Disconnect external audio processing equipment connections Result No output from amps until external equipment is reconnected Preset Parameters Test Turn unit off and on Manually select each input assigned for each amp and check VOL BASS and TREB settings by pushing the funct...

Page 45: ...heck that the correct output tap is used Recheck speaker power settings and connections No output from an amp PM 3180 Only Assuming that power is on volume is turned up and input is active check that the shorting clip across LINK on the amplifier output termi nal strip is in place except 4 ohm operation Check that the shorting clip is in place between COM and GND and that the speaker load returns ...

Page 46: ... Make sure no DC voltage is connected to the Tel input Check that Mic B is set for Tel operation see page 27 Aux always active Check if Aux is manually selected Check for high levels of hum and noise from source Aux never active Check if Aux is assigned to amp in question see page 24 No or very low audio signal present at aux input in question Music cuts in late Trim pad set incorrectly see page 1...

Page 47: ...rtain functions can be locked out when the amplifi er is in operation Ensure all input and output wiring is correctly installed If using the PM 3180 4 ohm output be sure to remove the output link see instruc tions Make sure that input sources are active Microphones may require software setup see instructions For warranty service refer to the product registration card Our customer service support c...

Page 48: ...B 0 5 THD N all outputs Amp 2 Aux Inputs 20Hz to 20KHz 2dB 0 5 THD N direct output Aux Inputs 70Hz to 20KHz 2dB 0 5 THD N transformer output Mic Inputs 100Hz to 10KHz 2dB 0 5 THD N all outputs Amp 3 Aux Inputs 20Hz to 15KHz 2dB 1 THD N direct output Aux Inputs 100Hz to 15KHz 2dB 1 THD N transformer output Mic Inputs 100Hz to 10KHz 2dB 1 THD N all outputs Signal To Noise 20Hz to 20KHz Mic Inputs 55...

Page 49: ...Input Impedance Mic Inputs 200 ohms balanced Tel Input 600 ohms transformer balanced Aux Input 50Kilohms unbalanced Frequency Response Distortion 20Hz to 20KHz Aux Inputs 20Hz to 20KHz 2dB 0 1 THD N Mic Inputs 100Hz to 10KHz 2dB 0 1 THD N Signal To Noise 20Hz to 20KHz Mic Inputs 55dBr Tel Input 55dBr Aux Inputs 70dBr Volume Control 25 step digital Tone Controls Bass 10dB 50Hz in 15 steps Treble 10...

Page 50: ...50 Spring Street Ramsey NJ 07446 www bogen com ...

Reviews: