background image

SG2060 series                  2 Quick Start Guide                                                                                 

                                        Page  8 

2.3.4 View Images or Videos 

Press 

  to enter playback mode viewing images or 

videos, the latest image or video icon will be shown 
on the LCD screen, click 


to play a video  .Press 

▲”

  or “

▼”

  to view the previous or next one. 

2.3.5 Delete Images or Videos 

Press DEL to delete images or videos. Note the DEL 
button just works in Playback state. So if it’s in 
Preview state, you should press    to enter into 
Playback state first.


2.4 Enter into On Mode 

After switching the camera to ON  position, the 
motion indication LED (red) will blink for about 10s. 
This time interval is for you to make the camera 
ready for automatic surveillance operation, e.g., to 
close the camera and to lock it, to fix the camera on 
a tree and to walk away. After entering into the ON 
mode, no manual controls are needed and possible. 
Camera will take pictures or videos automatically 
according to the previous programmed settings 
when human or animals enter into the monitoring 
region.
 

Summary of Contents for SG2060 Series

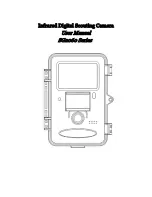
Page 1: ...Infrared Digital Scouting Camera User Manual SG2060 Series...

Page 2: ...2 Insert the SD Card 7 2 3 Enter into Setup Mode 7 2 3 1 Preview and Playback 7 2 3 2 Customer Settings 7 2 3 3 Manual Capturing 7 2 3 4 View Images or Videos 8 2 3 5 Delete Images or Videos 8 2 4 Ent...

Page 3: ...SG2060 series 1 Instruction Page 1 1 Instruction 1 1 Camera Body Interface SG2060 X SG2060 K SG2060 U...

Page 4: ...of interested monitored by a highly sensitive Passive Infra Red PIR motion sensor and then take high quality pictures up to 20 mega pixels or video clips This series of cameras contain three models K...

Page 5: ...le digital camera Pictures or videos can be taken manually by pressing on the operation panel 1 3 Application This camera can be used as an automatic surveillance device for guarding and recording une...

Page 6: ...o save parameter settings and play videos to exchange between playback mode and preview mode DEL to delete an image or video to capture a photo or record a video manually 1 5 Cautions The camera is su...

Page 7: ...ep Please do not insert or take out the SD card when the power switch is in the ON position It is recommended to format the SD card by the camera when used for the first time Storage recycling when SD...

Page 8: ...losion if battery is replaced by an incorrect type Also dispose of used batteries according to the instructions Correct Disposal of this product This marking indicates that this product should not be...

Page 9: ...customer settings and playback state view photos or videos via 2 0 LCD display 2 3 1 Preview and Playback After switching the camera to SETUP Mode it enters into the preview state Press to exchange b...

Page 10: ...iew state you should press to enter into Playback state first 2 4 Enter into On Mode After switching the camera to ON position the motion indication LED red will blink for about 10s This time interval...

Page 11: ...pturing photos recording videos or photo with a video clip Photo Size Choose the photo size e g 20MP 14MP or 8MP Video Size Choose the video size 1920x1080 or 1280x720 Photo Burst Choose the continuou...

Page 12: ...means the timer function is disabled Changing this parameter to a non zero value turns on the Time Lapse mode and camera will take photos at given time interval Please note that if PIR Trigger is set...

Page 13: ...Passive Infrared motion sensor will be disabled after each triggering in ON mode During this time the PIR of the device will not react to the motion of human or animals The minimum interval is 0 seco...

Page 14: ...that the length of the audio file less than 2 minutes otherwise it will consume much more power Language Choose the menu language you need Beep Sound Enable or disable the beep sound Distance This cam...

Page 15: ...t Set Restore all customer settings to default values Version Version information 3 2 Default Setting Setting Items Default Options Submenu Camera Mode Photo Video Pic Video Photo Size 20M 14M 8M Vide...

Page 16: ...ech Russian Italian Beep Sound On Off Distance Far Near Camera Posit Off A Z Position Recycle Storage Off On Format SD Enter Yes No Default Set Save Version Enter 3 3 Power Off Switch the camera to OF...

Page 17: ...SG2060 series 3 Item Settings Page 15 will not be used for a long time...

Page 18: ...camera on a tree to get the optimal picture quality the recommended distance is 16ft from the tree to the target monitoring area and recommended height from the ground is 4 9ft 6 5ft Adjust the viewin...

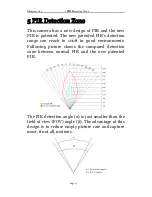
Page 19: ...patented PIR s detection range can reach to 100ft in good environments Following picture shows the compared detection zone between normal PIR and the new patented PIR The PIR detection angle is just s...

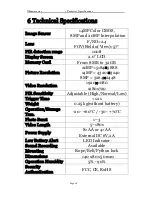
Page 20: ...20MP 5184 3888 14MP 4320 3240 8MP 3264 2448 Video Resolution 1920 1080 1280x720 PIR Sensitivity Adjustable High Normal Low Trigger Time 1 2s Weight 0 25 kg without battery Operation Storage Tem 20 60...

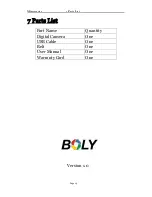
Page 21: ...SG2060 series 7 Parts List Page 19 7 Parts List Part Name Quantity Digital Camera One USB Cable One Belt One User Manual One Warranty Card One Version 1 0...

Reviews: