background image

16 


Electrical connection

Electrical connection

Electrical connection

Electrical connection    

    WARNING:

WARNING:

WARNING:

WARNING:    


The installation to the mains supply must conform 
to the local standards and regulations. 


Improper connection may cause to an electric 

electric 

electric 

electric 

shock

shock

shock

shock! 


Do not modify the appliance plug. If the plug does 
not fit properly to the outlet, let install a proper 
outlet by an authorized specialist. 


The accessibility of the power plug must be en-
sured to disconnect the appliance from the power 
supply in case of emergency. 


    CAUTION

CAUTION

CAUTION

CAUTION::::    

In case of disconnection or power failure: 


-


Wait for approx. 5 minutes before restarting.


-


Check the operation settings.


Ensure that your mains power corresponds with 
the specifications of the appliance. The specifica-
tions are printed on the rating label. 


Connect the mains cable to a properly installed 
and earthed wall outlet. 


If the plug after installation is not accessible, a 
corresponding disconnect device must be availa-
ble to meet the relevant safety regulations. 


Reverse the door opening

Reverse the door opening

Reverse the door opening

Reverse the door opening    

If required, the door opening can be moved from the 
right (supplied condition) to the left side. 


    WARNING:

WARNING:

WARNING:

WARNING:    

When replacing the door stop, the appliance must be 
disconnected from the power supply first.


    NOTE

NOTE

NOTE

NOTE:::: 


Ask another person to assist. 


You possibly need: screw wrench, Phillips screw-
driver as well as a thin-blade screwdriver. 


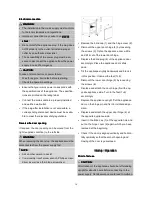
Remove the blind cap (1) and the hinge cover (2). 


Dismount the upper door hinge (4) by loosening 
the screws (3). Opfen the appliance door a little 
and lift it out of the lower door hinge. 


Displace the blind plug (9) of the appliance door 
accordingly. Place the appliance door safely 
aside. 


Tilt the appliance slightly backwards and block it 
in this position. Unscrew the feet (7+8). 


Dismount the lower door hinge (5) by loosening 
the screws (6). 


Displace and attach the door hinge (5) at the op-
posite appliance side. Turn in the feet (7+8) 
accordingly.  


Replace the appliance upright. Put the appliance 
door on the hinge pin and fix it in its intended po-
sition.  


Displace and attach the upper door hinge (4) at 
the opposite appliance side. 


Insert in the blind cap (1) at the opposite hole and 
put on the hinge cover (2) again, which you have 
removed at the beginning. 


Check if the door is aligned vertically and horizon-
tally optimally so that the smooth opening and 
closing of the door is guaranteed. 


Startup / Operation

Startup / Operation

Startup / Operation

Startup / Operation    

Prior to first use

Prior to first use

Prior to first use

Prior to first use    

    CAUTION:

CAUTION:

CAUTION:

CAUTION:    

After transport, the appliance should be left standing 
upright for about 4 hours before connecting to the 
power supply. Nonobservance could lead to malfunc-

Summary of Contents for GB 388

Page 1: ...388 388 388 388 F F F FREEZER REEZER REEZER REEZER B B B BOX OX OX OX Bedienungsanleitung Garantie Bedienungsanleitung Garantie Bedienungsanleitung Garantie Bedienungsanleitung Garantie Instruction Ma...

Page 2: ...gung und Pflege Seite 9 St rungsbehebung Seite 10 Technische Daten Seite 10 Garantie Seite 11 Entsorgung Seite 12 ENGLISH ENGLISH ENGLISH ENGLISH Contents Contents Contents Contents Introduction Page...

Page 3: ...EIS HINWEIS HINWEIS Die Darstellungen in dieser Bedienungsanleitung k nnen vom Originalger t abweichen Benutzen Sie das Ger t ausschlie lich f r den privaten und den daf r vorgesehenen Zweck Dieses Ge...

Page 4: ...chtungen oder sonstigen Mittel um den Abtauvorgang falls notwendig zu beschleunigen au er den in der Anleitung beschriebenen Hilfsmitteln Modellabh ngig im Lieferumfang enthalten Besch digen Sie nicht...

Page 5: ...durchl ften und einen Fachmann kontaktieren Auspacken Auspacken Auspacken Auspacken des Ger tes des Ger tes des Ger tes des Ger tes Nehmen Sie das Ger t aus seiner Verpackung Entfernen Sie s mtliches...

Page 6: ...e den Ger tenetzanschlussstecker nicht Lassen Sie die Netzsteckdose durch einen Fachmann ersetzen wenn diese f r den Ger te netzstecker nicht geeignet ist Die Zug nglichkeit des Netzsteckers muss ge w...

Page 7: ...s f hren Reinigen Sie den Innenraum des Ger tes mit allen sich darin befindenden Zubeh rteilen Beachten Sie die Anweisungen die wir Ihnen im Kapitel Reinigung und Pflege dazu geben Ger t starten Ger t...

Page 8: ...en beachten Sie da her die empfohlenen Lagerungszeiten auf der Verpackung des Handelsgefrierguts Allgemeine Allgemeine Allgemeine Allgemeine Schutzma Schutzma Schutzma Schutzma nahmen nahmen nahmen na...

Page 9: ...Dampf kann zu Sch den an Kunststoffteilen f hren Das Ger t muss trocken sein bevor Sie es wie der in Betrieb nehmen ACHTUNG ACHTUNG ACHTUNG ACHTUNG Benutzen Sie keine Drahtb rste oder anderen scharfka...

Page 10: ...ndenservice siehe Garantie Technische Daten Technische Daten Technische Daten Technische Daten Elektrischer A Elektrischer A Elektrischer A Elektrischer An n n nschluss schluss schluss schluss Netzspa...

Page 11: ...ermit erkl rt der Hersteller dass sich das Ger t GB 388 in bereinstimmung mit den grundlegenden Anfor derungen der europ ischen Richtlinie f r elektromagnetische Vertr glichkeit 2004 108 EG und der Ni...

Page 12: ...mann GmbH C Bomann GmbH Heinrich Horten Stra e 17 D 47906 Kempen Entsor Entsor Entsor Entsorgung gung gung gung Bedeutung des Symbols M lltonne Bedeutung des Symbols M lltonne Bedeutung des Symbols M...

Page 13: ...e This appli ance is not fit for commercial use The appliance is only to be used as described in the user manual Do not use the appliance for any other purpose Any other use is not intended and can re...

Page 14: ...d persons with reduced physical sensory or mental capabilities or lack of experience and knowledge if they have been given supervision or instruc tion concerning u u u use of the se of the se of the s...

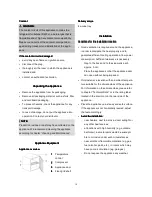
Page 15: ...2 2 2 2 Compressor 3 3 3 3 Appliance door 4 4 4 4 Fixed grid shelf Delivery scope Delivery scope Delivery scope Delivery scope Ice cube tray Installation Installation Installation Installation Conditi...

Page 16: ...e door stop the appliance must be disconnected from the power supply first NOTE NOTE NOTE NOTE Ask another person to assist You possibly need screw wrench Phillips screw driver as well as a thin blade...

Page 17: ...es the energy con sumption The freezer allows you to store frozen food at a temperature of 18 C or colder for several months to produce ice cubes and to freeze fresh food Due to external influences su...

Page 18: ...er supply the power supply If the appliance is out of use for long periods Remove the appliance content Thoroughly clean the appliance see Cleaning and Maintenance Leave open the appliance door to pre...

Page 19: ...an authorized specialist Before you contact an authorized specialist Pro Pro Pro Problem blem blem blem Cause Action Cause Action Cause Action Cause Action Appliance is not working or not properly Ch...

Page 20: ...ine storage appliances 3 Refrigera tor chiller and Refrigerator with a 0 star compartment 4 Refrigerator with a one star compartment 5 Refrigerator with a two star compartment 6 Re frigerator with a t...

Page 21: ...nger use to the collection points provided for their disposal This helps avoid the potential effects of incorrect disposal on the environment and human health This will contribute to the recycling and...

Page 22: ...22...

Page 23: ...23...

Page 24: ...24 C Bomann GmbH C Bomann GmbH C Bomann GmbH C Bomann GmbH www bomann de www bomann de www bomann de www bomann de Made in P R C Stand 12 16...

Reviews: