background image

BREAK-IN PERIOD

Engine

A break-in period of 10 operating hours

is required before running the vehicle

at sustained full throttle.

CAUTION:

Never mix oil with fuel.

This vehicle has a 4-stroke engine.

During this period, maximum throttle

should not exceed 3/4. However, brief

full acceleration and speed variations

contribute to a good break-in. Contin-

ued wide open throttle accelerations,

prolonged cruising speeds and engine

overheating are detrimental during the

break-in period.

Belt

A new belt requires a break-in period

of 50 km (30 mi). Avoid strong accel-

eration/deceleration, pulling a load or

high speed cruising.

10-Hour Inspection

NOTE:

The 10-hour inspection is at the

expense of the vehicle owner.
As with any precision piece of me-

chanical equipment,

we suggest

that after the first 10 hours, 200 km

(125 mi) or 30 days after the purchase,

whichever comes first, your vehicle

be inspected by an authorized Bom-

bardier ATV dealer. This inspection

will give you the opportunity to dis-

cuss the unanswered questions you

may have encountered during the first

hours of operation.

While reading this Operator’s Guide, remember that:

WARNING

Indicates a potential hazard that, if not avoided, could result in serious in-

jury or death.

_____________________

81

Summary of Contents for DS 250

Page 1: ......

Page 2: ...this Operator s Guide with the vehicle at all times WARNING Disregarding any of the safety precautions and instructions contained in this Operator s Guide Safety Videocassette and on product labels co...

Page 3: ...document the mascu line is used to denote the masculine or feminine The information and components sys tem descriptions contained in this doc ument are correct at the time of publi cation BRP however...

Page 4: ...ing with Your Vehicle 43 Recreational Riding 43 Environment 44 Design Limitation 44 Off Highway Operation 44 General Operating and Safety Precautions 45 Uphill Driving 45 Downhill Driving 45 Side Hill...

Page 5: ...wer Outlet 74 LIQUIDS 76 Fuel 76 Engine Oil 76 Gearbox Oil 78 Engine Coolant 78 Brake Fluid 79 Battery 80 BREAK IN PERIOD 81 OPERATING INSTRUCTIONS 82 General 82 Pre Operation Check 82 Initial Cold St...

Page 6: ...lter Cleaning 107 CARBURETOR 109 AIR INTAKE SYSTEM 110 Air Box Draining 110 Air Filter Cleaning 110 ELECTRICAL 112 Spark Plug 112 Battery 112 Fuse 113 Bulb Replacement 113 DRIVE TRAIN 115 Drive Chain...

Page 7: ...Ball Condition if so equipped 124 Fasteners 124 Seat Fasteners 124 Vehicle Cleaning and Protection 124 WARRANTY BRP INTERNATIONAL LIMITED WARRANTY 2006 BOMBARDIER ATV PRODUCTS 126 PRIVACY OBLIGATION...

Page 8: ...6 _______________________...

Page 9: ...ious injury or death CAUTION Denotes an instruction which if not followed could se verely damage vehicle compo nents NOTE Indicates supplementary infor mation needed to fully complete an in struction...

Page 10: ...ng conditions vary from place to place Each is subject to weather conditions which may radically change from time to time and from season to season Riding on sand is different than rid ing on snow or...

Page 11: ...SAFETY INFORMATION ____________ SAFETY INFORMATION ____________ 9...

Page 12: ...at fits properly You should also wear eye protection goggles or face shield gloves boots long sleeved shirt or jacket and long pants Never consume alcohol or drugs be fore or while riding this vehicle...

Page 13: ...ow the special procedure for braking described in this Operator s Guide Dismount on the uphill side or to a side if pointed straight uphill Turn the vehicle around and remount following the procedure...

Page 14: ...ributed and securely attached Reduce speed and follow instruc tions in this manual for carrying car go or pulling a trailer Allow greater distance for braking FOR MORE INFORMATION ABOUT ATV SAFETY con...

Page 15: ...A0AQ POTENTIAL HAZARD Operating this vehicle without proper instruction WHAT CAN HAPPEN The risk of an accident is greatly increased if the operator does not know how to operate this vehicle properly...

Page 16: ...severe injury or death of the child Even though a child may be within the age group for which this vehicle is recommended he may not have the skills abilities or judgment needed to operate this vehic...

Page 17: ...balance and control this vehicle Could cause an accident resulting in harm to you and or your passenger HOW TO AVOID THE HAZARD Never carry a passenger Even with a long seat that provides unrestricted...

Page 18: ...ad use only not for use on pavement Paved surfaces may seriously affect handling and control of this vehicle and may cause the vehicle to go out of control HOW TO AVOID THE HAZARD Never operate this v...

Page 19: ...N HAPPEN You can collide with another vehicle HOW TO AVOID THE HAZARD Never operate this vehicle on any public street road or highway even a dirt or gravel one In many states or provinces it is illega...

Page 20: ...event of an accident riding without eye protection can result in an accident and increases the chances of a severe injury in the event of an accident riding without protective clothing increases the c...

Page 21: ...HAPPEN Could seriously affect your judgment Could cause you to react more slowly Could affect your balance and perception Could result in an accident or death HOW TO AVOID THE HAZARD Never consume alc...

Page 22: ...CAN HAPPEN Increases your chances of losing control of the vehicle which can result in an accident HOW TO AVOID THE HAZARD Always travel at a speed which is proper for the terrain visibility and opera...

Page 23: ...heelies jumps and other stunts WHAT CAN HAPPEN Increases the chance of an accident including an overturn HOW TO AVOID THE HAZARD Never attempt stunts such as wheelies or jumps Do not try to show off _...

Page 24: ...follow the inspection and maintenance procedures and schedules described further in this Operator s Guide WARNING POTENTIAL HAZARD Riding on frozen waterways WHAT CAN HAPPEN Severe injury or death can...

Page 25: ...the vehicle or could cause you to lose your balance and fall off the vehicle If you remove a foot from the footrests your foot or leg may come into contact with the rear wheels which could injure you...

Page 26: ...me upon hidden rocks bumps or holes without enough time to react Could result in the vehicle overturning or loss of control HOW TO AVOID THE HAZARD Go slowly and be extra careful when operating on unf...

Page 27: ...on or vehicle control which could result in an accident including an overturn HOW TO AVOID THE HAZARD Do not operate on excessively rough slippery or loose terrain until you have learned and practiced...

Page 28: ...l causing a collision or overturn HOW TO AVOID THE HAZARD Always follow proper procedures for turning as described further in this Operator s Guide Practice turning at low speeds before attempting to...

Page 29: ...can overturn more easily on extremely steep hills than on level surfaces or small hills HOW TO AVOID THE HAZARD Never operate this vehicle on hills too steep for the vehicle or for your abilities Prac...

Page 30: ...s Guide Always check the terrain carefully before you start up any hill Never climb hills with excessively slippery or loose surfaces Shift your weight forward Never open the throttle suddenly or make...

Page 31: ...ribed further in this Operator s Guide NOTE A special technique is required when braking as you go down a hill Always check the terrain carefully before you start down any hill Shift your weight backw...

Page 32: ...tered the turning technique as described further in this Operator s Guide on level ground Be very careful when turning on any hill Avoid crossing the side of a steep hill if possible When crossing the...

Page 33: ...ck parking brake after you are stopped Dismount on uphill side or to a side if pointed straight uphill If you begin rolling backwards Keep your weight uphill Never open the throttle suddenly or make s...

Page 34: ...cause the vehicle to overturn HOW TO AVOID THE HAZARD Before operating in a new area check for obstacles Never attempt to ride over large obstacles such as large rocks or fallen trees When you go over...

Page 35: ...dly which may cause the vehicle to overturn HOW TO AVOID THE HAZARD Learn to safely control skidding or sliding by practicing at low speeds and on level smooth terrain On extremely slippery surfaces s...

Page 36: ...operate this vehicle in fast flowing water or in water deeper than that specified further in this Operator s Guide Check water depth and current before you attempt to cross any water Water should not...

Page 37: ...You could hit an obstacle or person behind the vehicle resulting in serious injury HOW TO AVOID THE HAZARD When you select reverse gear make sure there are no obstacles or people behind the vehicle Wh...

Page 38: ...eration of this vehicle with improper or uneven tire pressure may cause loss of control and increases the risk of an accident HOW TO AVOID THE HAZARD Always use the size and type of tires specified fu...

Page 39: ...ad to an accident HOW TO AVOID THE HAZARD Never modify this vehicle through improper installation or use of accessories All parts and accessories added to this vehicle should be approved by BRP and sh...

Page 40: ...Never exceed the stated load capacity for this vehicle including operator as well as other loads and added accessories Cargo should be properly distributed and securely attached Reduce speed when car...

Page 41: ...APPEN This can cause serious injury or death HOW TO AVOID THE HAZARD Never transport inflammable or dangerous material While reading this Operator s Guide remember that WARNING Indicates a potential h...

Page 42: ...airments or who are high risk takers have an increased exposure to overturns or collisions which may result in injury includ ing death Become completely familiar with the operational controls and the...

Page 43: ...L position Check drive chain for adjustment and lubrication Check sprockets for wear and dam ages Check fuel oil and coolant levels Check for oil leaks on the en gine transmission and drive train comp...

Page 44: ...you may encounter en route Operator must never wear loose clothing such as a scarf that may get entangled in the vehicle or on tree branches and shrubs Depending on conditions antifogging goggles or s...

Page 45: ...ed block the vehicle and trailer wheels from possible movement Always make sure load is evenly distributed on the trailer Use caution when disconnect ing a loaded trailer it or its load may topple on...

Page 46: ...ehicle If you encounter animals on the trail stop and observe quietly and with caution It will be one of the better memories of your life Observe the rule what you take in carry out Do not litter Do n...

Page 47: ...especially im portant when parking on a slope On very steep inclines or if the vehicle is car rying cargo the wheels should be blocked using rocks or bricks Remember to turn the fuel valve to the clos...

Page 48: ...ns may result in injury Apply only enough throttle to proceed safely Statistics show that high speed turns usually result in mishaps and injury Always remember that this vehicle is heavy Its pure weig...

Page 49: ...Riding your vehicle on roads or highways could cause a colli sion to occur with another vehicle ATV tires are not suited for paved road use Pavement may seriously affect the handling and control of th...

Page 50: ...d for sudden holes or changes in depth Similarly so be watchful of hazards such as rocks logs etc partially covered by vegetation If your trip crosses frozen waterways make sure that the ice is thick...

Page 51: ...a type safety flag can snag and rebound on your body if caught do not use it in areas where there are low hanging branches or obstacles Riding on loose stones or gravel is very similar to riding on ic...

Page 52: ...nd use proper body positioning Uphill Keep your body weight forward towards the top of the hill Keep your feet on the footpegs and shift into low gear then accelerate and when necessary change gear qu...

Page 53: ...risky types of riding since it may drastically change the balance of the vehicle It should be avoided wherever possible If it is necessary to do so however it is important that you ALWAYS keep your bo...

Page 54: ...of this Op erator s Guide It provides valuable advice on how to properly take care of your vehicle If further assistance is required your authorized Bombardier ATV dealer is always willing to help Mod...

Page 55: ...comes with a hang tag and labels containing important safety infor mation Any person who rides this vehicle should read and understand this information before riding V07M11L ____________ SAFETY INFOR...

Page 56: ...red perma nent parts of the vehicle If missing or damaged they can be replaced free of charge See an authorized Bombardier ATV dealer NOTE The following illustrations used in this Operator s Guide are...

Page 57: ...1 8 7 5 3 2 6 4 vmo2006 013 004_a ____________ SAFETY INFORMATION ___________ 55...

Page 58: ...Label 1 V01M01Z Label 2 V01M02Z Label 3 V01M07Z Label 4 Label 5 vmo2006 014 002_aen Label 6 V06M0EY 56 ___________ SAFETY INFORMATION ___________...

Page 59: ...Label 7 Label 8 vmo2006 014 003_a INTERNATIONAL MODELS ONLY ____________ SAFETY INFORMATION ___________ 57...

Page 60: ...58 ___________ SAFETY INFORMATION ___________...

Page 61: ...VEHICLE INFORMATION _____________________ 59...

Page 62: ...authorized Bombardier ATV dealer to complete war ranty claims properly No warranty will be allowed by BRP if the engine identifica tion number EIN or vehicle identification number VIN is removed or mu...

Page 63: ...Engine Identification Number Location vmo2006 014 005_a TYPICAL _____________________ 61...

Page 64: ...is label indicates vehicle s compliance in many countries LABEL LOCATION All DS250 Right front lower tube of the frame between A arm V00M02Y USA AND CANADA V00M03Y OTHER COUNTRIES IN THE WORLD 62 ____...

Page 65: ...e ultimate purchaser or while it is in use or 2 The use of the vehicle after such device or element of design has been re moved or rendered inoperative by any person Among those Acts Presumed to Const...

Page 66: ...uctions supplied A non compliance Red Label as well as a Green Label is obtained annually during California Vehicle registration The appropriate label is denoted by the vehicle identification number i...

Page 67: ...CONTROLS INSTRUMENTS EQUIPMENT NOTE Some controls instruments equipment are optional _____________________ 65...

Page 68: ...12 8 9 16 6 7 1 5 11 14 17 3 4 6 7 4 2 5 15 13 10 vmo2006 013 005_a 66 ______________________...

Page 69: ...and the vehicle will gradually slow down vmo2006 014 008_a 1 Throttle lever 2 To accelerate 3 To decelerate 2 Front Brake Lever Located on the right side of handle bar When compressed the brake is ap...

Page 70: ...vmo2006 013 003_a 1 Front brake lever 2 Brake lever lock parking brake To release mechanism Squeeze brake lever Lever lock should auto matically return to its original position Brake lever should ret...

Page 71: ...mp Switch It is located on top of the multi function switch Place switch to LO for the low beam and taillight HI for the high beam and taillight and OFF to close the headlamp only vmo2006 014 055_a 1...

Page 72: ...n then ac tive the throttle lever Release the but ton when the maneuver is completed WARNING Never activate the override button while throttle is open as loss of control may result causing severe pers...

Page 73: ...is in reverse position Neutral Lamp green When lit it indicates the transmission is in neutral position 8 Ignition Switch Located in the middle of cluster Key operated 2 position switch OFF ON vmo200...

Page 74: ...RES Rotate the tap to align its pointer with ON OFF or RES vmo2006 014 013_a 1 Align the pointer toward the desired position 2 ON position 3 OFF position 4 RES position OFF Stops fuel supply to carbu...

Page 75: ...b 1 Footpeg 13 Tool Kit The tool kit is located in the service compartment underneath the seat vmo2006 014 047_b 1 Tool kit 14 Radiator Cap Located under front access cover It provides access to the r...

Page 76: ...r of seat while pulling rearward to release vmo2006 014 017_a 1 Seat latch Seat Installation Insert seat tab into frame hook When seat rests in its position firmly push seat down to latch NOTE A disti...

Page 77: ...er Do not exceed the rating capacity See SPECIFICATIONS An auxiliary supply is available to connect additional accessories Two wires are hidden in the wiring har ness at the rear of vehicle See an aut...

Page 78: ...roke engine Oil must be added to engine base only Fuel Level WARNING Always stop engine before re fueling Open cap slowly If a differential pressure condition is noticed whistling sound heard when loo...

Page 79: ...80 60 40 20 0 20 SAE 5W30 SAE 15W40 SAE 20W50 Oil Level CAUTION Check level frequently and refill if necessary Do not over fill Operating the engine with an improper level may severely dam age engine...

Page 80: ...s Cooling system must be filled with Bombardier premixed coolant P N 219 700 362 or with distilled water and antifreeze solution 50 water 50 antifreeze Coolant Level Coolant reservoir is located under...

Page 81: ...CAUTION To avoid serious dam age to the braking system do not use fluids other than the recom mended one nor mix different fluids for topping up Fluid Level With vehicle on a level surface check brake...

Page 82: ...4 032 UNDERNEATH RH REAR FENDER Battery This vehicle is equipped with a dry type battery that requires no mainte nance NOTE Refer to MAINTENANCE for removal and installation procedures 80 ____________...

Page 83: ...50 km 30 mi Avoid strong accel eration deceleration pulling a load or high speed cruising 10 Hour Inspection NOTE The 10 hour inspection is at the expense of the vehicle owner As with any precision pi...

Page 84: ...Activate the brake levers and brake pedal to make sure the brakes fully apply Levers and pedal must fully return when released Ensure transmission lever is work ing then reset in NEUTRAL position Che...

Page 85: ...PECIAL PROCEDURES if it occurs When the engine is warm push the choke lever to OFF and release brakes Warm Engine Starting Start the engine as explained above but without the choke If the engine does...

Page 86: ...from for ward to reverse or vice versa al ways completely stop the vehicle and apply the brake prior to mov ing the transmission lever The same procedures as SHIFTING THE TRANSMISSION above apply ex...

Page 87: ...ho rized Bombardier ATV dealer NOTE Make sure to verify that there is no fuel in engine oil if so replace engine oil Engine Overheat If engine overheats and indicator light turns on try the following...

Page 88: ...hose The high pressure can cause electrical or mechanical damages Turn Over When vehicle is turned over or stays tilted on the side replace the vehi cle in its normal operating position on all four w...

Page 89: ...cure cargo as low as possible on the rack s to reduce the effect of a higher center of gravity Failure to follow the recommendations here could cause changes in vehicle handling which could lead to an...

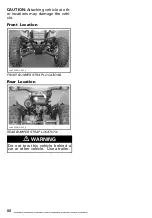
Page 90: ...may damage the vehi cle Front Location vmo2006 014 063_a FRONT BUMPER STRAP LOCATIONS Rear Location vmo2006 014 064_a REAR BUMPER STRAP LOCATION WARNING Do not tow this vehicle behind a car or other v...

Page 91: ...removed Refer to SPECIAL PROCEDURES 3 No fuel to the engine spark plug dry when removed Check fuel tank level turn fuel valve to ON also try on RES A failure of the fuel pump or carburetor may have oc...

Page 92: ...mproper valves adjustment Contact an authorized Bombardier ATV distributor dealer ENGINE BACKFIRE 1 Exhaust system leakage Contact an authorized Bombardier ATV dealer 2 Engine is running too hot See E...

Page 93: ...he air intake tube 4 CVT dirty or worn out Contact an authorized Bombardier ATV dealer TRANSMISSION LEVER IS HARD TO MOVE 1 Transmission gears are in a position that prevents the transmission lever to...

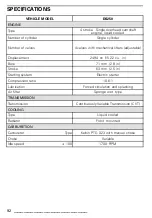
Page 94: ...15 22 cu in Bore 71 mm 2 8 in Stroke 63 mm 2 5 in Starting system Electric starter Compression ratio 10 6 1 Lubrication Forced circulation and splashing Air filter Sponge wet type TRANSMISSION Transmi...

Page 95: ...bulb 2 x 35 W Taillight bulb 1 x 5 21 W Indicator lamps 1 7W Fan motor 10 A Headlamps 15 A Other lamps 15 A Fuses Main fuse 30 A DRIVE TRAIN Rear axle Chain driven solid axle Turning radius 3 5 m 138...

Page 96: ...cludes a parking brake LOADING CAPACITY Total vehicle load allowed 150 kg 330 lb includes operator all other loads and added accessories DIMENSIONS Dry mass 195 kg 429 lb Overall length 1 830 m 72 in...

Page 97: ...a 87 R M 2 Outside North America 92 RON or higher Brake Brake fluid DOT 4 CAPACITIES Fuel tank 12 L 3 2 U S gal Engine 1 4 L 1 48 U S quarts Oil change 1 2 L 1 27 U S quarts Gearbox oil Oil change 800...

Page 98: ...96 ______________________...

Page 99: ...MAINTENANCE INFORMATION _____________________ 97...

Page 100: ...GINE TRANSMISSION Engine oil level 2 EVERY RIDE Customer Engine oil R R Dealer Engine oil strainer 7 C Dealer Gearbox oil I R Customer Dealer Valve clearance adjustment T T Dealer Engine mounting fast...

Page 101: ...ns I I Dealer Carburetor A A Dealer 4 More often under severe use such dusty area sand snow wet or muddy conditions ELECTRICAL Spark plug 5 I R Customer Ignition timing I I Dealer Battery connections...

Page 102: ...g etc I I 4 Dealer Tie rod ends I I Dealer Wheel nuts studs 2 I I Customer Tires pressure and wear 2 EVERY RIDE Customer Front wheels alignment I I Dealer 2 Pre ride inspection item 4 More often under...

Page 103: ...mi 200 H OR 2 YEARS OR 4000 KM 2485 mi A ADJUST C CLEAN I INSPECT L LUBRICATE R REPLACE T PROCEED WITH TASK TO BE PERFORMED BY PART TASK LEGEND BODY FRAME Engine compartment C C Customer Frame I Deale...

Page 104: ...e cooled down to avoid potential burns WARNING Should removal of a locking device e g lock tabs self locking fasteners etc be required when undergoing disassembly assembly always replace with a new on...

Page 105: ...the oil strainer cover Allow enough time for oil to flow out of oil strainer hole vmo2006 014 036_a RH SIDE OF ENGINE 1 Oil strainer cover Remove oil strainer and spring To clean oil strainer use a s...

Page 106: ...n pan under the gearbox drain plug area then remove plug vmo2006 014 039_a 1 Gearbox drain plug 2 Gearbox fill plug NOTE To completely drain the gear box place a jack under the left footpeg and tilt t...

Page 107: ...ll the by pass hose then remove the hose pincher NOTE If no coolant comes out by the by pass hose hole squeeze the lower radiator hose several times un til coolant comes out Complete the radiator fill...

Page 108: ...ted carbon WARNING Never perform this operation im mediately after the engine has been run because exhaust system is very hot Wear eye protection and gloves Respect all applicable laws and regulations...

Page 109: ...the radiating fins WARNING Never clean radiator with your hands when it is hot Let the radi ator cool down before cleaning CAUTION Be careful not to dam age the radiating fins when clean ing Do not us...

Page 110: ...clean inside the air injection valve Rinse filters with warm water until all cleaning solution disappears NOTE If air filters are still dirty replace them with new ones Then let filters dry completely...

Page 111: ...CARBURETOR See an authorized Bombardier ATV dealer each year to verify and clean the fuel system _____________________ 109...

Page 112: ...remove the clamp Pull drain tube out and empty it CAUTION Do not start engine when liquid deposits are found in the drain tube When liquid deposits are found the air filter must be inspected dried re...

Page 113: ...ce it with a new one Then let the filter dry completely When the filter is dried re oiled with air filter oil P N 219 700 340 or an equivalent CAUTION Engine performance degradation or severe damages...

Page 114: ...ible seizure Screw spark plug into cylinder head by hand and tighten with a torque wrench and a proper socket Torque spark plugs to 11 N m 97 lbf in Battery WARNING Never charge a battery while in sta...

Page 115: ...cover then pull fuse out Check if filament is melted A15E0KY 1 2 1 Fuse 2 Check if melted Bulb Replacement Always check light operation after re placement Headlamp CAUTION Never touch glass por tion o...

Page 116: ...ation to your convenience Adjust both headlamps evenly vmo2006 013 007_b 1 Beam height adjustment Taillight Unscrew lens screws to expose bulb V06G0UY 1 2 1 Lens 2 Screws Push bulb in and hold while t...

Page 117: ...AUTION Never wash the chain with a high pressure washer or gasoline Damage to the O ring will result causing premature wear and drive chain failure Clean the side surfaces of the chain with a dry clot...

Page 118: ...ION Never operate this vehi cle with the drive chain too loose or too tight as severe damage to the drive components can occur When the adjustment is done repeat the above procedure to check the defle...

Page 119: ...re using the vehicle Tire pres sure changes with temperature and altitude Recheck pressure if one of these conditions has changed For your convenience a pressure gauge is supplied in tool kit TIRE PRE...

Page 120: ...V06H05Y 1 TYPICAL 1 Taper side of nut CAUTION Always use the recom mended wheel nuts Using a differ ent nut could cause damages to the rim 118 _____________________...

Page 121: ...Rubber protector 2 Cable adjuster Remove the cable from the throttle lever NOTE Slide cable in clip slot and re move the end of cable from clip Remove the carburetor cap on top of the carburetor Place...

Page 122: ...tip of throttle lever Tighten lock nut and reinstall protector vmo2006 014 052_a 1 Throttle lever 2 Protector 3 Cable adjuster A 1 to 3 mm 039 to 118 in With the transmission lever on NEU TRAL positio...

Page 123: ...pring for a firmer ride and rough road condition Lengthen the spring for a light load and a smooth road condition vmo2006 014 049_a FRONT SUSPENSION A Same length on both sides vmo2006 014 072_a REAR...

Page 124: ...distortion cracks or bending See an authorized Bombardier ATV dealer if any problem is detected A Arms Check A arms for cracks bending or other damages See an authorized Bombardier ATV dealer as neces...

Page 125: ...replace any components of the brake system Check the following to keep the brakes in a good operating condition brake system for fluid leaks brake for spongy feel brake discs for excessive wear and s...

Page 126: ...all if worn Fasteners Check fastener condition and tight ness on the vehicle Retighten as required Seat Fasteners Check tightness of seat fasteners Retorque or replace if necessary Vehicle Cleaning an...

Page 127: ...WARRANTY _____________________ 125...

Page 128: ...yond its original expiration date 3 CONDITIONS TO HAVE WARRANTY COVERAGE This warranty coverage is available only on 2006 Bombardier ATV products pur chased as new and unused by its first owner from a...

Page 129: ...o modify products previously manufactured 6 EXCLUSIONS ARE NOT WARRANTED The following are not warranted under any circumstances Normal wear and tear Routine maintenance items tune ups adjustments Dam...

Page 130: ...nor any other person has been authorized to make any affirmation representation or warranty regarding the product other than those contained in this limited warranty and if made shall not be enforcea...

Page 131: ...uired the distributor s service department should be contacted in order to resolve the matter c If the matter still remains unresolved then contact BRP by writing to us at the address listed below BRP...

Page 132: ...ces and offers please let us know by writing to the address below Also note that from time to time carefully selected and trustworthy organiza tions may be permitted to use the coordinates of our clie...

Page 133: ..._____________________ 131...

Page 134: ...safety recalls are initiated It is the owner s responsibility to notify BRP STOLEN UNITS If your personal ATV is stolen you should notify BRP or an au thorized Bombardier ATV dealer We will ask you t...

Page 135: ..._____________________ 133...

Page 136: ...134 _____________________...

Page 137: ...be completed by the dealer at the time of the sale DEALER IMPRINT AREA NAME No STREET APT CITY STATE PROVINCE ZIP POSTAL CODE Please verify with your dealer to ensure your vehicle has been registered...

Page 138: ......

Reviews: