background image

70

Replacement

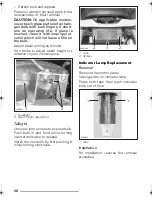
With the chain installed on vehicle,
measure the distance between a span
of 13 links from pin center to pin cen-
ter. Change drive chain if the distance
exceeds the service limits, see an


au-

thorized Bombardier ATV dealer.

A. 403 mm (15-7/8 in)

Drive Chain Slider

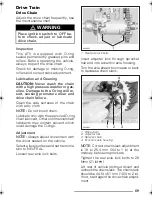
Check the drive chain slider frequently,
see the maintenance chart.

Replace the drive chain slider when it
is worn.

See an authorized Bombardier ATV deal-
er for replacement.

Sprocket and Pinion

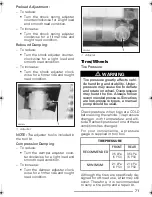
Check the sprocket axle and pinion for
distortion.

1. Good
2. Replace

CAUTION:

Replace chain, sprocket

axle and pinion together to prevent
rapid chain and sprocket wear. In-
stall a new retaining ring each time
the pinion is removed.

Suspension

Inspection

Inspect shock absorber for oil leaks
and fasteners for tightness. See an au-
thorized Bombardier ATV dealer as
necessary.

Adjustment

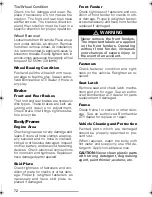
Front Shocks 

Preload Adjustment

Turn the spring clockwise for a firmer
ride and rought road condition.

Turn the spring counterclockwise for a
light load and a smooth road condition.

A. Same length

Rear Shock

V02H01Y

A

V02H02Y

1

2

 WARNING

Adjust the both springs at the
same load. Ensure even adjust-
ment. Uneven adjustment can
cause poor handling and loss of
stability, and/or control, and in-
crease the risk of an accident.

 WARNING

The rear shock includes a damper
unit that contains high pressure
nitrogen gas. 

Do not attempt to

diassemble or dispose of the
damper,

 see an authorized Bom-

bardier ATV dealer.

V02J02Y

A

A

vmo2000_001b.fm Page 70 Friday, September 17, 1999 1:21 PM

Summary of Contents for DS 7404

Page 1: ......

Page 2: ...safety understand and follow all the warnings contained in the Operator s Guide the Safety Handbook and the labels on your vehicle Failure to follow these warnings can result in SEVERE INJURY OR DEAT...

Page 3: ...this guide may be translated into another language In the event of any discrepancy the En glish version shall prevail The information and components system descriptions contained in this document are...

Page 4: ...NSTRUMENTS EQUIPMENTS 40 1 Throttle Lever 42 2 Front Brake Lever 42 3 Clutch Lever 43 4 Parking Lever Lock 43 5 Headlight Switch 44 6 Engine Stop Switch 44 7 Start Button 44 8 Fuel Tank Cap 44 9 Ignit...

Page 5: ...n 56 SPECIAL PROCEDURES 57 Flooded Engine 57 Engine Overheat 57 Post Operation Care 57 Storage and Preseason Preparation 57 MAINTENANCE CHART 58 Noise Emission Control System Regulation 58 Emission Re...

Page 6: ...cle components NOTE Indicates supplementary infor mation needed to fully complete an in struction Although the mere reading of such in formation does not eliminate the haz ard the understanding and ap...

Page 7: ...approved helmet that fits properly You should also wear eye protection goggles or face shield gloves boots long sleeved shirt or jacket and long pants Never consume alcohol or drugs be fore or while...

Page 8: ...d straight uphill Turn the ATV around and remount following the proce dure described in the Operator s Guide and the Safety Handbook Always check for obstacles before operating in a new area Never at...

Page 9: ...HAZARD Operating this ATV without proper instruction WHAT CAN HAPPEN The risk of an accident is greatly increased if the operator does not know how to operate the ATV properly in different situations...

Page 10: ...their age can lead to severe injury or death of the child Even though a child may be within the age group for which an ATV is recommended he or she may not have the skills abilities or judgment neede...

Page 11: ...your ability to balance and control this ATV Could cause an accident resulting in harm to you and or your passenger HOW TO AVOID THE HAZARD Never carry a passenger The long seat is to allow the opera...

Page 12: ...esigned for off road use only not for use on pave ment Paved surfaces may seriously affect handling and control of the ATV and may cause the vehicle to go out of control HOW TO AVOID THE HAZARD Never...

Page 13: ...ds or highways WHAT CAN HAPPEN You can collide with another vehicle HOW TO AVOID THE HAZARD Never operate this ATV on any public street road or highway even a dirt or gravel one In many states it is i...

Page 14: ...ent of an accident Operating without eye protection can result in an accident and increases your chances of a severe injury in the event of an accident Operating without protective clothing increases...

Page 15: ...hol or drugs WHAT CAN HAPPEN Could seriously affect your judgment Could cause you to react more slowly Could affect your balance and perception Could result in an accident HOW TO AVOID THE HAZARD Neve...

Page 16: ...ive speeds WHAT CAN HAPPEN Increases your chances of losing control of the ATV which can result in an accident HOW TO AVOID THE HAZARD Always travel at a speed which is proper for the terrain visibili...

Page 17: ...00A09Q WARNING POTENTIAL HAZARD Failure to inspect the ATV before operating Failure to properly maintain the ATV WHAT CAN HAPPEN Increases the possibility of an accident or equipment damage HOW TO AVO...

Page 18: ...bility to control the ATV or could cause you to lose your balance and fall off the ATV If you remove a foot from the footpegs your foot or leg may come into contact with the rear wheels which could in...

Page 19: ...APPEN You can come upon hidden rocks bumps or holes without enough time to react Could result in the ATV overturning or going out of control HOW TO AVOID THE HAZARD Go slowly and be extra careful when...

Page 20: ...ause loss of traction or vehicle control which could result in an accident including an overturn HOW TO AVOID THE HAZARD Do not operate on excessively rough slippery or loose terrain until you have le...

Page 21: ...control causing a collision or overturn HOW TO AVOID THE HAZARD Always follow proper procedures for turning as described in the Opera tor s Guide and the Safety Handbook Practice turning at low speeds...

Page 22: ...N HAPPEN The vehicle can overturn more easily on extremely steep hills than on level surfaces or small hills HOW TO AVOID THE HAZARD Never operate the ATV on hills too steep for the ATV or for your ab...

Page 23: ...s Guide and the Safety Handbook Always check the terrain carefully before you start up any hill Never climb hills with excessively slippery or loose surfaces Shift your weight forward Never open the t...

Page 24: ...as described in the Operator s Guide and the Safety Handbook NOTE A special technique is required when braking as you go down a hill Always check the terrain carefully before you start down any hill S...

Page 25: ...ered the turning technique as described in the Operator s Guide and the Safety Handbook on level ground Be very careful when turning on any hill Avoid crossing the side of a steep hill if possible Whe...

Page 26: ...eep weight uphill Apply the brakes Lock parking device after you are stopped If you begin rolling backwards Keep weight uphill Never apply the rear brake while rolling backwards Apply the front brake...

Page 27: ...ion Could cause the ATV to overturn HOW TO AVOID THE HAZARD Before operating in a new area check for obstacles Never attempt to ride over large obstacles such as large rocks or fallen trees When you g...

Page 28: ...action unexpectedly which may cause the ATV to overturn HOW TO AVOID THE HAZARD Learn to safely control skidding or sliding by practicing at low speeds and on level smooth terrain On extremely slipper...

Page 29: ...ich could lead to an accident HOW TO AVOID THE HAZARD Never operate this ATV in fast flowing water or in water deeper than that specified in the Operator s Guide and the Safety Handbook Remember that...

Page 30: ...reverse WHAT CAN HAPPEN You could hit an obstacle or person behind you resulting in serious injury HOW TO AVOID THE HAZARD When you select reverse gear make sure there are no obstacles or people behi...

Page 31: ...his ATV or operation of this ATV with improper or uneven tire pressure may cause loss of control and increases the risk of an accident HOW TO AVOID THE HAZARD Always use the size and type tires specif...

Page 32: ...situations could lead to an ac cident HOW TO AVOID THE HAZARD Never modify this ATV through improper installation or use of accesso ries All parts and accessories added to this vehicle should be genu...

Page 33: ...OID THE HAZARD Never exceed the stated load capacity for this ATV Cargo should be properly distributed and securely attached Reduce speed when carrying cargo or pulling a trailer Allow greater dis tan...

Page 34: ...repair or replace at its option all genuine BOMBARDIER part found defective in material and or workmanship under normal use maintenance and service with a genuine BOMBAR DIER part without charge for...

Page 35: ...to modify this warranty at any time being understood that such modification will not alter the warranty conditions applicable to the BOMBARDIER ATV sold while this warranty is in effect 6 TRANSFER If...

Page 36: ...of my vehicle A In the Operator s Guide provided with the vehicle at the time of delivery Q Will the entire warranty be voided or cancelled if I do not operate or maintain my new vehicle exactly as sp...

Page 37: ...and goodwill of the owners of Bombardier products are of primary concern to your ATV dealer and Bombardier Normally any prob lems that arise in connection with the sales transaction or the operation...

Page 38: ...icle identification number in the 8th character detailed herein HANG TAG This ATV comes with a hang tag and labels containing important safety informa tion The labels should be considered as permanent...

Page 39: ...37 LOCATION OF THE IMPORTANT LABELS The following labels are on your ATV If missing or damaged they can be replaced free of charge See an authorized Bombardier ATV dealer 1 V02L02L 6 5 3 2 4 7...

Page 40: ...38 LABEL 1 LABEL 2 LABEL 3 LABEL 4 LABEL 5 LABEL 6 LABEL 7 V01M01Z V01M02Z V02M05Y V02M06Y V01M07Z V02M03Y V02M07Y...

Page 41: ...authorized Bombardier ATV dealer to complete warranty claims properly No warranty will be honored by Bom bardier if the engine identification number EIN or vehicle identification number VIN is remove...

Page 42: ...40 CONTROLS INSTRUMENTS EQUIPMENTS 10 V02L08L 9 19 19 3 5 6 7 16 14 15 16 17 8 1 2 4 11...

Page 43: ...41 14 V02L09L 12 13 16 18 17 19 16 15 14...

Page 44: ...ht side of handlebar When compressed the brake is ap plied When released it should auto matically return to its original position Braking effect is proportional to the force applied on the lever and t...

Page 45: ...is now compressed and applying front brake 1 Parking lever lock 2 To apply parking device To release mechanism Squeeze front brake lever Lever lock should automat ically return to its original positi...

Page 46: ...be stopped by the engine stop button 1 Engine stop switch 7 Start Button Located on left side of handlebar To start engine Place the engine stop switch to RUN Select transmission to the NEU TRAL posit...

Page 47: ...f ter restarting engine If lamp stays ON stop engine and see an authorized Bombardier ATV dealer CAUTION Failure to stop the engine immediately after RED engine indi cator lamp comes ON will adversely...

Page 48: ...arshift Pedal Located in front of left footpeg 1 Gearshift pedal 14 Storage Compartment Located on back of air box under seat 1 Storage compartment 2 Air box Tool Box Located in storage compartment Th...

Page 49: ...seat front tab into body hook Pull latch lever to insert it over the rear lock pin Release latch lever then firmly push on rear of the seat to relatch 1 Seat tab 2 Body hook 16 Footpeg Located on bot...

Page 50: ...ition of the terrain 18 Rear Brake Fluid Reservoir Located near the right rear fender 1 Rear brake fluid reservoir 19 Engine Transmission Oil Tank Cap Located on LH of control panel 1 Engine transmiss...

Page 51: ...components CAUTION Never mix oil with fuel This ATV has a 4 stroke engine Oil must be added to oil tank only Fuel Level Engine Transmission Oil Recommended Oil Always use 4 stroke mineral based engin...

Page 52: ...l use Other viscosity should be used if the average temperature is outside the range of the recommended oil See chart below SAE 5W30 SAE 10W30 SAE 10W40 SAE 15W40 SAE 15W50 SAE 20W50 C F 60 50 40 30 2...

Page 53: ...ze Coolant Level 1 Coolant reservoir 2 Radiator 3 RH front shock With vehicle on a level surface liquid should be between MIN and MAX level marks of coolant reservoir NOTE When checking level at tem p...

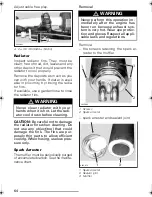
Page 54: ...intenance Cleaning Clean battery post with a wire brush Apply dielectric grease on post to pro tect against oxidation Removal Disconnect negative BLACK cable first then positive cable Remove bolts ret...

Page 55: ...in Continued wide open throttle acceler ations prolonged cruising speeds and engine overheating are detrimental during the break in period 10 Hour Inspection As with any precision piece of me chanical...

Page 56: ...nd adjustment Check sprockets for wear and dam ages Check fuel oil and coolant levels Check for oil leaks on the engine transmission and oil tank Ensure fuel valve is in fully open po sition ON Clean...

Page 57: ...ld until engine starts CAUTION Do not hold start button more than 4 seconds A rest period should be observed between the cranking cycles to let starter cool down Pay attention not to discharge battery...

Page 58: ...Control To shift the transmission pull in the clutch lever then operate gearshift pedal as follow One full stroke of the pedal shifts the transmission to the next higher or low er gear in the shifting...

Page 59: ...vehicle moving to supply air to radiator If engine is still overheating after ap proximately one minute stop vehicle and set transmission to NEUTRAL Ap ply parking device and stop engine Inspect radia...

Page 60: ...turing of the muffler or any engine component which conducts removal of engine exhaust gases 2 Removal or alteration or the puncturing of any part of the intake system 3 Replacing any moving parts of...

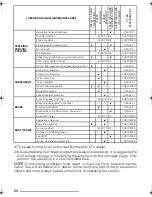
Page 61: ...s CUSTOMER Clutch and transmission operation DEALER Clutch lever adjustment DEALER FUEL SYSTEM Air filter cleaning draining CUSTOMER Air filter and foam replacement CUSTOMER Fuel lines and connections...

Page 62: ...EVERY RIDE CUSTOMER Choke condition EVERY RIDE CUSTOMER Steering system mechanism DEALER Tie rod ends DEALER Tire pressure EVERY RIDE CUSTOMER Wheel mount tightness and stud lubrication CUSTOMER Wear...

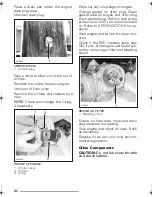
Page 63: ...be done with a warm engine Ensure vehicle is on a level surface Remove dipstick Clean the drain plug area Drain all oil from oil tank by removing the rubber hose on the engine Wipe out any oil spilla...

Page 64: ...n gasket area on engine and drain plug then reinstall plug Refill oil tank at the proper level with the recommended oil Refer to SPECIFICATIONS for ca pacity Start engine and let idle for a few min ut...

Page 65: ...adjustment Insufficient clearance will cause loss of power and possibly damage the valves Excessive clearance will cause noise Throttle Lever Adjustment Slide rubber protector back to expose throttle...

Page 66: ...ns are pur posely thin parts to allow efficient cooling When hosing use low pres sure only Spark Arrester The muffler must be periodically purged of accumulated carbon See the mainte nance chart Remov...

Page 67: ...aning Draining Periodically inspect air filter box drain plug for water or deposits 1 Air filter box 2 Drain plug 3 Clamp NOTE If vehicle is used in dusty area inspect more frequently than specified i...

Page 68: ...ssure airgun Blow com pressed air backward of operating air flow If air filter element or foam is dirty re place with a new one Air Filter Installation Properly reinstall removed parts in the reverse...

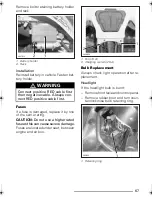
Page 69: ...ere damage Fuses are located under seat between engine and air box 1 Fan 15 A 2 Charging system 25 A Bulb Replacement Always check light operation after re placement Headlight If the headlight bulb is...

Page 70: ...s Turn knobs to adjust beam height ori entation to your convenience 1 Headlight 2 Beam height adjustment Taillight Unscrew lens screws to expose bulb Push bulb in and hold while turning counterclockwi...

Page 71: ...in solvent which could damage the O rings Adjustment NOTE Always adjust drive chain with the driver seated on the vehicle Select a level surface and set transmis sion to NEUTRAL Loosen rear axle lock...

Page 72: ...In stall a new retaining ring each time the pinion is removed Suspension Inspection Inspect shock absorber for oil leaks and fasteners for tightness See an au thorized Bombardier ATV dealer as necessa...

Page 73: ...e for a firmer ride and rought road condition 1 Adjuster Tires Wheels Tire Pressure Check pressure when tires are COLD before using the vehicle Tire pressure changes with temperature and alti tude Rec...

Page 74: ...Check electrical connections for corrosion and tightness Replace or have damaged parts repaired Skid Plate Check tightness of fasteners and con dition of plate for cracks or other dam age Properly ret...

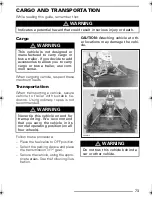
Page 75: ...the appro priate areas See the following illus tration CAUTION Attaching vehicle at oth er locations may damage the vehi cle WARNING Indicates a potential hazard that could result in serious injury o...

Page 76: ...to ON also try on RES A failure of the fuel pump or carburetor may have occurred Contact an authorized Bombardier ATV dealer 4 Spark plug ignition no spark Check ignition fuse condition Remove spark...

Page 77: ...lean verify spark plugs and heat range Replace as required 2 Water in fuel Drain fuel system and refill with fresh fuel SYMPTOM Vehicle cannot reach full speed Possible causes What to do 1 Engine See...

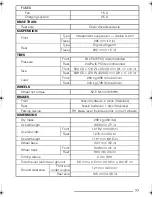
Page 78: ...eeds constant mesh transmission COOLING Type Liquid cooled with integrated water pump Radiator Front mounted with thermostatic fan CARBURETION Carburetor make and type Mikuni BSR42 Constant depression...

Page 79: ...Rear 340 kg 748 lb maximum WHEELS Wheel nut torque 52 5 N m 39 lbf ft BRAKES Front Nissin hydraulic 2 discs Stainless Rear Nissin hydraulic 1 disc Stainless Parking device RH brake lever includes a lo...

Page 80: ...l type engine and transmission SAE 10W40 4 stroke mineral based engine oil API classification SH or SJ Do not use synthetic or synthetic blend oil Coolant Ethyl glycol water mix 60 coolant 40 water Us...

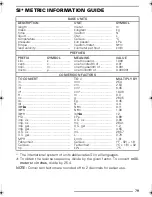
Page 81: ...ilo pascal newton meter kilometer per hour SYMBOL m kg N L C kPa N m km h PREFIXES PREFIX kilo centi milli micro SYMBOL k c m MEANING one thousand one hundredth of one thousandth of one millionth of V...

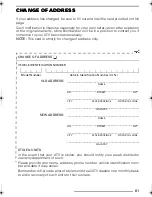
Page 82: ...___________ VEHICLE IDENTIFICATION NUMBER V I N ________________________________ ENGINE IDENTIFICATION NUMBER E I N ________________________________ IDENTIFICATION NUMBER E I N _______________________...

Page 83: ...T APT ______________________________________________ CITY STATE PROVINCE ZIP POSTAL CODE ______________________________________________ COUNTRY NEW ADDRESS ____________________________________________...

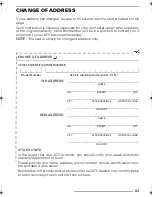
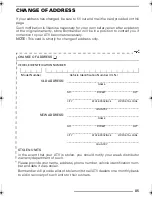
Page 84: ...CHANGE OF ADDRESS N OTE This card is strictly for change of address only CHANGE OF ADDRESS AFFIX PROPER POSTAGE BOMBARDIER Recreational Products ATV Warranty Valcourt Quebec Canada J0E 2L0...

Page 85: ...NO STREET APT ______________________________________________ CITY STATE PROVINCE ZIP POSTAL CODE ______________________________________________ COUNTRY NEW ADDRESS ___________________________________...

Page 86: ...CHANGE OF ADDRESS N OTE This card is strictly for change of address only CHANGE OF ADDRESS AFFIX PROPER POSTAGE BOMBARDIER Recreational Products ATV Warranty Valcourt Quebec Canada J0E 2L0...

Page 87: ...NO STREET APT ______________________________________________ CITY STATE PROVINCE ZIP POSTAL CODE ______________________________________________ COUNTRY NEW ADDRESS ___________________________________...

Page 88: ...CHANGE OF ADDRESS N OTE This card is strictly for change of address only CHANGE OF ADDRESS AFFIX PROPER POSTAGE BOMBARDIER Recreational Products ATV Warranty Valcourt Quebec Canada J0E 2L0...

Page 89: ...NO STREET APT ______________________________________________ CITY STATE PROVINCE ZIP POSTAL CODE ______________________________________________ COUNTRY NEW ADDRESS ___________________________________...

Page 90: ...CHANGE OF ADDRESS N OTE This card is strictly for change of address only CHANGE OF ADDRESS AFFIX PROPER POSTAGE BOMBARDIER Recreational Products ATV Warranty Valcourt Quebec Canada J0E 2L0...

Page 91: ...WARNING Indicates a potential hazard that could result in serious injury or death...

Page 92: ......

Reviews: