background image

Post-Operation Care

When vehicle is used in saltwater envi-
ronment (beach area, launching/load-
ing boats etc.), rinsing the vehicle with
fresh water is necessary to preserve
vehicle and its components. Metal-
lic parts lubrication is highly recom-
mended. Use BOMBARDIER LUBE
(P/N 293 600 016) or an equivalent.
This must be performed at the end of
each operating day.

When vehicle is operated in muddy
conditions, rinsing the vehicle is rec-
ommended to preserve vehicle and its
components and to keep lights clean.

Emergency Shifter

Traxter MAX 5 SPEED

If the shifting system is not opera-
tional, you may use the emergency
shifter.

It allows transmission gear

change when the vehicle is not in mo-
tion. You set the desired gear once
then go back home while the trans-
mission remains in this gear. No gear
change can take place since the shift-
ing system is not operational. The
shifter shaft end is located on rear
side of engine.

Place transmission on PARK position.

Remove seat.

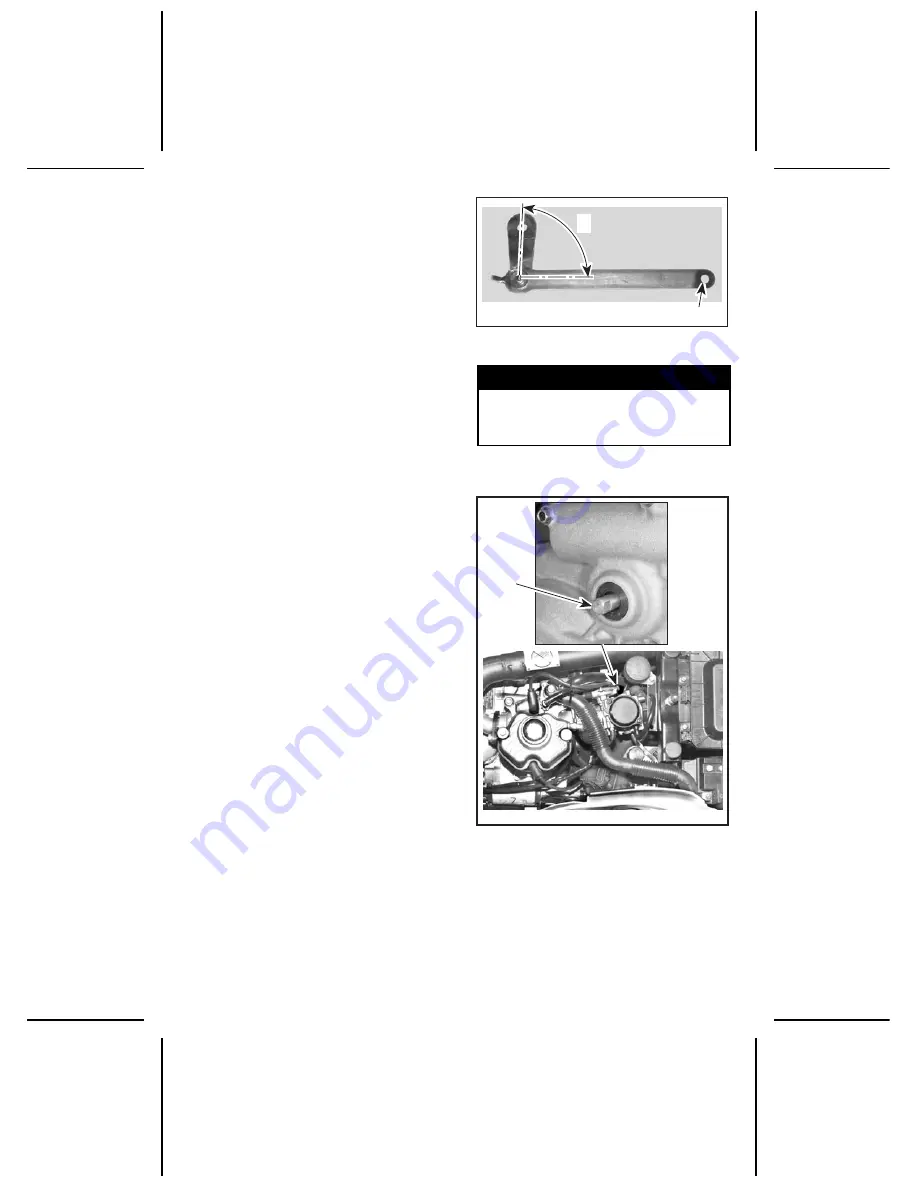
Use the special key in the tool box to
rotate the emergency shifter. Open
the tab of the tool approximately at
a right angle (90°). Insert the screw-
driver included in the tool box at the
end of the special tool so that it can
be used as a handgrip.

V01B02Y

1

A

1. Insert the screwdriver here as a handgrip
A. Open tab at a right angle (90°)

WARNING

The exhaust pipe can be very hot.
Wear gloves and/or allow exhaust
pipe to cool.

Insert the tool to the end of the shifter
shaft.

V01C22Y

1

1. Emergency shifter shaft. Insert

special tool here

Pull special tool upward to downshift
and push downward to upshift. Place
the gear in the desired position.

_____________________

119

Summary of Contents for traxter max series

Page 1: ...vmo2005 traxter max ang FH8 Fri Jul 09 10 20 19 2004 Page 1 C M Y CM MY CY CMY K ...

Page 2: ...or s Guide with the vehicle at all times WARNING Disregarding any of the safety precautions and instructions contained in this Operator s Guide Safety Videocassette and on product labels could cause injury including the possibility of death All safety documentation should remain with the vehicle at the time of sale All content of the Safety Information section should be interpreted by the reader a...

Page 3: ... masculine is used to denote the masculine or feminine The information and components sys tem descriptions contained in this document are correct at the time of publication Bombardier Recreational Products Inc however maintains a policy of continuous improvement of its products without imposing upon itself any obligation to install them on products previously manufactured Due to late changes some ...

Page 4: ...Check 44 Clothing 45 Carrying Loads Passenger 46 Hauling a Trailer 46 Working with your Vehicle 46 Recreational Riding 47 Environment 47 Design Limitation 47 Off Highway Operation 48 General Operating and Safety Precautions 48 Uphill Driving 49 Downhill Driving 49 Side Hilling 49 Drop Off 49 Riding Techniques 50 Routine Maintenance 57 HANG TAG 58 LOCATION OF THE IMPORTANT LABELS 59 SAFETY TRAINING...

Page 5: ...ever 88 4 Brake Lever Lock 89 5 Transmission Lever 89 6 Multi Function Switch 91 7 Indicator Lights Cluster 94 8 Speedometer 95 9 Rear Passenger s Grab Handles 97 10 Ignition Switch 97 11 Choke Knob Lever 98 12 Auxiliary Headlamp 99 13 Fuel Tank Cap 99 14 Fuel Gauge 99 15 Fuel Valve 99 16 Rear Brake Pedal 100 17 Rewind Starter Handle 101 18 Footpeg 101 19 Storage Compartment 101 20 Tool Box 102 21...

Page 6: ...the Transmission 116 Winch Operation 117 SPECIAL PROCEDURES 118 Flooded Engine 118 Engine Overheat 118 Turn Over 118 ATV Immersion 118 Post Operation Care 119 Emergency Shifter 119 Storage and Preseason Preparation 120 CARGO AND TRANSPORTATION 121 Cargo 121 Hauling a Trailer 122 Transportation 122 MAINTENANCE INFORMATION MAINTENANCE CHART 126 MAINTENANCE 129 Engine Transmission 129 Carburetor 133 ...

Page 7: ...NAL METRIC INFORMATION GUIDE 160 WARRANTY BRP LIMITED WARRANTY NORTH AMERICA 2005 BOMBARDIER ATV 162 BRP INTERNATIONAL LIMITED WARRANTY 2005 BOMBARDIER ATV 166 PRIVACY OBLIGATION DISCLAIMER 170 CHANGE OF ADDRESS OWNERSHIP 171 ______________________ 5 ...

Page 8: ...lt in serious injury or death CAUTION Denotes an instruc tion which if not followed could severely damage vehicle compo nents NOTE Indicates supplementary infor mation needed to fully complete an in struction Although the mere reading of such in formation does not eliminate the haz ard the understanding and application of the information will promote the correct use of this vehicle To fully apprec...

Page 9: ... from time to time and from season to season Riding on sand is different than riding on snow or through forests or marshes Each location may re quire a greater degree of awareness and skill may not be suitable with a passenger Show good judgement Always proceed with caution Please do not take any unnecessary risks that could leave you or your passenger stranded or possibly injured The vehicle hand...

Page 10: ...SAFETY INFORMATION ____________ SAFETY INFORMATION ____________ 9 ...

Page 11: ...Passenger The passenger should be 12 years old or more and must be capable of keeping his feet on footrests and his hands on grab handles at all times when he is seated on this vehicle Passenger should always hold on to rear passenger grab handles Never hold on to the operator Passenger should pay attention to vehicle and operator movements Passenger should always wear the appropriate protective g...

Page 12: ...ed when riding with a passenger Allow greater distance for braking Never operate this vehicle on any paved surfaces including sidewalks drive ways parking lots and streets Never operate this vehicle on any public street road or highway even a dirt or gravel one Never take place on this vehicle without wearing an approved helmet that fits properly The operator and the passenger should also wear eye...

Page 13: ...Shift operator and passenger weight backward Never go down a hill at high speed Avoid going down a hill at an angle that would cause the vehicle to lean sharply to one side Go straight down the hill where possible Always keep in mind that you are carrying a passenger Always follow proper procedures for crossing the side of a hill as described further in this Operator s Guide Avoid hills with exces...

Page 14: ...ires specified further in this Operator s Guide Always maintain proper tire pressure as described further in this Operator s Guide Never modify this vehicle through improper installation or use of accessories Only use BRP s approved accessories Do not install passenger s seats or use the racks to carry more than one passenger Never exceed the stated load limits for this vehicle including operator ...

Page 15: ...roper instruction WHAT CAN HAPPEN The risk of an accident is greatly increased if the operator does not know how to operate this vehicle properly in different situations and on different types of terrain with or without passenger HOW TO AVOID THE HAZARD Beginning and inexperienced operators should complete the training course offered by BRP They should then regularly practice the skills learned in...

Page 16: ...o severe injury or death of the child Even though a child may be within the age group for which this vehicle is recommended he may not have the skills abilities or judgment needed to operate this vehicle safely and may be involved in a serious accident HOW TO AVOID THE HAZARD No one under 16 should operate this vehicle ____________ SAFETY INFORMATION ___________ 15 ...

Page 17: ...2 should be riding on this vehicle WARNING POTENTIAL HAZARD Failure to respect the physical limitations of the passenger WHAT CAN HAPPEN A passenger that cannot completely lean his feet on footrests can be ejected when riding on uneven terrain HOW TO AVOID THE HAZARD The passenger must be capable of keeping his feet on the footrests and his hands on grab handles at all time when he is seated on th...

Page 18: ...ident resulting in harm to you and or your passengers HOW TO AVOID THE HAZARD Never carry more than one passenger Even with a long seat that provides unrestricted operator movement the vehicle is not designed nor intended to carry more than one 1 operator and one 1 passenger The passenger must use the designated passenger s seat when he is seated on the vehicle ____________ SAFETY INFORMATION ____...

Page 19: ...seat could impair vehicle stability which could lead to a loss of control suffer injury from impact on hard surfaces Could cause an accident resulting in harm to you and or your passenger HOW TO AVOID THE HAZARD Passenger must always remain seated on designated passenger s seat with feet firmly planted on footrests and always hold on to the grab handles 18 ___________ SAFETY INFORMATION __________...

Page 20: ... use only not for use on pavement Paved surfaces may seriously affect handling and control of the vehicle and may cause the vehicle to go out of control HOW TO AVOID THE HAZARD Never operate this vehicle on any paved surfaces including sidewalks driveways parking lots and streets ____________ SAFETY INFORMATION ___________ 19 ...

Page 21: ... CAN HAPPEN You can collide with another vehicle HOW TO AVOID THE HAZARD Never operate this vehicle on any public street road or highway even a dirt or gravel one In many states it is illegal to operate this vehicle on public streets roads and highways 20 ___________ SAFETY INFORMATION ___________ ...

Page 22: ... or death in the event of an accident riding without eye protection can result in an accident and increases the chances of a severe injury in the event of an accident riding without protective clothing increases the chances of severe in jury in the event of an accident HOW TO AVOID THE HAZARD Always wear an approved helmet that fits properly You should also wear eye protection goggles or face shie...

Page 23: ...seriously affect your judgment Could cause you to react more slowly Could affect your balance and perception Could result in an accident or death of passenger and or operator HOW TO AVOID THE HAZARD The operator and the passenger should never consume alcohol or drugs before or while riding this vehicle 22 ___________ SAFETY INFORMATION ___________ ...

Page 24: ...ccident HOW TO AVOID THE HAZARD Always travel at a speed which is proper for the terrain visibility and op erating conditions and your experience The vehicle handling stability and braking distance may be affected when riding with a passenger Safely reduce speed when riding with a passen ger Allow greater distance for braking ____________ SAFETY INFORMATION ___________ 23 ...

Page 25: ...d other stunts WHAT CAN HAPPEN Increases the chance of an accident for the operator and the passenger including an overturn HOW TO AVOID THE HAZARD Never attempt stunts such as wheelies or jumps Do not try to show off 24 ___________ SAFETY INFORMATION ___________ ...

Page 26: ...e inspection and maintenance procedures and schedules described further in this Operator s Guide WARNING POTENTIAL HAZARD Riding on frozen waterways WHAT CAN HAPPEN Severe injury or death can result if the vehicle and or operator and or pas senger break through the ice HOW TO AVOID THE HAZARD Never ride this vehicle on a frozen surface before you are sure the ice is thick enough and sound enough t...

Page 27: ...control the vehicle or could cause you to lose your balance and fall off the vehicle If you remove a foot from the footrests your foot or leg may come into contact with the rear wheels which could injure you or cause an accident HOW TO AVOID THE HAZARD Operator and passenger must always keep both hands on the handlebars or on grab handles and both feet on the footrests during vehicle operation 26 ...

Page 28: ...result in the vehicle overturning passenger ejection or loss of con trol HOW TO AVOID THE HAZARD Go slowly and be extra careful when operating on unfamiliar terrain Always be alert to changing terrain conditions when operating the vehicle Do not forget the operator is responsible for the safety of his passenger Safely reduce speed when riding with a passenger ____________ SAFETY INFORMATION ______...

Page 29: ...n or passenger ejection HOW TO AVOID THE HAZARD Do not operate on excessively rough slippery or loose terrain until you have learned and practiced the skills necessary to control this vehicle on such terrain Always be especially cautious on these kinds of terrain Do not forget the operator is responsible for the safety of the passenger In doubt disembark him before operating on these terrains 28 _...

Page 30: ...described further in this Operator s Guide Practice turning at low speeds before attempting to turn at faster speeds Do not forget the operator is responsible for the safety of the passenger Never perform this maneuver with a passenger Always remember that the vehicle handling stability and braking distance may be affected when riding with a passenger Do not turn at excessive speed ____________ SA...

Page 31: ...ever operate this vehicle on hills too steep for the vehicle or for your abil ities Practice without and with passenger on smaller hills before attempting larger hills Always remember that even if this vehicle can climb some steep hills it is not recommended to climb such hills with a passenger always disembark him before attempting this maneuver Show good judgement 30 ___________ SAFETY INFORMATI...

Page 32: ...r the safety of the passenger In doubt disembark him before climbing hill Always remember that the vehicle handling stability and braking distance may be affected when riding with a passenger Never climb hills with excessively slippery or loose surfaces Shift operator and passenger weight forward Never open the throttle suddenly or make sudden gear changes The ve hicle could flip over backwards Ne...

Page 33: ...efully before you start down any hill Do not forget the operator is responsible for the safety of the passenger In doubt disembark him before climbing hill Always remember that the vehicle handling stability and braking distance may be affected when riding with a passenger Shift operator and passenger weight backward The passenger must hold the grab handles firmly Never go down a hill at high spee...

Page 34: ...t to turn the vehicle around on any hill until you have mas tered the turning technique as described further in this Operator s Guide on level ground Be very careful when turning on any hill Avoid crossing the side of a steep hill if possible When crossing the side of a hill Always follow proper procedures as described further in this Operator s Guide Avoid hills with excessively slippery or loose...

Page 35: ...pped First disembark the passenger then dismount on uphill side or to a side if pointed straight uphill If you begin rolling backwards Operator and passenger must keep their weight uphill Never open the throttle suddenly or make sudden gear changes The ve hicle could flip over backwards Never apply the rear brake while rolling backwards Apply the front brake gradually When fully stopped apply rear...

Page 36: ...f the passenger In doubt dis embark him before riding over obstacles Always remember that the vehi cle handling and stability may be affected when riding with a passenger Before operating in a new area check for obstacles Never attempt to ride over large obstacles such as large rocks or fallen trees When you go over obstacles always follow proper procedures as de scribed further in this Operator s...

Page 37: ...HAZARD Never attempt this maneuver with passenger Always remember that this vehicle handling and stability may be affected when riding with a passen ger Learn to safely control skidding or sliding by practicing at low speeds and on level smooth terrain On extremely slippery surfaces such as ice go slowly and be very cautious in order to reduce the chance of skidding or sliding out of control 36 __...

Page 38: ...er or in water deeper than that specified further in this Operator s Guide Check water depth and current before you attempt to cross any water Wa ter should not go above footrests Remember that wet brakes may have reduced stopping ability Test your brakes after leaving water If necessary apply them several times to let friction dry out the pads Do not forget allow greater distance for braking when...

Page 39: ...or person behind the vehicle resulting in serious injury HOW TO AVOID THE HAZARD When you select reverse gear make sure there are no obstacles or people behind the vehicle When it is safe to proceed go slowly Take account that the passenger can obstruct your view 38 ___________ SAFETY INFORMATION ___________ ...

Page 40: ...eration of this vehicle with im proper or uneven tire pressure may cause loss of control and increases the risk of an accident HOW TO AVOID THE HAZARD Always use the size and type of tires specified further in this Operator s Guide for this vehicle Always maintain proper tire pressure as described further in this Opera tor s Guide ____________ SAFETY INFORMATION ___________ 39 ...

Page 41: ...n acci dent HOW TO AVOID THE HAZARD Never modify this vehicle through improper installation or use of acces sories All parts and accessories added to this vehicle should be approved by BRP and should be installed and used according to instructions If you have questions consult an authorized Bombardier ATV dealer Do not install passenger seats or use the racks to carry more than one pas senger 40 _...

Page 42: ...exceed the stated load capacity for this vehicle including operator and passenger as well as other loads and added accessories Cargo should be properly distributed and securely attached Reduce speed when carrying cargo or pulling a trailer Allow greater dis tance for braking Always follow the instructions in this Operator s Guide for carrying cargo or pulling a trailer ____________ SAFETY INFORMAT...

Page 43: ... HAPPEN This can cause serious injury or death HOW TO AVOID THE HAZARD Never transport inflammable or dangerous material While reading this Operator s Guide remember that WARNING Indicates a potential hazard that if not avoided could result in serious in jury or death 42 ___________ SAFETY INFORMATION ___________ ...

Page 44: ...ry includ ing death Become completely familiar with the operational controls and the general oper ation of the vehicle before venturing into off road conditions Practice driving in a suitable area free of hazards and feel the response of each control Drive at low speeds Higher speeds require greater experience knowledge and suitable riding conditions The vehicle handling stability and braking dist...

Page 45: ... for oil leaks on the en gine transmission and drive train components Ensure fuel valve is in fully open position ON Clean headlamps and taillight Ensure front storage cover com partment is properly latched Ensure seat is properly latched If you transport cargo respect load capacity Ensure cargo is properly secured to the racks If you are pulling a trailer or other equipment ensure it respects the...

Page 46: ...tection from some of the minor hazards you may encounter en route Op erator and passenger must never wear loose clothing such as a scarf that may get entangled in the vehicle or on tree branches and shrubs Depending on con ditions anti fogging goggles or sunglasses may be required Different colored lenses available for goggles or sunglasses help you distinguish terrain variations Sunglasses should...

Page 47: ...that its hitch is compatible with the one on the vehicle Make sure the trailer is horizontal with the vehicle In some instances a special extension may have to be installed on the vehicle hitch Use security chains to secure the trailer with the vehicle This vehicle may require additional stopping distance if hauling heavy loads es pecially on inclined surfaces and when a passenger is on board Be c...

Page 48: ...e a consideration Environment One of the benefits of this vehicle is that it can take you off the beaten path away from most communities However you should always respect nature and the rights of others to enjoy it Do not ride in environmentally sensitive areas Do not drive over forest crops or shrubs nor cut down trees or take down fencing nor spin your wheels and destroy the terrain Tread Lightl...

Page 49: ... particular piece of terrain always choose an alternate route In off road operation power and traction not speed are important Never drive faster than visibility and your own ability to select a safe route permit Constantly watch the terrain ahead for sudden changes in slopes or obstacles such as rocks or stumps that may cause loss of stability resulting in tipover or rollover The vehicle handling...

Page 50: ...re steeper than it can safely descend There fore it is essential to assure that a safe route exists to descend a slope before you climb it Decelerating while negotiating a slippery downhill slope could toboggan the vehicle Maintain steady speed and or accelerate slightly to regain control Side Hilling Whenever possible such operation should be avoided If necessary do so with extreme caution Always...

Page 51: ...rongly advised that you keep your hands on the handlebar and within easy reach of all controls The same holds true for your feet To minimize the possibility of any leg or foot injury keep your feet on the footrests at all times Do not direct your toes outwards nor place your foot out to assist turning as they can be hit or snagged by passing obstacles or may contact the wheels Your passenger must ...

Page 52: ...vel on side walks They are designated for pedestrian use Water can be a unique hazard If it is too deep the vehicle may float and topple Check the water depth and current before you attempt to cross any water Water should not go above the footrest Be wary of slippery surfaces such as rocks grass logs etc both in the water and on its banks A loss of traction may occur Do not attempt to enter the wa...

Page 53: ...me basic precautions that should be observed Wet deep or fine sand snow may create a loss of traction and cause the vehicle to slide drop off or become bogged down If this occurs look for a firmer base Again the best advice is to slow down and be watchful of the conditions When you ride with a passenger drive slowly When riding in sand dunes it is advisable to equip the vehicle with an antenna typ...

Page 54: ...er and in doubt disembark the passenger before getting through the obstacles Small rocks or fallen trees may be safely crossed approach at a 90 angle Stand on the footrests while keeping your knees flexed Adjust speed without losing momentum and do not gun the throttle Hold handlebar firmly Place your body weight rearwards and proceed Do not try to lift the vehicle front wheels off the ground Be a...

Page 55: ... vehicle begins to roll backwards apply the brake being careful not to slide Dismount passenger first then use the U turn or K turn while walking back next to the vehicle on the up hill side and with a hand on the brake lever slowly back the rear of the vehicle toward the top of the hill then drive downhill Always walk or dismount on the upside of the slope while keeping clear of the vehicle and i...

Page 56: ...ability and braking distance may be affected when riding with a passenger If you decide to keep your passenger the passenger must synchronize its move ments with yours Keep your body weight rearwards Apply the brake gradually to prevent skidding Do not coast down the slope using solely engine compression or in neutral gear V00A1YL ____________ SAFETY INFORMATION ___________ 55 ...

Page 57: ...ynchronize its move ments with yours This is one of the most risky types of riding since it may drastically change the balance of the vehicle It should be avoided wherever possible If it is necessary to do so however it is important that the operator and the passenger ALWAYS keep their body weight on the upside of the slope and be prepared to dismount on that side should the vehicle begin to toppl...

Page 58: ... speed and performance may violate the terms and conditions of your vehicle limited warranty In addition certain modifi cations including the removal of engine or exhaust components are illegal under most laws Changing the wheel and or tire size may affect the stability of the vehicle Incor rect tire pressure may lead to blow outs or cause a tire to move around on its rim and become lost or damage...

Page 59: ...e comes with a hang tag and labels containing important safety infor mation Any person who rides this vehicle should read and understand this information before riding V00M0BL 58 ___________ SAFETY INFORMATION ___________ ...

Page 60: ...ed they can be replaced free of charge See an authorized Bombardier ATV dealer NOTE The following illustrations used in this Operator s Guide are a general representation only Your model may differ Traxter MAX CVT V04M0LL 1 10 3 2 12 5 6 11 9 8 7 4 ____________ SAFETY INFORMATION ___________ 59 ...

Page 61: ...Traxter MAX 5 SPEED V01M16L 1 2 12 5 6 11 9 8 7 4 3 60 ___________ SAFETY INFORMATION ___________ ...

Page 62: ...Label 1 V00M0CY Label 2 V01M0RY Label 3 V01M03Z Label 4 V01M0SY Label 5 V01M0TY Label 6 V00M05Y Label 7 V00M04Y ____________ SAFETY INFORMATION ___________ 61 ...

Page 63: ...V00M0EY Label 10 V04M08Y Label 11 V00M0AY ALL MODELS EXCEPT THOSE SOLD IN CANADA AND IN USA Label 12 6442 644 0cc V04M0PY TRAXTER MAX CVT 4982 497 70cc V00M09Y TRAXTER MAX 5 SPEED 62 ___________ SAFETY INFORMATION ___________ ...

Page 64: ...SAFETY TRAINING _____________ SAFETY TRAINING ____________ 63 ...

Page 65: ...f the training course is required to com plete the sale of the 2 UP vehicle The 2 UP vehicle allows you to ride with one passenger Remember you should never allow passengers on an ATV not specifically designed for such use Sections Covered 1 General Safety Information 2 Bombardier 2 UP vehicle Safety Videocassette 3 Operator s Guide Review 4 Hands on Riding Time Required As required depending on t...

Page 66: ... Why you and your passenger should not use alcohol or drugs prior to operating your vehicle 5 Why you should not ride on paved surfaces B CPSC Statistics The CPSC has published statistics of injury and death suffered by rid ers of ATVs during the last 5 years January 1997 December 2001 1 417 200 ATV related injuries 2 1 463 ATV related deaths C Age and Size Requirements for the 2 UP Vehicle No one...

Page 67: ... not attempt maneuvers that ex ceed your ability Always know where you are and where you are going Expected Results Upon completion of this section you should Know the current injury and death statistics as published by the CPSC Know BRP s policy toward drivers under 16 years of age and passen gers under 12 years of age Know what clothing and protective gear should be worn by you and your passenge...

Page 68: ... in safe and proper working order every time you use it Body Posture You and your passenger must position your body weight to lessen the hazard of tipping over You and your pas senger must keep your feet on your respective footrests at all times and your passenger should always hold the grab handles Starting Procedure The proper method for starting the ve hicle Uphill and Downhill Riding The prope...

Page 69: ...p Questions and answers Review of the CPSC injury and death data Review of safety messages such as wearing protective head gear and clothing Expected Results Upon completion of this section you should Know the content of the Bom bardier 2 UP vehicle Safety Video cassette 68 ____________ SAFETY TRAINING ____________ ...

Page 70: ...the Operator s Guide 1 Table of Contents 2 Notice Page 3 Special Safety Messages 4 Operation Warnings 5 Warning Labels 6 Vehicle Identification Number 7 Controls Instruments Equip ment 8 Break In Period 9 Pre Operation Check 10 Operating Instructions 11 Special Procedures 12 Post Operating Care 13 Cargo and Transportation 14 Maintenance Expected Results Upon completion of this section you should B...

Page 71: ...ts 7 elbow pads optional 8 knee pads optional 9 kidney belt optional C Basic Maneuvers Drive the course performing all of the basic maneuvers described in the attached DRIVING MANEUVER LIST without a passenger 1 Dealer representative demon strates each of the maneuvers first 2 You perform the maneuver without passenger after be ing shown how 3 Dealer representative checks off the scoring chart whe...

Page 72: ... the trainee repeat the following minimum number of repetitions Maneuver 1 Starting and stopping practice on a large oval course minimum repe tition once counterclockwise and once clockwise V01A4FY START FINISH 6 m 20 1 1 6 m 20 6 m 20 6 m 20 6 m 20 6 m 20 1 TYPICAL 1 Stop here Maneuver 2 Turning left and right figure 8 s mini mum repetition three times V01A4GY START FINISH 2 1 TYPICAL 1 2 laps or...

Page 73: ...wise V01A4HY START FINISH 1 TYPICAL 1 Reverse range Maneuver 4 Slalom minimum repetition three times V01A4IY START FINISH 1 TYPICAL 1 Finish of last maneuver While reading this Operator s Guide remember that WARNING Indicates a potential hazard that if not avoided could result in serious in jury or death 72 ____________ SAFETY TRAINING ____________ ...

Page 74: ... left right or straight on command 3 Finish of last maneuver 4 Instructor signal panic turnout Maneuver 6 Riding over obstacle minimum rep etition once with left wheels once with right wheels and once with both wheels V01A4KY START FINISH 1 2 1 5 m 5 1 8 m 6 1 2 m 4 TYPICAL 1 Finish of last maneuver 2 Obstacle _____________ SAFETY TRAINING ____________ 73 ...

Page 75: ...FINISH START A 9 m 30 TYPICAL 1 Down 2 Uphill 3 Stop and start here A Traverse Maneuver 8 U turn and K turn minimum repeti tion one time V01A5SY Uphill 2 4 m 8 START FINISH TYPICAL U TURN 2 4 m 8 START FINISH Uphill V01A4MZ TYPICAL K TURN 74 ____________ SAFETY TRAINING ____________ ...

Page 76: ...tion on the 2 UP vehicle safety training course please contact BRP at 1 800 366 6992 in the US or at 1 800 361 9980 in Canada Introduction Each trainee must carefully reads the content of the Customer Safety Training Guide Section I General Safety Information Explain the reason for safety training Discuss CPSC Injury and Death Statistics Discuss Bombardier s age and size recommendations Discuss wh...

Page 77: ... Have the trainee drive the 2 UP vehicle and perform all of the following basic maneuvers 1 Starting and Stopping Starting and stopping practice on a large oval course minimum repetition once counterclockwise and once clockwise Should have a starting area long enough so the operator has enough time to think about the next maneuver before he has to execute it Should incorporate a braking area at le...

Page 78: ...ould be set up to use the hill to practice traversing minimum repetition once each direction If there is no hill available make sure to review the description of the maneuver in the Operator s Guide with the trainee 8 K Turn and U Turn Where there is a hill available of approximately 8 incline or less the course should be set up to use the hill to practice K turns and U turns minimum repeti tion o...

Page 79: ...ion of the maneuver in the Operator s Guide with the trainee 8 K turn and U turn if there is no hill available make sure to review the description of the maneuver in the Operator s Guide with the trainee Instructor comments 9 NOTE The dealer must make a photocopy of this scoring card for his record Signature of 2 UP vehicle Purchaser Signature of dealer representative Date 78 ____________ SAFETY T...

Page 80: ...VEHICLE INFORMATION _____________________ 79 ...

Page 81: ...r to complete war ranty claims properly No warranty will be allowed by Bombardier Inc if the en gine identification number EIN or vehicle identification number VIN is removed or mutilated in any way We strongly recommend that you take note of all the serial numbers on your vehicle and supply them to your insurance company Engine and Vehicle Identification Number Location Traxter MAX CVT V04M0QL 3 ...

Page 82: ...Traxter MAX 5 SPEED V01M19L 1 3 2 TYPICAL 1 EIN Engine Identification Number 2 VIN Vehicle Identification Number 3 Model _____________________ 81 ...

Page 83: ...s conformity in many countries LABEL LOCATION Traxter MAX 5 SPEED Under seat on the RH upper bar of frame Traxter MAX CVT Under seat on the LH upper bar of frame V00M02Y USA AND CANADA V00M03Y OTHER COUNTRIES IN THE WORLD 82 ______________________ ...

Page 84: ...ructions supplied A noncompliance Red Label as well as a Green Label is obtained annually during California Vehicle registration The appropriate label is denoted by the vehicle identification number in the 8th character detailed herein VEHICLE CATEGORY VIN 8TH CHARACTER Non complying Red Label Must denote a C or 3 Complying Green Label Any alphanumeric designation other than a C or 3 _____________...

Page 85: ...TROLS INSTRUMENTS EQUIPMENT NOTE Some controls instruments equipment are optional on some models Traxter MAX CVT V04A1SL 3 4 29 8 19 22 6 15 26 14 10 2 1 13 5 16 29 6 27 24 22 25 84 ______________________ ...

Page 86: ...V04A1TL 9 23 5 21 12 20 28 30 18 16 12 19 23 9 25 21 27 15 18 _____________________ 85 ...

Page 87: ...Traxter MAX 5 SPEED V01A6HL 6 7 8 2 22 5 14 26 10 11 13 1 22 2 24 25 6 29 86 ______________________ ...

Page 88: ...V01A6IL 9 23 21 20 28 30 18 16 12 19 23 25 17 18 19 22 9 27 15 3 4 _____________________ 87 ...

Page 89: ...AY 1 2 3 TYPICAL 1 Throttle lever 2 To accelerate 3 To decelerate 2 Front Brake Lever Located on the right side of handle bar When compressed the brake is applied When released it should au tomatically return to its original posi tion Braking effect is proportional to the force applied on the lever and to the type and condition of the terrain The front brake will have also an effect on rear wheels...

Page 90: ...s not in operation WARNING Always use the brake lever lock and engage the PARK position on the transmission lever when the vehicle is not in operation WARNING Make sure brake lever lock is fully disengaged before operating the ATV When you ride the vehicle brakes that are caused to drag by a con tinuous pressure on the lever may cause damage to the brake system and cause loss of braking capacity a...

Page 91: ...d position while pulling lever upward Do not force lever If unable to shift rock the vehi cle back and forth to move the vehicle and try again V01I06Y 1 N 2 1 Transmission lever 2 To change position CAUTION Always completely stop the vehicle and apply the brake prior to moving the transmission lever All Models P Park This position locks the transmission to help prevent vehicle movement Al ways use...

Page 92: ... Switch Traxter MAX CVT The multi function switch is located on the left side of handlebar V04A1PY 1 1 Multifunction switch The controls located on this multi function switch are Headlamp Switch Located on the top of multi function switch Place headlamp switch to LO for the low beam and taillight Place headlamp switch to HI for the high beam and taillight V04A1JY 3 1 2 1 Headlamp switch 2 Low beam...

Page 93: ... above the engine stop switch V04A1LZ 1 1 Start button To start engine place the engine stop switch to RUN Press and hold the start button Re lease immediately after engine is started Choke Lever Located at bottom of multi function switch This device features a variable lever to ease cold start V04I0EY CHOKE LEVER IN THE OFF POSITION Position OFF is for normal use with a warm engine The full choke...

Page 94: ...ss here to downshift The lower the gear the slower the ve hicle speed and the higher the gear the higher the vehicle speed Vehicle must be running to allow gear change The button must be released then pressed again to perform another gear shift There are 5 gears in high and low gear positions On Traxter MAX 5 SPEED all mod els feature a manual autoshift se lector located beside headlamp dim mer sw...

Page 95: ...y turning ignition key OFF we recom mend the engine be stopped by press ing the start stop switch Headlamp Dimmer Switch Located under the electric gear shift button Toggle type switch It allows selection of headlamp intensity V01I070 1 1 Headlamp dimmer switch 7 Indicator Lights Cluster Traxter MAX 5 SPEED NOTE When first turning switch to ON either position all indicator lights will turn on for ...

Page 96: ...on as possible 8 Speedometer These vehicles are equipped with an electronic speedometer It indicates the speed of the vehicle either in MPH and km h The speedometer is located at the middle of cluster and it is backlit when the ignition switch is turned ON ei ther position V01A66Y 3 4 1 2 TYPICAL 1 Speedometer 2 Display Odometer trip meter hourmeter 3 Display selection button 4 Indicator lamps Cha...

Page 97: ...ator lamp is ON it indicates high intensity is selected on the headlamps NOTE The auxiliary headlamp functions when high intensity is selected AUTO Mode AMBER Traxter 5 SPEED When lit it indicates the vehicle is operating in autoshift mode Engine Temperature RED Traxter CVT When this indicator lamp is ON it indicates the engine is overheating Traxter 5 SPEED Dual function light When indicator ligh...

Page 98: ...andles are located on each side of passenger seat V01A41Y 1 1 2 1 Grab handles 2 Passenger s seat The grab handles must be used by the passenger to hold on firmly during ve hicle operation WARNING Never hold on to the operator Al ways hold the grab handles firmly V01A42Y 10 Ignition Switch Located at bottom of cluster Key operated 3 position switch OFF ON with lights and ON without lights V04A1MY ...

Page 99: ...own If for some reason the engine is not started within approximately 6 min utes the MPEM Multi Purpose Elec tronic Module will shut down to cut all electrical system functions Simply turn the key to OFF then to ON to re gain normal use 11 Choke Knob Lever Traxter MAX 5 SPEED NOTE On Traxter CVT models the choke lever is located at the bottom of multi function switch Located at bottom of cluster T...

Page 100: ...no ticed whistling sound heard when loosening fuel tank cap have ve hicle inspected and or repaired before further operation Fuel is flammable and explosive Never use an open flame to check fuel level Never smoke or allow flame or spark in vicinity Always work in a well ventilated area Never top off the fuel tank before plac ing the vehicle in a warm area As temperature increases fuel ex pands and...

Page 101: ...ion only when the ON supply is empty When down to the reserve refuel as soon as possible Be sure to turn the valve back to the ON position after re fuelling CAUTION Improper opening of fuel valve will restrict the flow of fuel Make sure valve is fully opened while running 16 Rear Brake Pedal Located on the right footrest When pressed down the rear brake is ap plied When released it should return t...

Page 102: ... then pull vigor ously Slowly release handle V01C3LY 1 1 Rewind starter handle 18 Footpeg Located on footrest Use this area to keep your feet stable V04A1RY 1 2 TRAXTER MAX CVT 1 Operator s footpeg 2 Passenger s footpeg V01A43Z 1 2 TRAXTER MAX 5 SPEED 1 Operator s footpeg 2 Passenger s footpeg 19 Storage Compartment Located in front of vehicle Conve nient location to carry personal arti cles such ...

Page 103: ...ded in the tool box are pliers 1 screwdriver 1 open wrench 10 13 mm 1 open wrench 15 17 mm 1 socket wrench 10 13 mm 1 socket wrench 16 18 mm 1 tire pressure gauge 1 Allen key 3 mm 1 fuse 30 A 1 fuse 20 A 1 fuse 15 A 1 21 Seat Latch Located underneath rear end of seat It allows the removal of seat to give access to engine compartment V01A5AY 2 1 1 Seat 2 Seat latch Seat Removal Pull latch upward wh...

Page 104: ...bility and or steering Do not carry passenger s Refer to SPECIFICATIONS for carry ing loads and cargo weight distribution recommendations 23 Air Duct Located on rear fenders They force the flow of air to cool radiator and sup ply air inside air box CAUTION Do not place anything over air intake ducts 24 Trailer Hitch Located on rear axle Convenient hitch to install a ball to tow a trailer or other ...

Page 105: ... key on of cluster V00A2LY 2 1 TYPICAL 1 Protective cap 2 Power outlet Convenient for handheld spotlight or other portable equipment Remove cap to use Always reinstall protective cap after use to protect against weather Do not exceed the rating capacity See SPECIFICATIONS An auxiliary supply is available to connect additional accessories Two wires are hidden in the wiring harness at the rear of ve...

Page 106: ...t side of switch To get wire rope into the winch press the right side of switch Refer to ATV Winch Operator s Man ual for more informations concerning the instructions for use the winch safely 30 Fairlead if so equipped Located on the front skid plate 2 V01A1OZ 1 1 Front skid plate 2 Fairlead The fairlead is used to prevent the damages to the vehicle and guide the wire rope into the winch ________...

Page 107: ...CAUTION Never mix oil with fuel Your ATV has a 4 stroke engine Oil must be added to engine base only Fuel Level WARNING Always stop engine before refu eling Open cap slowly If a dif ferential pressure condition is no ticed whistling sound heard when loosening fuel tank cap have ve hicle inspected and or repaired before further operation Fuel is flammable and explosive under certain conditions Neve...

Page 108: ...AX 5 SPEED Other viscosity should be used if the average temperature is outside the range of the recommended oil See chart below V01A38Y BOMBARDIER SYNTHETIC OIL 5W40 P N 293 600 039 SAE 10W30 SAE 10W40 SAE 15W40 SAE 20W50 C F 60 50 40 30 20 10 10 20 30 0 140 120 100 80 60 40 20 0 20 SAE 5W30 BOMBARDIER SYNTHETIC OIL 5W40 P N 293 600 039 SAE 10W30 SAE 10W40 SAE 15W40 SAE 20W50 C F 60 50 40 30 20 1...

Page 109: ...crew filler cap Traxter MAX 5 SPEED Add a small amount of oil and recheck oil level Repeat until oil level reaches the dip stick s upper mark Do not overfill NOTE Use a funnel to avoid spillage Properly reinstall the dipstick and or tighten filler cap then reinstall seat Engine Coolant Recommended Coolant Always use ethylene glycol antifreeze containing corrosion inhibitors specifi cally for inter...

Page 110: ...order to avoid potential burns do not remove the radiator cap if the engine is hot NOTE A cooling system that fre quently requires coolant is the indica tion of leaks or engine problems See an authorized Bombardier ATV dealer Coolant Replacement Refer to MAINTENANCE section Brake Fluid Recommended Fluid Always use brake fluid meeting the specification DOT 4 only CAUTION To avoid serious dam age to...

Page 111: ...ier ATV dealer Front Brake Fluid Reservoir Turn steering in the straight ahead po sition to ensure reservoir is level Check the brake fluid level the reser voir is full when the fluid reaches of the top of window V04K04Y Visually inspect lever boot condition Check for cracks tears etc Replace if damaged Rear Brake Fluid Reservoir Traxter MAX CVT V04K0RY Traxter MAX 5 SPEED V01K1JY 110 ____________...

Page 112: ...evel surface Check electrolyte level by the rear left inner fender Use a flashlight if neces sary Do not use an open flame The electrolyte should be between lower and upper marks If level is low remove battery from vehicle to add distilled water Refer to MAINTE NANCE for the proper removal refill ing installation procedure _____________________ 111 ...

Page 113: ...equires a break in period of 50 km 30 miles Avoid strong ac celeration deceleration pulling a load or high speed cruising 10 Hour Inspection As with any precision piece of me chanical equipment we suggest that after the first 10 hours 250 km 150 m or 30 days after the pur chase whichever comes first your vehicle be inspected by an authorized Bombardier ATV dealer This inspec tion will give you the...

Page 114: ...l leaks on the en gine transmission and drive train components Ensure fuel valve is in fully open position ON Clean headlamps and taillight Ensure front storage cover com partment is properly latched Ensure seat is properly latched If you transport cargo respect load capacity Ensure cargo is properly secured to the racks If you are pulling a trailer or other equipment ensure it respects the tongue...

Page 115: ...X 5 SPEED The engine can be started in any gear from 1 to 5 To start engine insert key in ignition switch and turn to ON then press the start stop switch Initial Cold Starting Insert key in ignition switch and turn to ON In cold weather colder than 0 C 32 F place the choke lever in full position 1 V04I0FZ TRAXTER MAX CVT 1 Full choke position V01A6AZ 1 TRAXTER MAX 5 SPEED 1 Full choke position NOT...

Page 116: ...ever to OFF and release brakes V04I0EZ 1 TRAXTER MAX CVT 1 OFF position V01A69Z 1 TRAXTER MAX 5 SPEED 1 OFF position Warm Engine Starting Start the engine as explained above but without the choke If the engine will not start after two 5 second at tempts with the electric starter place the choke lever between the FULL and the OFF position Start the engine without activating the throttle lever After...

Page 117: ...hen the transmission lever is en gaged in the park position Shift to 1st gear for the Traxter MAX 5 SPEED Release brakes CAUTION Make sure parking brake is fully disengaged before op erating the vehicle Traxter MAX CVT Gradually press the throttle lever to in crease engine speed and thus engag ing the continuously variable transmis sion CVT At the opposite when the throttle lever is released the e...

Page 118: ...TION When changing from forward to reverse or vice versa always completely stop the vehicle and apply the brake prior to moving the transmission lever The same procedures as SHIFTING THE TRANSMISSION above apply ex cept for the following Set the transmission lever in RE VERSE position Winch Operation XT Models See the ATV Winch Operator s Man ual This manual should be kept in the tool box and rema...

Page 119: ...fins See MAINTENANCE section WARNING The radiator can be very hot wear gloves before touching radiator Reduce vehicle speed but try to keep vehicle moving to supply air to radia tor If engine is still overheating after approximately one minute stop vehi cle and set transmission to PARK Stop engine Place the ignition switch to ON posi tion DO NOT RESTART ENGINE YET The radiator fan will cool the ra...

Page 120: ...ar once then go back home while the trans mission remains in this gear No gear change can take place since the shift ing system is not operational The shifter shaft end is located on rear side of engine Place transmission on PARK position Remove seat Use the special key in the tool box to rotate the emergency shifter Open the tab of the tool approximately at a right angle 90 Insert the screw drive...

Page 121: ...ge and Preseason Preparation WARNING Have an authorized Bombardier ATV dealer inspect fuel system integrity as specified in MAINTE NANCE CHART When a vehicle is not in use for more than one month proper storage is a necessity See an authorized Bombardier ATV dealer for proper procedures When using your ATV after storage a preparation is required See an autho rized Bombardier ATV dealer for proper ...

Page 122: ...fely reduce speed when carrying cargo or pulling a trailer Allow greater distance for break ing Always secure cargo as low as possible on the rack s to re duce the effect of a higher cen ter of gravity Failure to follow the recommendations here could cause changes in vehicle handling which could lead to an accident re sulting in severe injuries including the possibility of death When cargoing vehi...

Page 123: ...secure vehicle to trailer or in pickup box with suitable tie downs Using ordinary ropes is not recommended WARNING V00A174 Never tip this vehicle on end for transporting We recommend that you carry the vehicle in its normal op erating position on all four wheels Place the fuel valve to OFF position Select the PARK position and set the parking brake Unload racks before transporting the vehicle Secu...

Page 124: ...Rear Location V01A3MY WARNING Do not tow this vehicle behind a car or other vehicle Use a trailer _____________________ 123 ...

Page 125: ...MAINTENANCE INFORMATION _____________________ 125 ...

Page 126: ...ter 2 R R Customer Engine transmission oil strainer C Customer Engine mounting fasteners I I Dealer Exhaust system I I Dealer Spark arrester C Customer Condition of seals I I Dealer Coolant 2 I 3 R Customer Radiator cap cooling system pressure test I I Dealer Radiator condition cleanliness air ducts and radiator fins 4 I I Customer Rewind starter rope condition I Dealer Clutch and transmission ope...

Page 127: ...ondition of lighting system HI LO intensity brake light headlamp aiming etc 2 I I Customer Winch connections Refer to ATV Winch Operator s Manual Customer DRIVE TRAIN Drive shaft boot and protector 2 I I Customer Drive shaft joint I Dealer Rear propeller shaft joint I L Dealer Wheel bearing condition I Customer Front differential and rear axle oil seals and vent I I R Dealer STEERING Handlebar fas...

Page 128: ... RIDE Customer Frame I Dealer Hitch trailer ball condition if installed EVERY RIDE Customer Chassis Fasteners I Customer Seat fasteners EVERY RIDE Customer Backrest EVERY RIDE Customer Grab handles EVERY RIDE Customer Front storage compartment cover latches 2 EVERY RIDE Customer Vehicle cleaning and protection C 4 Customer 1 To be performed by an authorized Bombardier ATV dealer The initial mainte...

Page 129: ...he following covers the maintenance items that can be performed by the customer if desired Other items found in maintenance chart must be performed by an authorized Bom bardier ATV dealer NOTE Among other things this sec tion gives the procedures to replace the liquids Refer to LIQUIDS for pro cedures to check levels and refill Engine Transmission Oil Change and Oil Filter Replacement Oil and filt...

Page 130: ...ly unscrew oil filter and as soon as it can be removed from the engine turn it upright Discard filter NOTE Be sure that the old filter O ring is removed CAUTION Only use Bombardier high pressure filter or suitable equivalent The Bombardier filter is specifically designed for this en gine This filter does not operate at the same pressure as other brands Using a non recommended filter may cause seri...

Page 131: ... regulations Coolant Replacement WARNING In order to avoid potential burns do not remove the radiator cap or loosen the engine drain plug if the engine is hot Turn the radiator cap counterclockwise and remove it On Traxter MAX CVT remove the skid plate under vehicle the RH side panel and the door in the footrest Remove the drain plug and drain the coolant into a suitable container V04L1LY 1 TRAXTE...

Page 132: ...ks and check coolant level in the reservoir Valve Adjustment Valve adjustment is not required on this engine Spark Arrester The muffler must be periodically purged of accumulated carbon WARNING Never run engine in an enclosed area Never perform this opera tion immediately after the engine has been run because exhaust sys tem is very hot Make sure that there are no combustible materi als in the are...

Page 133: ...g Inspect radiator fins They must be clean free of mud dirt leaves and any other deposit that would prevent the radiator from cooling properly Remove as much deposits as you can with your hands If water is available in proximity try rinsing the radiator fins If available use a garden hose to rinse the radiator fins WARNING Never clean radiator with your hands when it is hot Let the radi ator cool ...

Page 134: ...explained below Air Filter Removal CAUTION Never remove or mod ify any component in the air box Otherwise engine performance degradation or damage can occur The engine carburetion is calibrated to operate specifically with these components Remove seat Release clamps and remove air filter box cover V01F05Y 1 2 TYPICAL 1 Release clamps 2 Lift to remove Loosen clamp and remove air filter 1 V01F1LY 2 ...

Page 135: ...so that electrolyte flows out of vent tube WARNING Battery electrolyte is a caustic substance that burns or destroys organic tissues by chemical ac tion Avoid contact with eyes skin and clothing Wear protec tive eyeglasses and a suitable pair of non absorbent gloves when removing the battery by hand Should any electrolyte spillage oc cur immediately wash off with a solution of baking soda and wate...

Page 136: ...r MAX CVT the fuse holder is located at the rear of the vehicle on left side under rear fender V04G1KY 1 TRAXTER MAX CVT 1 Fuse holder On Traxter MAX 5 SPEED the fuse holder is located in engine compart ment on LH side of battery V01G13Y 2 1 TRAXTER MAX 5 SPEED 1 Battery 2 Fuse holder Fuses are identified by a number lo cated beside the fuse V00G01Y TRAXTER MAX CVT 1 Spare 2 Spare 3 Accessories po...

Page 137: ... melted Bulb Replacement WARNING Always turn the ignition switch OFF before replacing a defective bulb Always check light operation after re placement Headlamps CAUTION Never touch glass por tion of an halogen bulb with bare fingers it shortens its operating life If glass is touched clean it with iso propyl alcohol which will not leave a film on the bulb Unplug connector from headlamp V04G02Y Rota...

Page 138: ...ulb Insert a little flat screwdriver into the slot at the bottom of the speedome ter Slightly pry the speedometer and turn it clockwise then remove it from steering pod V01A67Y Unplug the auxiliary headlamp then turn the socket counterclockwise to unlock it Pull the socket out of aux iliary headlamp housing and remove bulb Install a new bulb then place the socket into housing It is important to po...

Page 139: ... steadily Use synthetic grease P N 293 550 033 or an equivalent Drive Shaft Boot Protector Visually inspect drive shaft protectors and boot conditions Check protec tors for damage or rubbing against shafts Check boots for cracks tears leaking grease etc Repair or replace damaged parts as necessary V00A14Y 1 2 1 Drive shaft protector 2 Drive shaft boots Wheel Occasionally wheel nuts should be re mo...

Page 140: ...n tires are cold before using the vehicle Tire pres sure changes with temperature and altitude Recheck pressure if one of these conditions has changed For your convenience a pressure gauge is supplied in tool box TIRE PRESSURE ALL MODELS FRONT REAR MAX 48 kPa 7 PSI 48 kPa 7 PSI up to 290 kg 640 lb MIN 35 kPa 5 PSI 35 kPa 5 PSI Although the tires are specifically de signed for off road use a flat m...

Page 141: ...bri cant Using another lubricant like a water based lubricant could cause the throttle lever cable stick ing or stiffness Open the throttle lever housing V07I0FY 1 1 Remove these screws Separate the housing Slide rubber protector back to expose throttle ca ble adjuster Unscrew the locking nut of the cable adjuster then screw in the adjuster to release the cable tension 4 V07I0GY 3 2 1 1 Cable prot...

Page 142: ...bber protector back to expose throttle cable adjuster Loosen lock nut then turn the adjuster to obtain correct throttle lever free play NOTE Measure throttle free play at the tip of throttle lever Tighten lock nut and reinstall protector V01I1VY 1 A 1 Throttle lever A 3 to 6 mm 1 8 to 7 32 in With the transmission lever on PARK position start the engine Check if the throttle cable is adjusted corr...

Page 143: ... Left and right adjusting cams must always be set at the same posi tion Never adjust one adjusting cam only Uneven adjustment can cause poor handling and loss of stability which could lead to an ac cident Preload Adjustment Adjust spring preload by turning ad justing cam accordingly with the ad justing wrench in vehicle tool box Turn the adjusting cams clockwise for a firmer ride and rough road co...

Page 144: ...d lock screw nut and spring Remove cable from hand lever To ease this operation apply a force on the brake pedal to loosen the cable Put the cable luber P N 529 035 738 on the cable Insert the needle of the spray can in the cable luber hole Spray a small quantity of silicone lubri cant P N 293 600 041 or an equiv alent then press the brake pedal to move the brake cable Repeat this procedure until ...

Page 145: ... replacement if damaged Vehicle Cleaning and Protection Never use a high pressure washer to clean the vehicle USE LOW PRES SURE ONLY like a garden hose High pressure can cause electrical or me chanical damages Painted parts which are damaged should be properly repainted to pre vent rust When required wash the body with hot water and soap only use mild de tergent Apply nonabrasive wax CAUTION Never...

Page 146: ...rocedure particularly use of the choke NOTE On Traxter MAX 5 SPEED below 15 C 5 F the use of fuel primer optional is required Also it is recommended to add gas line antifreeze 3 Flooded engine spark plug s wet when removed Refer to SPECIAL PROCEDURES 4 No fuel to the engine spark plug s dry when removed Check fuel tank level turn fuel valve to ON also try on RES A failure of the fuel pump or carbu...

Page 147: ...sists contact an authorized Bombardier ATV dealer 5 Air filter box plugged or dirty Check air filter and clean if necessary Check deposits in air box drain Check the position of the air intake tube reinstall properly if necessary 6 CVT dirty or wear Contact an authorized Bombardier ATV dealer Engine backfire 1 Exhaust system leakage Contact an authorized Bombardier ATV dealer 2 Engine is running t...

Page 148: ... not shift smoothly 1 Engine transmission oil level is low Refill engine with recommended oil at the proper level 2 Transmission shifting system Try depressing the throttle lever more while shifting 3 Improper oil type Drain oil in engine and use recommended oil only 4 Transmission See an authorized Bombardier ATV dealer Transmission lever is hard to move 1 Transmission gears are in a position tha...

Page 149: ...tact an authorized Bombardier ATV dealer 3 Engine Contact an authorized Bombardier ATV dealer The RPM increases but the vehicle does not move 1 Transmission is set on PARK or NEUTRAL Move the transmission lever to R H or L position 2 CVT is defective Contact an authorized Bombardier ATV dealer 3 Water in the CVT housing Contact an authorized Bombardier ATV dealer _____________________ 149 ...

Page 150: ...aceable oil filter lubrication of engine and transmission simultaneously Decompressor Automatic Exhaust system Nelson stainless steel spark arrestor USDA Forest Service approved Air filter 2 stage foam filter TRANSMISSION Transmission Continuously Variable Transmission CVT COOLING Type Liquid cooled Radiator Rear mounted with thermostatic fan CARBURETION Make Mikuni Carburetor Type BSR 42 constant...

Page 151: ... in Number of spark plug 1 Type Electrolyte type battery Battery Volt 12 volts 19 Ah Starting system Electric start Start on P R N H L position with brake applied Headlamp bulb 2 x 30 W Auxiliary headlamp 30 W Taillight and brake light bulb 8 27 W 1157 Indicator lights LEDs not replaceable separately Location no 1 spare 15 A N A Location no 2 spare 15 A N A Location no 3 accessories 15 A power out...

Page 152: ...orbers oil Rear Travel 191 mm 7 5 in TIRES Make Othsu Carlisle ACT Type Bias Radial Front Pressure Up to 290 kg 640 lb Rear 48 kPa 7 PSI recommended 35 kPa 5 PSI minimum Front 25 x 8 12 Size Rear 25 x 11 12 WHEELS Front 12 x 6 5 Size Rear 12 x 8 Wheel nuts torque 75 N m 55 lbf ft BRAKES Front Hydraulic 2 drilled discs Rear Mechanical cable hydraulic 1 disc Parking device Park through transmission ...

Page 153: ...1500 lb Towing capacity 500 kg 1100 lb Tongue capacity included with rear rack 14 kg 30 lb Front storage tray included with front rack 10 kg 22 lb Weight distribution front rear 47 53 DIMENSIONS Dry mass 363 kg 798 lb Overall length 2 33 m 92 in 2 37 m 93 in Overall width 1 20 m 47 in Overall height 1 33 m 52 in Seat height 0 95 m 37 in Wheel base 1 55 m 61 in Front 0 99 m 39 in Wheel track Rear 0...

Page 154: ...S Fuel tank 22 L 5 8 U S gal includ ing an approximate reserve of 4 L 1 1 U S gal Engine transmission oil Oil change with filter 2 5 L 2 65 U S quarts Total 3 L 3 17 U S quarts Coolant 2 5 L 2 65 U S quarts Front 610 mL 21 U S oz Differential Rear 200 mL 6 8 U S oz A ampere kW kilowatt Ah ampere hour RPM revolution per minute cc cubic centimeters Volt volt cu in cubic inches W watt hp horsepower B...

Page 155: ...usly Decompressor Automatic Exhaust system Nelson stainless steel spark arrestor USDA Forest Service approved Air filter 2 stage foam filter TRANSMISSION Clutch 1 centrifugal and 1 multi disc hydraulically controlled Transmission Dual range HI LO with park neutral and reverse 5 speeds Electronically controlled hydraulic shift COOLING Type Liquid cooled Radiator Rear mounted with thermostatic fan C...

Page 156: ... battery Battery Volt 12 volts 19 Ah Starting system Electric start and manual rewind starter Start on P R N H L position with brake applied and in any gear 1 to 5 Headlamp bulb 2 x 30 W Auxiliary headlamp 30 W Taillight and brake light bulb 8 27 W 1157 Indicator lights LEDs not replaceable separately Pilot lamp cluster LEDs not replaceable separately Location no 1 ignition 15 A Location no 2 Acce...

Page 157: ...orbers oil Rear Travel 191 mm 7 5 in TIRES Make Othsu Carliles ACT Type Bias Radial Front Pressure Up to 290 kg 640 lb Rear 48 kPa 7 PSI recommended 35 kPa 5 PSI minimum Front 25 x 8 12 Size Rear 25 x 10 12 WHEELS Front 12 x 6 5 Size Rear 12 x 8 Wheel nuts torque 75 N m 55 lbf ft BRAKES Front Hydraulic 2 drilled discs Rear Mechanical cable hydraulic 1 disc Parking device Park through the transmiss...

Page 158: ... Towing capacity 500 kg 1100 lb Tongue capacity included with rear rack or cargo box 14 kg 30 lb Front storage tray included with front rack 10 kg 22 lb Weight distribution front rear 47 53 DIMENSIONS Dry mass 361 kg 795 lb Overall length 2 34 m 92 in Overall width 1 20 m 47 in Overall height 1 33 m 52 in Seat height 0 95 m 37 in Wheel base 1 55 m 61 in Front 0 99 m 39 in Wheel track Rear 0 94 mm ...

Page 159: ...lic brake Brake fluid DOT 4 CAPACITIES Fuel tank 20 L 5 38 U S gal includ ing an approximate reserve of 6 L 1 6 U S gal Engine transmission oil Oil change with filter 2 5 L 2 65 U S quarts Total 3 L 3 17 U S quarts Coolant 2 5 L 2 65 U S quarts Front 610 mL 21 U S oz Differential Rear 200 mL 6 8 U S oz A ampere kW kilowatt Ah ampere hour RPM revolution per minute cc cubic centimeters Volt volt cu ...

Page 160: ... FACTORS 1 TO CONVERT in in in in ft oz lb lbf lbf in lbf ft lbf ft PSI imp oz imp oz imp gal imp gal U S oz U S gal MPH Fahrenheit Celsius hp TO mm cm cm cm m g kg N N m N m lbf in kPa U S oz mL U S gal L mL L km h Celsius Fahrenheit kW MULTIPLY BY 25 4 2 54 6 45 16 39 0 3 28 35 0 45 4 4 0 11 1 36 12 6 89 0 96 28 41 1 2 4 55 29 57 3 79 1 61 F 32 1 8 C x 1 8 32 75 navigation velocity knot kn F00A2...

Page 161: ...WARRANTY _____________________ 161 ...

Page 162: ...ken SC 29805 Warranty Information in USA 1 800 260 7959 in Canada 1 800 265 6155 in Quebec 1 877 997 4999 Warn Industries inc for the winches 12900 SE Capps Road Clackamas Oregon 97015 8903 Customer service in USA 1 800 543 9276 in Canada 1 800 668 6012 in Quebec 1 800 361 9291 Generally the Traxter ATVs are originally equipped with Carlisle tires If your ATV is equipped with other tires they are ...

Page 163: ...provide it with reasonable access to the prod uct and reasonable opportunity to repair it The customer must also present to the authorized Bombardier dealer proof of purchase of the product and must sign the repair work order prior to starting the repair in order to validate the warranty repair All parts replaced under this limited warranty become the property of BRP 5 WHAT BRP WILL DO BRP s oblig...

Page 164: ...ARRANTY GIVES YOU SPECIFIC RIGHTS AND YOU MAY ALSO HAVE OTHER LEGAL RIGHTS WHICH MAY VARY FROM STATE TO STATE OR PROVINCE TO PROVINCE Neither the distributor any Bombardier ATV dealer nor any other person has been authorized to make any affirmation representation or warranty regarding the product other than those contained in this limited warranty and if made shall not be enforceable against BRP B...

Page 165: ...V CUSTOMER ASSISTANCE CENTER VALCOURT QC J0E 2L0 Tel 819 566 3366 In USA BOMBARDIER MOTOR CORPORATION OF AMERICA BOMBARDIER ATV CUSTOMER ASSISTANCE CENTER 7575 BOMBARDIER COURT WAUSAU WI 54401 Tel 715 848 4957 In the USA products are distributed and serviced by Bombardier Motor Corpo ration of America 2004 Bombardier Recreational Products Inc All rights reserved Registered trademark and TM tradema...

Page 166: ...ts original expiration date 3 CONDITIONS TO HAVE WARRANTY COVERAGE This warranty coverage is available only on 2005 Bombardier ATVs purchased as new and unused by its first owner from a Bombardier dealer authorized to distrib ute Bombardier ATV products in the country in which the sale occurred Bom bardier ATV distributor dealer and then only after the BRP specified pre deliv ery inspection proces...

Page 167: ...n to modify products previously manufactured 6 EXCLUSIONS ARE NOT WARRANTED The following are not warranted under any circumstances Normal wear and tear Routine maintenance items tune ups adjustments Damage caused by failure to provide proper maintenance and or storage as described in the Operator s Guide Damage resulting from removal of parts improper repairs service mainte nance modifications or...

Page 168: ... STATE OR PROVINCE TO PROVINCE Neither the distributor any Bombardier ATV dealer nor any other person has been authorized to make any affirmation representation or warranty regarding the product other than those contained in this limited warranty and if made shall not be enforceable against BRP BRP reserves the right to modify this warranty at any time being understood that such modification will ...

Page 169: ...ice department should be contacted in order to resolve the matter c If the matter still remains unresolved then contact BRP by writing to us at the address listed below BOMBARDIER RECREATIONAL PRODUCTS INC BOMBARDIER ATV CUSTOMER ASSISTANCE CENTER VALCOURT QC J0E 2L0 Tel 819 566 3366 In the USA products are distributed and serviced by Bombardier Motor Corpo ration of America 2004 Bombardier Recrea...

Page 170: ...offers please let us know by writing to the address below Also note that from time to time carefully selected and trustworthy organiza tions may be permitted to use the coordinates of our clients to promote quality products and services If you prefer not to have your name and address released please let us know by writing to the address below Bombardier Recreational Products Inc Warranty Departmen...

Page 171: ...wner if necessary like when safety recalls are initiated It is the owner s responsibility to notify BRP STOLEN UNITS If your personal ATV is stolen you should notify BRP or an au thorized Bombardier ATV dealer We will ask you to provide your name address phone number the vehicle identification number and the date it was stolen V00A2F CHANGE OF ADDRESS CHANGE OF OWNERSHIP VEHICLE IDENTIFICATION NUM...

Page 172: ...Bombardier Recreational Products Inc WARRANTY DEPARTMENT 75 J A Bombardier Sherbrooke QC Canada J1L 1W3 V00A2G AFFIX PROPER POSTAGE 172 _____________________ ...

Page 173: ... completed by the dealer at the time of the sale DEALER IMPRINT AREA NAME No STREET APT CITY STATE PROVINCE ZIP POSTAL CODE V00A2IL Please verify with your dealer to ensure your vehicle has been registered with BRP While reading this Operator s Guide remember that WARNING Indicates a potential hazard that if not avoided could result in serious in jury or death ...

Page 174: ...vmo2005 traxter max ang FH8 Fri Jul 09 10 20 19 2004 Page 1 C M Y CM MY CY CMY K ...

Reviews: