background image

969

19

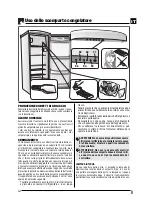
Using the freezer compartment

T1

S3

S5

S2

S4

S6

GB

established as it depends on the type of food.

Always comply with the indications on the frozen food 
packaging to be sure.

SOME RECOMMENDATIONS:

Ensure that the enclosure is intact; wet and swelling 
packaging indicate that the frozen product may have 
deteriorate.

Food that have started the defrosting process must 
never be frozen again. Do not store food longer than 
the recommended period.

DEFROSTING

In power outage conditions, it depends on its duration. 
If it is expected to last less than 12 hours, leave the food 
inside the freezer and keep the door closed. If power 
outage is expected to last more than 12 hours, consume 
the defrosting food as soon as possible.  The frost that 
forms on the racks must be removed when it reaches a 
thickness of about 3-4 mm, in order to prevent affecting 
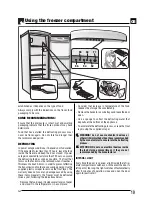
the transmission of cold and consuming energy. Use the 
supplied plastic scraper to remove the frost layer. The 
warranty does not cover any damage caused by using 
these items. Generally, the freezer must be defrosted 
twice a year, following the indications below:

-  Remove the food, wrap it inside several layers of paper 

and store it in the refrigerator or in a cool place.

-  Consider that increase in temperature of the food 

reduces the storage life considerably.

-  Remove the baskets, ice cube trays and leave the door 

open .

-  Use a sponge to collect the defrosting water that 

deposits at the bottom of the appliance.

-  To accelerate the defrosting process, scrape the frost 

layer using the supplied scraper.


WARNING! do not use mechanical devices or 
other artifi cial methods than those recommended 
by the manufacturer to accelerate the defrosting 
process . 


ATTENTION: Do not use electrical devices inside 
the food storage compartment, if they are not 
recommended by the manufacturer.

INTERNAL LIGHT

Every time the door is opened, a light inside the refrig-
erator compartment switches on. In the event the door is 
left open for too long, the light switches off automatically 
after 5 minutes of operation; close and open the door 
again to reactivate it.

Summary of Contents for BOMP111C

Page 1: ...IT ITALIANO Istruzioni per l istallazione l uso la manutenzione GB ENGLISH Installation use and maintenance instructions...

Page 2: ...GB IT ITALIANO 3 Istruzioni per l istallazione l uso la manutenzione ENGLISH 13 Installation use and maintenance instructions...

Page 3: ...guenti punti 6 USO DEL REPARTO FRIGORIFERO 7 Pannello di comando 7 Descrizione dell apparecchio 7 Prima della messa in funzione 7 Collegamento dell apparecchiatura 7 Messa in funzione e regolazione de...

Page 4: ...i bagnati o umidi non tirare il cavo di alimentazione per staccare la spina dalla presa non lasciare esposto l apparecchio agli agenti atmo sferici non permettere che l apparecchio sia usato dai bambi...

Page 5: ...onservare sostanze esplosive in questo apparecchio come bombolette per aerosol con propellente infiammabile Il presente apparecchio concepito per essere utilizzato in applicazioni domestiche e simili...

Page 6: ...LL INSTALLARE OCCORRE OSSERVARE I SEGUENTI PUNTI A Non installatelo vicino a sorgenti di calore come stufe termosifoni cucine etc ed evitare la sua esposizione alla luce diretta del sole B Sistemate l...

Page 7: ...ESSAINFUNZIONEEREGOLAZIONEDELLOSCOMPARTO FRIGORIFERO Se all inserimento della spina nella presa di corrente la spia verde S2 posizione minima non si accende significa che il prodotto spento Per metter...

Page 8: ...con notevole rispar mio di energia elettrica Per attivare al funzione HOLIDAY occorre cliccare sul pulsante T1 fi no a che non si accende in modo lampeggiante il led blu S6 La funzione HOLIDAY sar att...

Page 9: ...l apposito raschietto di plastica in dotazione Qualsiasi danno derivato dall uso di questi oggetti non coperto dalla garanzia Generalmente il congelatore deve essere sbrinato almeno 2 volte l anno op...

Page 10: ...rite l apparecchio dalla rete elettrica Pulite entrambi i comparti e asciugateli Lasciate aperte le porte per impedire la formazione di cattivi odori o muffe PULIZIA SCARICO ACQUA Contemporaneamente a...

Page 11: ...llate la lampadina e sostituitela se necessario con una nuova per la potenza vedere il vattaggio indicato in figura rimontate il coperchio C 6 C ACQUA SUL PAVIMENTO La vaschetta V ben inserita a conta...

Page 12: ...969 12 Note IT...

Page 13: ...es for transport 16 When installing comply with the following points 16 USING THE COOLING COMPARTMENT 17 Control panel 17 Description of the appliance 17 Before commissioning 17 Connecting the applian...

Page 14: ...ble to remove the plug from its socket do not expose the appliance to atmospheric agents do not allow the appliance to be used by unsupervised children do not plug in or unplug the appliance using wet...

Page 15: ...E SUB STANCES SUCH US AEREOSOL CANS WITH A FLAMMABLE PROPELLANT IN THIS APPLIANCE This appliance is intended to be used in household and similar applications such as staff kitchen areas in shops offic...

Page 16: ...e by adjusting the feet WHEN INSTALLING THE APPLIANCE REMEMBER THE FOLLOWING A Do not install it near to sources of heat such as heat ers radiators cookers etc or in direct sunlight B Position the app...

Page 17: ...GERATORCOMPARTMENT On insertion of the plug in the mains socket if the green led S2 minimum position does not light this means that the appliance is switched off To start up the appliance press button...

Page 18: ...is maintained inside the refrigerator during long periods of time when the householder is away leading to signifi cant savings in terms of electricity To activate the HOLIDAY function click the T1 bu...

Page 19: ...he frost layer The warranty does not cover any damage caused by using these items Generally the freezer must be defrosted twice a year following the indications below Remove the food wrap it inside se...

Page 20: ...ally inspect the power cable to check its condition If the cable is damaged do not use the appliance and do not attempt any repairs Call a qualified technician to replace the faulty cable ELECTRICAL C...

Page 21: ...ace it with a new one if required see the voltage indicated in the figure remount the cover C 6 WATER IS FOUND ON THE FLOOR Is tray V placed correctly and contacting the compressor surface Is discharg...

Page 22: ...969 22 Notes GB...

Page 23: ......

Page 24: ...IT GB 461308263 969 01 TLF 04 07 2013...

Reviews: