background image

12 


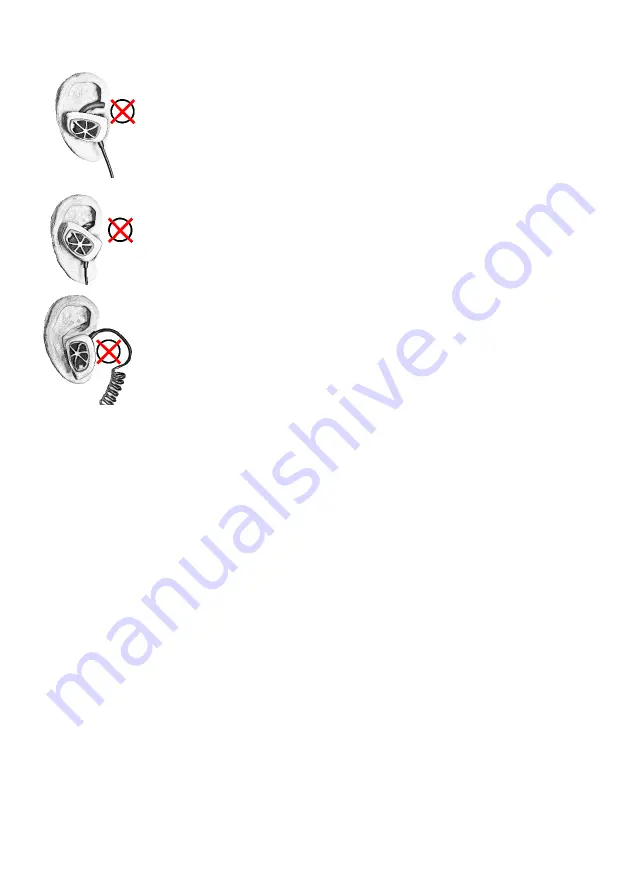
6.1  Troubleshooting Fit 


1.


If the Ear Wing does not fully seat into the fold of the ear, the Ear   

Wing may be too large.  Repeat “

WING AND FOAM FITTING

” steps 1-7 

using the Small size Ear Wing. 

2.


If the Ear Wing still does not fully seat into the fold of the ear, the 

Foam Ear Tip may be too large.  Repeat “

WING AND FOAM FITTING

” 

steps 2-7 using the Medium size Foam Ear Tips.  If the Ear Wing still 

does not fully seat, repeat “

WING AND FOAM FITTING

” steps 2-7 using 

the Small size Foam Ear Tips. 

3.


If the Ear Piece can rotate in your ear or does not remain parallel to 

the ground, the Ear Wing may be too small.  Repeat all “

WING AND 

FOAM FITTING

” steps using a larger size of Ear Wing. 


_____________________________________________________________________________ 

7. BASIC FUNCTIONS 

 
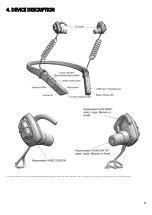
Please reference “

4. DEVICE DESCRIPTION

” for the name and location of all buttons. 


7.1  Powering On 


To turn on power, press and hold the 

Multi-Function Button (MFB)

 for 2 seconds until the 

voice prompt says, “Power On.” 

o


The 

Function Indicator LED

 will flash white three times. 


7.2  Powering Off 


To turn power off, press and hold the 

Multi-Function Button (MFB)

 for 5 seconds. 

o


You will hear a series of beeps followed by a voice prompt that says, “Powering Off in 

3…2…1…” 

o


You can release the button once the voice prompt plays. 

o


The 

Function Indicator LED

 will flash red two times once the power off sequence has 

begun. 


Summary of Contents for Clear 360 Pro

Page 1: ...USER MANUAL ...

Page 2: ...ns etc Do not place lighted candles or other incendiary devices on the apparatus To reduce the risk of fire or electric shock do not place objects filled with liquids such as vases on the apparatus Connect AC power adapter to an easily accessible AC outlet Should you notice any abnormalities in the AC adapter immediately disconnect the AC power adapter from the outlet Do not expose the battery to ...

Page 3: ... Follow the instructions carefully Improper fit may result in permanent hearing damage If using the headset daily it is highly recommended that you change your Foam Ear Tips at least once a week to ensure maximum hearing protection __ WARNING IMPORTANT __ Table of Contents 1 INTRODUCTION 6 ...

Page 4: ...ng the Listening Audio Volume 13 7 4 Muting and Unmuting the Listening Audio 13 7 5 Changing Listening Audio Modes 13 7 6 Checking The Battery Level 13 8 CHARGING 14 9 BLUETOOTH INFORMATION AND FUNCTIONS 15 9 1 Bluetooth Information 15 9 1 1 What is Bluetooth wireless technology 15 9 1 2 Bluetooth related precautions 15 9 2 Bluetooth Pairing 16 9 2 1 What is pairing 16 9 2 2 How to pair Bluetooth ...

Page 5: ... INDICATOR LED 17 11 BUTTON FUNCTIONS QUICK REFERENCE 19 12 ADDITIONAL INFORMATION 20 12 1 Warranty 20 12 2 Limitation of Liability 20 12 3 Maintenance 20 12 4 Important Notice 21 12 5 Materials and Allergies 21 12 6 Product Disposal 21 13 CERTIFICATIONS AND SAFETY APPROVALS 22 13 1 Certificate of Compliance Restriction of the use of Hazardous Substances RoHs 22 13 2 Certificate of Compliance Regi...

Page 6: ...360 PRO is used in safe environments ONLY If the information and recommendations contained herein are not followed the protection afforded by the headset will be severely impaired Improper fit of this device will reduce its effectiveness in attenuating noise Consult the enclosed instructions for proper fit Misuse or failure to wear hearing protection at all times when exposed to hazardous noise ma...

Page 7: ...re is detected the user should refer to the manufacturer s advice for maintenance or replacement _____________________________________________________________________________ 3 PACKAGE CONTENTS 1x CLEAR 360 PRO Hearing Protection System 1x Carrying Case 1x AC Charging Block 1x USB C Charging Cable 1pair Small Foam Ear Tip 1pair Medium Foam Ear Tip 1pair Large Foam Ear Tip 1pair Small Ear Wing 1pai...

Page 8: ...8 4 DEVICE DESCRIPTION _____________________________________________________________________________ ...

Page 9: ...__ 5 2 Attaching Foam Ear Tips IMPORTANT Attach the Large size Foam Ear Tip before first use Only try a smaller size if there is a problem with the fit See 6 Wing and Foam Fitting 1 Orient the Foam Ear Tip so that the flat end is facing towards the Ear Piece and the rounded tapered end is facing away from the Ear Piece 2 Firmly press the Foam Ear Tip onto the post of the Ear Piece so that the post...

Page 10: ..._______________________ To replace the Wind Screen 1 Insert the forward tab on the Wind Screen into the front socket on the face of the Ear Piece 2 Rock the Wind Screen towards the rear of the Ear Piece and press to lock the rear clip on the Wind Screen into the rear socket on the Ear Piece _____________________________________________________________________________ ...

Page 11: ...the rounded part of the Ear Wing is facing upward and the front of the Ear Piece is facing the ground Insert the Foam Ear Tip into your ear canal as deeply as is comfortable 5 Rotate the Ear Piece backward in your ear until the wing is fully seated inside the fold of your ear Note You may need to press on the wing with your finger to install it fully 6 The Ear Piece will look like the picture to t...

Page 12: ...y be too small Repeat all WING AND FOAM FITTING steps using a larger size of Ear Wing _____________________________________________________________________________ 7 BASIC FUNCTIONS Please reference 4 DEVICE DESCRIPTION for the name and location of all buttons 7 1 Powering On To turn on power press and hold the Multi Function Button MFB for 2 seconds until the voice prompt says Power On o The Func...

Page 13: ...ion Indicator LED will flash red twice every 2 seconds while listening audio is muted Listening audio can be unmuted by quick pressing the Switch Mode button the Volume DOWN button or the Volume UP button o The Function Indicator LED will return to its normal blue flash whenever listening audio is on 7 5 Changing Listening Audio Modes Your CLEAR 360 PRO has four different audio modes o Each of the...

Page 14: ...for the safe use of the product to provide time to plan your next charge Please remember that your battery life will vary based on optional Bluetooth use and other factors 1 Lift the moisture preventing flap on the left side of the collar that is covering the USB type C Charging Port See 4 DEVICE DESCRIPTION 2 Insert the charging cable s USB type C end into the USB type C Charging Port 3 Insert th...

Page 15: ...our right side The following conditions may affect the sensitivity of Bluetooth communications o There is an obstacle such as a person metal or wall between the unit and the Bluetooth device o A device using 2 4 GHz frequency such as a wireless LAN device cordless telephone or microwave oven is in use near the unit Because Bluetooth devices and wireless LAN IEEE802 1 b g use the same frequency mic...

Page 16: ...ither manually or as part of a repair The unit is paired with nine or more devices When recognition of the unit by the device to be connected is deleted 9 2 2 How to pair Bluetooth 1 Ensure the CLEAR 360 PRO is fully powered off 2 Press and hold the Multi Function Button MFB for 5 seconds a Continue to hold the MFB until you first hear the voice prompt say Power On and then Bluetooth Pairing b The...

Page 17: ...and microphone on your phone s handset To transfer an in progress call back to your CLEAR 360 PRO double click the Multi Function Button MFB 9 3 2 4 Muting and Unmuting the microphone You can mute and unmute the CLEAR 360 PRO microphone by triple clicking the Multi Function Button MFB ____________________________________________ 9 3 3 Media Streaming button functions 9 3 3 1 Playing and Pausing me...

Page 18: ...powered on and the battery life is low the LED will flash RED once every three seconds Battery Life Indication When a battery check is initiated by simultaneously quick pressing the Multi Function Button MFB and Volume DOWN button the LED will flash to show the device s remaining battery life o More than 8 hours remaining The LED will flash RED four times o Less than 8 hours remaining The LED will...

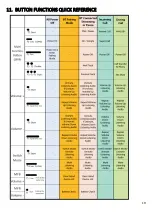
Page 19: ...19 11 BUTTON FUNCTIONS QUICK REFERENCE ...

Page 20: ...ation of Liability EXCEPT WHERE PROHIBITED BY LAW THIS WARRANTY IS EXCLUSIVE AND IS IN LIEU OF ANY EXPRESS OR IMPLIED WARRANTY OF MERCHANTABILITY FITNESS FOR A PARTICULAR PURPOSE OR OTHER WARRANTY OF QUALITY OR THOSE ARISING FROM A COURSE OF DEALING CUSTOM OR USAGE OF TRADE EXCEPT OF TITLE AND AGAINST PATENT INFRINGEMENT EXCEPT WHERE PROHIBITED BY LAW IN NO EVENT SHALL CLEAR 360 BE LIABLE FOR ANY ...

Page 21: ...ud impulse noises such as gunfire It is difficult to predict the required and or actual hearing protection obtained during exposure to impulse noises For gunfire the weapon type number of rounds fired proper selection fit and use of hearing protection proper care of hearing protection and other variables will impact performance If your hearing seems dulled or you hear a ringing or buzzing during o...

Page 22: ...NT FCC ID 2AXCP CLEAR360PRO This equipment has been tested and found to comply with the limits for a Class B digital device pursuant to part 15 of the FCC Rules These limits are designed to provide reasonable protection against harmful interference in a residential installation This equipment generates uses and can radiate radio frequency energy and if not installed and used in accordance with the...

Page 23: ...23 _____________________________________________________________________________ ...

Page 24: ...e Bluetooth word mark and logos are registered trademarks owned by Bluetooth SIG Inc All other trademarks included herein are the property of their respective owners Design and specifications subject to change without notice Made in China Responsible Party CLEAR 360 VENTURES BONGIOVI ACOUSTIC LABS 649 SW Whitmore Drive Port St Lucie Florida 34984 Tel 772 879 0578 ...

Reviews: