PARTS LIST
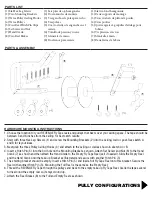
(1) Six Hex Lag Screws
(2) Two Mounting Brackets
(3) Three Pulley Ceiling Hooks
(4) Three Pulleys
(5) Four Reel Hitch Pin Clips
(6) Set Screw and Nut
(7) Hand Crank
(8) Two Reel Brakes
(1) Seis pijas de ojo hexagonales
(2) Dos ménsulas de montaje
(3) Tres ganchos de polea para techo
(4) Tres poleas
(5) Cuatro clavijas de enganche en el
carrete
(6) Tornillo de presion y tuerca
(7) Manivela de mano
(8) Dos frenos para carrete
(1) Six tire-fond hexagonaux
(2) Deux supports de montage
(3) Trois crochets de plafond à poulie
(4) Trois poulies
(5) Quatre agrafes à goupilles d’attelage pour
bobine
(6) Vis pression et écrou
(7) Manivelle à main
(8) Deux freins d’e bobine
PARTS & ASSEMBLY
HARDWARE MOUNTING INSTRUCTIONS
1. Choose the location for your REVENGE Fly Tape reels and pulleys that best cover your ceiling space. The tape should be
between 3 and 6 inches from the ceiling for best catch results.
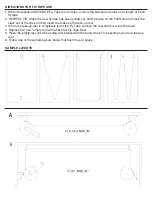
2. Start with three Hex Lag Screws (1) and screw the Mounting Brackets (2) into the ceiling, wall or post. See sketch A
and B for layout ideas.
3. Next grab the three Pulley Ceiling Hooks (3) and attach to the ceiling or wall as shown in sketch A or B.
4. Insert a Hitch Pin (5) into the 3rd hole on the Mounting Bracket as shown. Attach Set Screw and Nut (6) to the Hand
Crank (7) as shown and then attach the Hand Crank to the Empty Fly Tape Reel (call if needed). Slide the Empty Reel
and the Hand Crank onto the take-up Bracket as illustrated and secure with another Hitch Pin (5).
5. The starting bracket should be empty. Insert a Hitch Pin (5) and load a full Fly Tape Reel onto this bracket. Secure the
Reel with another Hitch Pin (5). Mounting the Full Reel is the same as the Empty Reel.
6. Thread the REVENGE Fly Tape through the pulleys and back to the empty take-up Fly Tape Reel. Crank the tape several
turns around the empty reel so it stays wound up.
7. Attach the Reel Brakes (8) to the Full and Empty Reels as shown.
PULLY CONFIGURATIONS


