background image


AHD 12XX / AHD 11XX 

PC Panels / Displays 


Installation Instructions 

Addendum to Operation Manual for Panel PCs/Displays 12XX/11XX 

Please also read the corresponding operation manual before beginning any work! 


Dok-ID: PaB-1139 V6              

 ART.-Nr. 4575 EN


Summary of Contents for AHD 1115 Series

Page 1: ... PC Panels Displays Installation Instructions Addendum to Operation Manual for Panel PCs Displays 12XX 11XX Please also read the corresponding operation manual before beginning any work Dok ID PaB 1139 V6 ART Nr 4575 EN ...

Page 2: ...2 V6 Böning Automationstechnologie GmbH Co KG Am Steenöver 4 D 27777 Ganderkesee Tel 49 0 4221 9475 0 Fax 49 0 4221 9475 21 22 E Mail info boening com Internet www boening com ...

Page 3: ...tion Location 11 3 2 1 Installation Angle 11 3 3 Preparation 11 3 4 Viewing Angle AHD 1219 X AHD 1119 X 12 3 5 Viewing Angle AHD 1215 X AHD 1115 X 13 3 6 Console Installation 14 3 6 1 1 AHD 12XX 14 3 6 1 2 AHD 11XX 15 4 Panel Cutouts and Drill Holes 16 4 1 Panel Cutout and Drill Holes AHD 1219 X AHD 1119 X 16 4 2 Panel Cutout and Drill Hole AHD 1215 X AHD 1115 X 17 5 Installing the Panel PCs Displ...

Page 4: ...es for 15 and 19 16 19 Pasuki Bahram PaB Jul 22 nd 2013 AHD_12XX_11XX_Montageanleitung_EN_V3_20130722 Advice for additional gasket added 20 Pasuki Bahram PaB Aug 29 th 2013 AHD_12XX_11XX_Montageanleitung_EN_V4_20130829 Viewing Angles for AHD 1219x AHD 1119 X changed 12 Pasuki Bahram PaB Nov 6 th 2013 AHD_12XX_11XX_Montageanleitung_EN_V5_20131106 Installation pictures adapted Installation depth def...

Page 5: ...ering to all product safety and handling instructions for the product and all connected components is a prerequisite for safe operation In addition the local accident prevention and general safety rules for the device s area of operation must be observed The illustrations in this manual are intended to demonstrate the contents more clearly They are not necessarily drawn to scale and can vary from ...

Page 6: ...ible for damages due to Noncompliance with the instructions in this manual Unintended use Employment of untrained personnel Unauthorized modifications Technical modifications Use of unauthorized spare parts The actual scope of delivery can vary from the explanations and il lustrations in this manual in case of customized models special ordering options or the latest technical improvements In addit...

Page 7: ...ting from the special working conditions of the product s place of use He must implement these in the form of operating instructions for the product s use During the product s entire period of operation the operator must verify that his operating instructions are in compliance with current regulations and revise them if necessary The operator must clearly regulate and define areas of respon sibili...

Page 8: ...ledge of the situational norms and regulations Electrician is able to work on electrical systems and recognize and avoid potential hazards independently due to formal training know ledge and experience as well as knowledge of the situational norms and regulations The electrician is trained for the specific work site in which he is active and knows the relevant norms and regulations Only those pers...

Page 9: ... angles can be found in the corresponding operation manual available from the manufacturer if it is not present TIP These installation instructions outline and further ex plain the installation of a 19 inch panel PC display However all steps are also fully valid for installing 15 inch displays The mounting frame included in the delivery ensures an equal distribution of force when tightening the fi...

Page 10: ...needed 3 1 1 Hardware AHD 1219 X AHD 1119 X The following hardware pieces included in the delivery are re quired for installing panel PCs displays mounting frame 454 x 384 mm 10 drill holes used as a tem plate for panel cutout and drill holes 10 x spring washer M4 10 x washer M4 10 x hexagonal nut M4 3 1 2 Hardware AHD 1215 X AHD 1115 X The following hardware pieces included in the delivery are re...

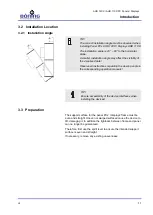
Page 11: ... Observe all instructions regarding the viewing angle in the corresponding operation manuals TIP Ensure accessibility of the device interfaces when installing the devices 3 3 Preparation The support surface for the panel PCs displays frame must be even and straight Uneven or warped surfaced cause the device to tilt damaging it In addition the tightness between frame and panel can no longer be guar...

Page 12: ...le AHD 1219 X AHD 1119 X On the Panel PCs AHD 1219 X Displays AHD 1119 X the screen display can be viewed best at an angle of less than 88 to the ver tical of screen from above from the side and from the bottom Viewing angle from above and below Viewing angle from the side ...

Page 13: ...X AHD 1115 X On the Panel PCs AHD 1215 X Displays AHD 1115 X the screen display can be viewed best at an angle of less than 70 to the ver tical of screen from above and the side and an angle of less than 40 from the bottom Viewing angle from above and below Viewing angle from the side ...

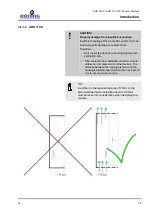
Page 14: ... Only install the devices in housings panels with ventilation slits When selecting the installation location ensure airflow can circulate and cool the devices The distance between the cooling element and the housing switching board wall must be at least 70 mm to ensure proper cooling TIP In addition to the required distance of 70mm to the board wall the device installation depth of 140mm must be t...

Page 15: ...l the devices in housings panels with ventilation slits When selecting the installation location ensure airflow can circulate and cool the devices The distance between the cooling element and the housing switching board wall must be at least 70 mm to ensure proper cooling TIP In addition to the required distance of 70mm to the board wall the device installation depth of 140mm must be taken into co...

Page 16: ...Holes 16 V6 4 Panel Cutouts and Drill Holes 4 1 Panel Cutout and Drill Holes AHD 1219 X AHD 1119 X TIP The dimension drawings in this manual are not drawn to scale The included mounting frame can be used as a tem plate Panel Cutout 427 x 357 mm Drill holes Ø 5 mm ...

Page 17: ...touts and Drill Holes V6 17 4 2 Panel Cutout and Drill Hole AHD 1215 X AHD 1115 X TIP The dimension drawings in this manual are not drawn to scale The included mounting frame can be used as a tem plate Panel Cutout 354 x 294 mm Drill holes Ø 5 mm ...

Page 18: ...s 19 inch devices see 4 1 15 inch devices see 4 2 Mounting frame as cutout and drill hole template TIP The mounting frame for 15 inch devices only has 8 drill holes 2 Carefully cut the panel cutout with the jigsaw Take special care to make smooth straight cuts If necessary smooth out any bumps with a file 3 Drill the holes with a 5 mm bit After drilling check to see that both sides of the drill ho...

Page 19: ...AHD 12XX AHD 11XX PC Panels Displays Installing the Panel PCs Displays V6 19 Panel cutout and drill holes for mounting bolts ...

Page 20: ...IP The device features a gasket ensuring the protection class IP 66 front when installed into a console If the surface of consoles especially those consoles in outdoor areas should show irregularities it is advised that a small silicone ring is applied to the surface around the device after installation ...

Page 21: ...nto the panel cutout Make sure that the bolts in the device frame do not bend or are subject to ten sion If a bolt does not freely slide into the drill hole this drill hole must be reworked CAUTION Bending the bolts can lead to irreparable damage to the display when installing the device Installation front view Installation rear view ...

Page 22: ... do not bend inside the frame or are subject to tension If a bolt does not freely slide into the drill hole this drill hole must be reworked CAUTION Bending the bolts can lead to irreparable damage to the display when installing the device Placing the mounting frame CAUTION If the device is secured without the mounting frame it may be damaged irreparably ...

Page 23: ... pattern below Begin with the interior nuts and tighten them lightly working from the inside to the outside maximum torque of 0 5 Nm Lightly tighten the corner nuts last maximum torque of 0 5 Nm Now repeat the process with a maximum torque of 3 Nm and tighten the nuts again working from the inside to the outside tightening the corner nuts last Refer also to the tightening pattern shown in 5 5 CAUT...

Page 24: ...AHD 12XX AHD 11XX PC Panels Displays Installing the Panel PCs Displays 24 V6 5 5 Tightening Pattern Tightening pattern AHD 1219 X AHD 1119 X Tightening pattern AHD 1215 X AHD 1115 X ...

Page 25: ...UTION Property damage and system errors from missing earthing A missing earthing of the Panel PCs Displays can lead to property damage or system errors Therefore Earth the device when installing it Only use the earth bolt in the device s area marked red in the drawing when earthing the device ...

Page 26: ...tion Instructions 5 Installing the Panel PCs Displays 18 Introduction 9 L Liability 6 O Operator 7 P Panel Cutout and Drill Holes AHD 1215 X AHD 1115 X 17 AHD 1219 X AHD 1119 X 16 Personnel Electrician 8 Specialist 8 Trained Person 8 Personnel Requirements 7 Preparation 11 S Safety 7 Symbols Explanation 5 T Tightening Pattern 24 Tools 10 V Viewing Angle AHD 1215 X AHD 1115 X 13 Viewing Angle AHD 1...

Page 27: ...AHD 12XX AHD 11XX PC Panels Displays Index V6 27 ...

Page 28: ...echnology Ship Automation Böning Automationstechnologie GmbH Co KG Am Steenöver 4 D 27777 Ganderkesee E Mail info boening com Internet www boening com Texts and illustrations not binding We reserve the right to make changes due to technical improvements ...

Reviews: