background image

12

13

•  Do not use more than one baby wrap at a time.

•  Do not use if any parts are missing or damaged;

•  Do not use when it shows signs of wear (for example, 

fibre balls/piling).

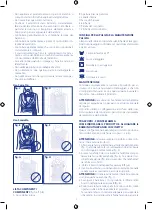
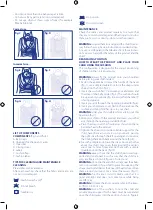
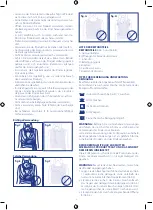
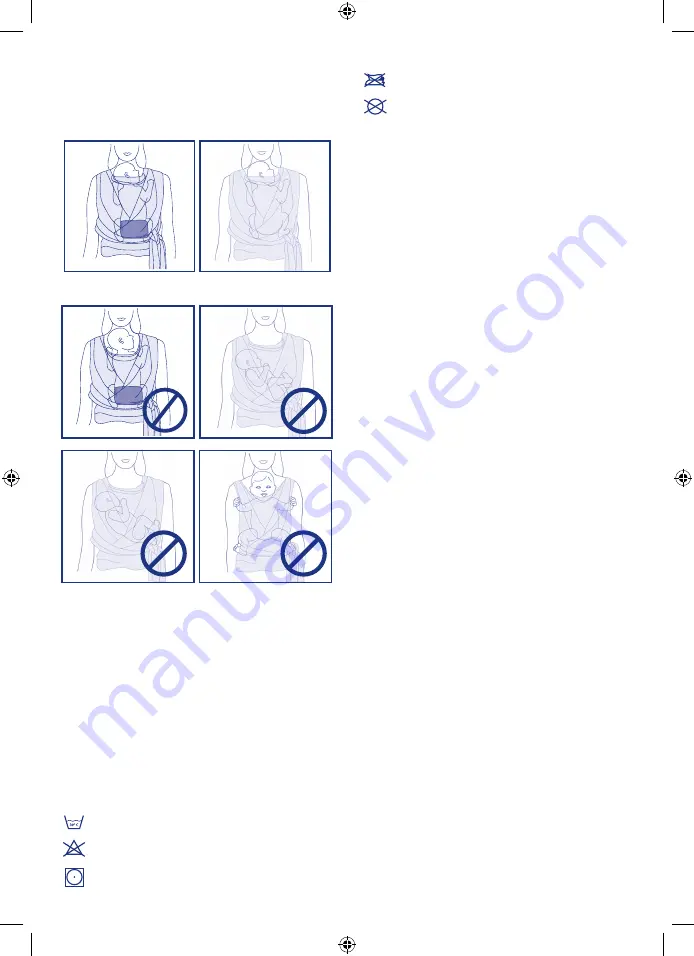
Correct use


Incorrect use

LIST OF COMPONENTS 

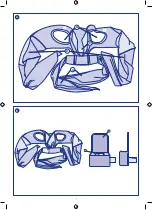
COMPONENTS

 (fig. A and fig. B)

A. Belt straps

B. Openings for the parent’s arms

C. Inner seat 

D. Closing straps 

E. Labels 

X. Cushion flap

Y. Cushion label

TIPS FOR CLEANING AND MAINTENANCE 

CLEANING

Please refer to the care label. 

After each washing check that the fabric and seams are 

not worn or damaged. 

Machine wash at 30⁰ 

Do not bleach

Tumble dry

30° C

30° C

Do not iron 

Do not dry clean

MAINTENANCE

Check the seams and product regularly to ensure that 

they are not worn or damaged and that no part is missing. 

If any part is worn or missing, do not use the product.


WARNING:

 to avoid hazards and guard the child from in­

jury follow the step by step instructions provided below.

Any use or configuration that deviates from these instruc­

tions poses a hazard for the safety of the product and the 

child.

REAR-FACING POSITION 

HOW TO WEAR THE PRODUCT AND PLACE YOUR 

CHILD USING THE CUSHION 

This configuration is designed for the correct positioning 

of children in the > 2.5 kg category 

WARNING:

 always fit the product onto your shoulders 

before placing your child inside it.

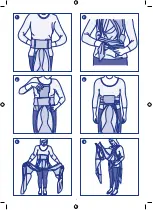
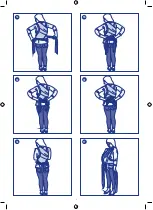
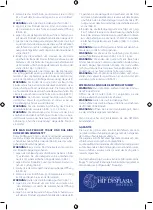
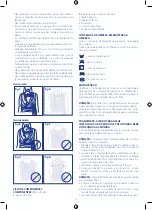
1.  Fasten the abdominal strap, at the height of the navel 

(fig. 1), use a simple double knot to tie the straps under 

the belt on the front (fig. 2) 

2.  Insert the cushion flap ‘X’ between your abdomen and 

the strap of the baby carrier (fig 3.) The cushion should 

be up against your belly. (fig. 4) be sure that the label ‘Y’ 

is facing upwards.

3. Insert your arm through the opening provided B (fig.6). 

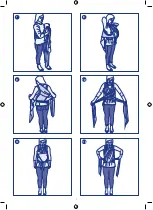
4.  Insert your child, place your child on the seat above the 

cushion and bring him/her close to your chest.

WARNING:

 Hold your child safely while carrying out this 

operation (fig. 7). 

5.  Wrap your child with the product and insert your other 

arm through the opening provided B (fig.8).

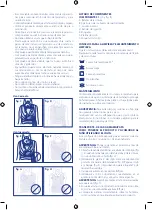
6.  Place the straps over the shoulders as shown on the la­

bels attached to the product.

7.  Tighten the straps to provide suitable support for the 

child, have them run criss­cross on your back, passing 

the right strap through the left opening and vice­versa, 

then bring them both back around the front (fig. 9).

8.  Tie with a simple knot, have the straps cross each other 

above the child’s legs, wrap them around the carrier’s 

waist one or more times and tie them with a simple 

double knot on the back. (fig.10)

WARNING:

 always check that the child’s head is well sup­

ported and positioned in such a way that the child’s air­

ways are free, as shown in figure C “correct use”

WARNING:

 Do not tie the ends of the straps near the abdo­

men or lower limbs of your child to prevent squeezing. The 

straps must not fall below the knees of the adult user. Wrap 

them around your waist once more if necessary (fig.11). 

WARNING:

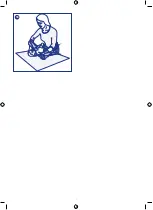
 Tie the knot correctly. Make sure that it is 

good and tight and does not come loose while being 

used (fig.16).

WARNING:

 To make the knot correctly, refer to the imag­

es (fig. 12­13­14­15­16).

WARNING:

 Use of the cushion, to raise the child and 

provide proper support for the head, must be suspended 

once the child grows into the position shown in figure E 

fig. C

fig. E

fig. G

fig. D

fig. F

fig. H

Summary of Contents for ComfyHug

Page 1: ...Boppy ComfyHug...

Page 2: ......

Page 3: ...j ldkfjl kjdsfj jfaj fjasldkfjalsdkjf jfdasljkfsad lkj fjs dfkjlkj fjdaslkfjjfasd lskdfj jfdsalkjf jf sal dkfj faksdljf lkjdakljfjfjda l kjf fjdkjfjaslkjfj lkj fja ldkfj fjdkaafdsj fjsldkfj jfdask ljf...

Page 4: ...4 1 2 3 5 4 6...

Page 5: ...5 7 9 11 8 10 11A...

Page 6: ...6 12 14 16 15 17 13...

Page 7: ...7 18...

Page 8: ...orto per fornire un perfetto sostegno alla testa Sistemare il bambino all interno del prodotto e controlla re attentamente il corretto posizionamento dello stesso compreso il posizionamento delle gamb...

Page 9: ...golarmente le cuciture e il prodotto per as sicurarsi che non siano usurati o danneggiati e che non vi siano parti mancanti Se una qualsiasi parte usurata o mancante non utilizzare il prodotto ATTENZI...

Page 10: ...e le fasce sulle spalle in modo corretto come riportato sulle etichette applicate al prodotto 7 Tensionare le fasce in maniera adeguata per supportare il bambino incrociarle sulla schiena facendo pass...

Page 11: ...comfortable Keep this product away from children when it is not in use If this product is used for newborns below the age of 4 months they can move in positions where their face is pressed against yo...

Page 12: ...g 3 The cushion should be up against your belly fig 4 be sure that the label Y is facing upwards 3 Insert your arm through the opening provided B fig 6 4 Insert your child place your child on the seat...

Page 13: ...elt fabric loose over the shoulders tighten properly WARNING To tie the knot correctly refer to the images fig 12 13 14 15 16 WARNING Do not tie the ends of the straps near the ab domen or lower limbs...

Page 14: ...oir lu auparavant et int grale ment compris les avertissements et les instructions Avant toute utilisation s assurer que toutes les fixations n uds sont s rs Ex cuter le n ud correctement L enfant peu...

Page 15: ...pi ces manquent ou sont endom mag es Ne pas utiliser en cas de signes d usure par exemple boules de fibres bouloches Utilisation correcte Utilisation incorrecte LISTE DES COMPOSANTS COMPOSANTS fig A...

Page 16: ...rrectement l as sise int rieure C fig 5 3 Enfiler le bras dans l ouverture B pr vue cet effet fig 6 4 Positionner correctement l enfant dans l assise et le pla cer pr s de votre poitrine ATTENTION Ten...

Page 17: ...haben Stellen Sie vor jeder Benutzung sicher dass alle Halte vorrichtungen Knoten sicher sind Den Knoten richtig binden Das Kind k nnte im Produkt m de werden Pr fen Sie re gelm ig ob das Kind bequem...

Page 18: ...erwenden Richtige Verwendung FalscheVerwendung LISTE DER BESTANDTEILE BESTANDTEILE Abb A und Abb B A Haltegurtb nder B ffnungen f r Arme des Elternteils C Innensitz D Befestigungsgurte E Etiketten X L...

Page 19: ...g Abb 5 3 Stecken Sie den Arm durch die entsprechende ffnung B Abb 6 4 Setzen Sie das Kind hinein positionieren Sie es richtig im Sitz und legen Sie es an den Brustkorb WARNUNG Halten Sie das Kind dab...

Page 20: ...l estar dentro del producto Con trole frecuentemente que el ni o est c modo y seguro Se recomienda efectuar paradas frecuentes Aseg rese de que los reci n nacidos queden bien colo cados en el soporte...

Page 21: ...mirando hacia arriba 3 Introduzca el brazo en la apertura B fig 6 4 Introduzca al ni o coloc ndolo correctamente en el asiento encima del coj n y ap yelo contra el pecho ADVERTENCIA Sujete firmemente...

Page 22: ...as bandas correctamente sobre los hombros como se indica en las etiquetas aplicadas al producto 7 Tense las bandas para sujetar al ni o cr celas por la es palda pasando la banda de la derecha por la a...

Page 23: ...ntes Certifique se que o rec m nascido est posicionado cor retamente no suporte para permitir o apoio perfeito da cabe a Para evitar o risco de queda certifique se de que a crian a esteja posicionada...

Page 24: ...m quina N o passar a ferro N o limpar a seco MANUTEN O Verifique com frequ ncia as costuras e o produto para garantir que n o estejam desgastados ou danificados e que nenhuma pe a esteja a faltar N o...

Page 25: ...Posicione as faixas nos ombros de modo correto como mostrado nas etiquetas aplicados ao produto 7 Ajuste as faixas de forma adequada para apoiar a crian a cruze as nas costas passando a faixa direita...

Page 26: ...de juiste wijze uit Het kind in het product kan moe worden Controleer re gelmatig of het kind comfortabel en veilig zit Er wordt aanbevolen om regelmatig een pauze te houden Zorg ervoor dat baby s co...

Page 27: ...uw arm in de daarvoor voorziene opening B afb 6 4 Zet het kind erin plaats het correct op de zitting boven het kussen en plaats het kind dicht bij uw borst WAARSCHUWING Ondersteun het kind stevig ter...

Page 28: ...arm in de daarvoor bedoelde opening B afb 8 6 Plaats de banden correct op de schouders zoals aange geven op de labels die op het product zijn aangebracht 7 Span de banden voldoende om het kind te onde...

Page 29: ...z y s stabilne Wykona w ze w prawid owy spos b Dziecko mo e zm czy si przebywaj c w produkcie Regularnie sprawdza czy dziecko ma bezpieczn i wy godn pozycj Zaleca si cz ste przerwy Upewni si e noworo...

Page 30: ...eli ja ka cz jest uszkodzona Nie u ywa je eli wida lady zu ycia np zmechacenie sfilcowanie U ycie prawid owe U ycie nieprawid owe SPIS CZ CI ELEMENTY rys A i rys B A Wi zane ko c wki pasa B Otwory na...

Page 31: ...s 6 4 Posadzi dziecko prawid owo na siedzisku i przysun je do klatki piersiowej OSTRZE ENIE W trakcie wykonywania tej czynno ci do brze przytrzymywa dziecko rys 7 5 Owin dziecko produktem i w o y drug...

Page 32: ...32 C 37 2 5 9 4...

Page 33: ...33 A B A C D E X Y 30 2 5 kg 1 1 2 30 C 30 C fig C fig E fig D fig F fig G fig H...

Page 34: ...34 2 X 3 4 3 6 4 7 5 8 6 7 9 8 10 C 11 16 12 13 14 15 16 1 1 2 2 C 5 3 6 4 7 5 8 6 7 9 8 leg pass 11A 12 13 14 15 16 14 17 18 ARTSANA IHDI Boppy ComfyHug...

Page 35: ...in i ine d zg n yerle tirildiklerinden emin olun ocu unuzu r n n i ine yerle tirin ve bacaklar da da hil olmak zere d zg n konumland rd n z dikkatlice kontrol edin D meye ba l tehlikeleri nlemek i in...

Page 36: ...ki leri ve r n d zenli olarak kontrol ediniz E er eskiyen veya kay bolan bir par a varsa r n kullanmay n z UYARI tehlikeleri nlemek ve ocu unuzu yaralanmaya kar korumak i in a a da verilen talimatlar...

Page 37: ...e tiriniz 7 eritleri ocu unuzu desteklemeye yetecek kadar s k n z sa eridi sol a kl ktan ve sol eridi sa a kl ktan ge irerek bunlar s rt n zda aprazlay n z ve her ikisini de ne getiriniz ek 9 8 Bacak...

Page 38: ...38 37 o 2 5 9 4...

Page 39: ...39 A B A B C D E X Y 30 2 5 1 1 30 C 30 C fig C fig E fig D fig F fig G fig H...

Page 40: ...40 2 2 X 3 4 Y 3 6 4 7 5 8 6 7 9 8 10 C 11 16 12 13 14 15 16 E 1 1 2 2 5 3 6 4 7 5 8 6 7 9 8 leg pass 11 12 13 14 15 16 14 17 18 ARTSANA IHDI Boppy ComfyFit...

Page 41: ...41 C 37 9 2 5 4 C E D F...

Page 42: ...42 B A A B C D E X Y 2 5 1 1 2 3 X 2 4 Y 6 B 3 4 7 B 5 8 6 7 9 8 10 C 11 16 12 13 14 15 16 E E 1 1 2 5 C 2 6 B 3 4 7 B 5 8 6 7 9 8 11A 12 13 14 15 16 14 17 18 30 C 30 C G H...

Page 43: ...43 ARTSANA IHDI Boppy ComfyHug Baby Carrier...

Page 44: ...44 NOTE...

Page 45: ...45 NOTE...

Page 46: ...46 NOTE...

Page 47: ......

Page 48: ...46 079952 000 000_2104 CODE 79952 UNI 11736 2020 ARTSANA S p A Via Saldarini Catelli 1 22070 Grandate CO Italy Tel 39 031 382 111 Fax 39 031 382 400 www chicco com 2 5 9kg 0 6...

Reviews: