background image

EN

26

Cleaning and  maintenance

www.bora.com

7  Cleaning and 

maintenance

X

X

Observe all safety and warning information 

(see the Safety section).

X

X

Follow the enclosed manufacturer’s information.

X

X

When conducting scheduled cleaning and other 

maintenance, make sure that the cooktop and cooktop 

extractor are fully switched off so as to prevent injury 

(see Operation section).

Q

Q

Regular cleaning and maintenance ensures the 

 longevity of the product and optimal function.

X

X

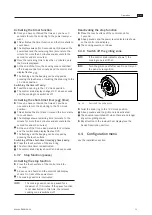
Adhere to the following cleaning and maintenance 

cycles:

Component

Cleaning cycle

Control knob Cooktop 

immediately they become dirty with 

conventional detergents

Tab. 7.1  Cleaning cycles

7.1  Cleaning agents

INFO


Due to the use of aggressive cleaning agents 

and abrasion caused by the pot bases the 

 surface will become damaged and dark stains 

will occur.

To clean the Tepan stainless steel grill, you need a special 

Tepan scraper and suitable detergents.

X

X

Never use steam cleaners, abrasive sponges, scouring 

pads or chemically aggressive cleaning agents 

(e.g. oven cleaner spray).

X

X

Make sure that the cleaning agent does not contain 

any sand, soda, acids, lyes or chloride.

7.2  Looking after the cooktop

X

X

Never use the cooktop as a work or storage surface.

X

X

Do not push or pull cookware over the cooktop.

X

X

Keep the cooktop clean.

X

X

Remove any dirt immediately.

7.3  Cleaning the cooktop

7.3.1  Cleaning the stainless steel grill 

surface

INFO


Only use the scraper on the grill surface, as 

otherwise it could damage the surface.

INFO


Only clean the stainless steel in the polishing 

direction.

INFO


Do not put lemon juice on areas near the 

 cooktop and the worktop as it could damage 

them.

INFO


Do not put stainless steel cleaners on the 

stainless steel surfaces or the stainless steel 

grill area.

Slight soiling 

X

X

Make sure that the cooktop is switched off 

(see the Operation section).

X

X

Wait until the stainless steel grill surface has cooled 

down sufficiently.

X

X

Remove light soiling with a damp cloth and washing-up 

liquid.

X

X

To prevent water or limescale marks (yellowish colour), 

use a soft cloth to dry off the surface you have cleaned 

with water.

Normal soiling

X

X

Make sure that the cleaning function is activated for 

both grilling areas (see Operation section).

X

X

Wait for the grill zone displays to stop flashing 

(= optimum cleaning temperature of 70°C)

X

X

Only put clean, cold water on the grill surface.

X

X

Allow the water around 15 minutes to take effect.

X

X

Remove all coarse dirt and food residues from the 

cooktop using a Tepan scraper.

X

X

Remove the remaining dirt and water residue with a 

clean cloth.

X

X

Dry the cooktop with a clean cloth.

Heavy soiling

X

X

Make sure that the cleaning function is activated for 

both grilling areas (see Operation section).

X

X

Wait for the grill zone displays to stop flashing 

(= optimum cleaning temperature of 70°C)

X

X

Dissolve a tablespoon of lemon juice (approx. 

10 – 15 ml) in another bowl of warm water 

(around 200 ml).

X

X

Now put this liquid on the grill surface.

X

X

Allow the liquid around 5-8 minutes to take effect.

X

X

Use a plastic brush to remove burnt-on grill residues 

from the surface.

X

X

Remove the remaining dirt and the residues of the 

water and lemon juice mixture (citric acid) completely 

with a clean cloth.

X

X

Only put clean, cold water on the grill surface.

X

X

Remove the remaining dirt and water residue with a 

clean cloth.

X

X

Dry the cooktop with a clean cloth.

Any changes in colour or little scratches are not damage 

to the cooktops. They do not affect the functionality of 

Summary of Contents for PKT11

Page 1: ...EN PKT11UMEN 000 www bora com Operating and installation instructions PKT11 Tepan stainless steel grill 1038521 ...

Page 2: ...e of its contents are prohibited unless expressly authorised These operating and installation instructions have been drawn up with the greatest of care But it cannot be ruled out that subsequent technical modifications have not yet been incorporated or the relevant content has not yet been adapted Please accept our apologies in this eventuality An updated version can be requested from the BORA Ser...

Page 3: ... panel 16 5 5 3 Installing the cooktop 17 5 5 4 Seal the cooktop 18 5 5 5 Establish communication 18 5 5 6 Establishing the power connection 19 5 6 Configuration menu 19 5 6 1 Accessing the configuration menu 19 5 6 2 Select menu option 19 5 6 3 Changing the setting 20 5 6 4 Exiting configuration menu 21 5 7 Handover to user 21 6 Operation 22 6 1 General operating instructions 22 6 2 Initial opera...

Page 4: ...lectrical installation and commissioning Gas specialists The gas connection may only be established by certified engineers They also assume responsibility for proper installation and commissioning of the gas system Tab 1 1 Target groups INFO BORA Holding GmbH BORA Vertriebs GmbH Co KG BORA APAC Pty Ltd and BORA Lüftungstechnik GmbH hereinafter referred to as BORA do not assume any liability for da...

Page 5: ...ghted with symbols and signal words Safety and warning information is structured as follows WARNING SYMBOL AND SIGNAL WORD Type and source of the danger Consequences of non compliance X X Measures to minimise risk The following applies Q Q The warning symbol draws attention to the danger Q Q The signal word indicates the severity of the risk Warning sign Signal word Hazard Danger Indicates an immi...

Page 6: ...r X X When using recirculation mode ensure a sufficient supply of fresh air e g by opening a window X X Ensure a normal and comfortable room climate humidity of 45 60 e g by opening natural ventilation openings or using domestic ventilation systems X X After every use in recirculation mode switch the cooktop extractor to a low level for about 20 minutes or activate the automatic after run function...

Page 7: ...holders oven gloves CAUTION Escaping hot liquids Unattended pans can boil over allowing hot liquids to escape X X Always keep an eye on pans while cooking X X Short cooking sessions must be constantly monitored 2 3 Safety instructions installation The device must only be installed and assembled by trained specialists who are X X Where possible clean the cooktop after every cooking session X X Only...

Page 8: ...rcuit breakers or contactors X X Use an authorised measuring device to ensure that there is no power to the appliance familiar with and comply with the standard national regulations and supplementary regulations of the local utility companies Work on electrical components must be conducted by trained electrical personnel The electrical safety of the appliance is only guaranteed if it is connected ...

Page 9: ...amage to property Incorrect components can lead to personal injury or damage to the appliance Modifications additions or alterations to the appliance can lead to safety risks X X Only use original spare parts for repairs 2 6 Intended use The device cannot be used at altitudes above 2000 m metres above sea level The device is designed exclusively for the preparation of food in private households Th...

Page 10: ...perature control 1 9 P 150 230 C 250 C Front cooking zone 295 x 230 mm 2400 W Back cooking zone 295 x 230 mm 2400 W Temperature control range 70 250 C Tab 3 1 Technical data Device dimensions control knob Ø76 Ø58 Ø49 92 22 10 40 20 Fig 3 1 Device dimensions control knob Device dimensions 465 540 370 295 37 5 37 5 Fig 3 2 PKT11 Device dimensions aerial view 311 29 5 73 60 5 246 62 Fig 3 3 PKT11 Dev...

Page 11: ...Q Cleaning function 4 1 Structure 1 2 4 3 Fig 4 1 Tepan stainless steel grill 1 Two grilling zones 2 Connections for control knob and extraction system back 3 Control knob for the back grilling zone 4 Control knob for the front grilling zone 4 3 2 1 Fig 4 2 Structure of control knob 1 Knob casing 2 Universal nut 3 Control knob display 4 knob ring 4 2 Operating principle 2 1 Fig 4 3 Control element...

Page 12: ...s in the control knob display INFO You can set a time range of between 1 and 120 minutes for the timer functions Unit Display Meaning Control knob display e g 190 Temperature display P Power setting Bridging function H Residual heat display Grill zone is switched off but still hot temperature 60 C t Short time timer function egg timer L Childproofing feature I I Pause function c Cleaning function ...

Page 13: ...hes off a cooking zone which is in use Short time timer egg timer INFO The short time timer requires the cooking zone to be switched off and works like a conventional egg timer 4 3 7 Pause function The cooking session can be temporarily interrupted max 10 minutes Q Q 1 1 is displayed in front of the power level on the control knob display 4 4 Safety devices 4 4 1 Residual heat display INFO While H...

Page 14: ...ts which are damaged X X Dispose of transport packaging in the proper manner see the Decommissioning and Disposal section 5 2 Tool and aids The following tools are required for the correct installation of the cooktop Q Q Pencil Q Q Measurement equipment Q Q Drill or cordless drill with Forstner bit Ø 50mm Q Q Screwdriver hexolobular internal key Torx 20 Q Q Silicone sealant for sealing cutting sur...

Page 15: ...il must always be fitted between adjacent cooktops available as an accessory INFO Alternatively the cooktop can be fitted rotated about 180 Q Q Cross bars on the kitchen unit in the area of the worktop cut out may need to be removed Q Q The drawers and or shelves in the floor unit must be removable for maintenance and cleaning purposes X X Make sure that the area below the cooktop is sufficiently ...

Page 16: ...o clock position X X Tighten the fixing nut X X Place the knob ring on the control knob INFO A minimum opening cross section of 50 cm must be provided for ventilation on the front side and in the false floor 5 5 1 Optional cable protection If cable protection false floor is planned below the device this must be fitted so it can be removed for maintenance work Sufficient ventilation or extraction m...

Page 17: ...n system 3 are at the back 1 2 Fig 5 14 Cooktop and height adjustment plates 1 Cooktop 2 Height adjustment plates Example bore holes 70 90 90 90 Ø50 0 5 90 196 196 370 370 110 1 1 Fig 5 11 Bore holes for 2 cooktops and 1 extractor 1 Bore holes for socket 2x external 2 Bore holes for control knobs 5x 3 Cooktop 2x 4 Cooktop extractor 5 Worktop 6 Floor unit panel 70 90 90 90 90 90 196 196 196 196 370...

Page 18: ...ckets 1 Screw 2 Mounting bracket X X Fasten the cooktop 1 using the mounting brackets 2 X X Tighten the mounting bracket screws 1 with max 10 Nm X X Verify that the alignment is correct X X Once all of the installation work is complete seal the devices with black heat resistant silicone sealant Installation rotated around 180 X X Rotate the cooktop around 180 X X For the installation proceed as de...

Page 19: ...the touch surface again within 3 seconds and hold it down for 5 seconds Q Q The control knob display shows C a beep sounds and the configuration menu is available 5 6 2 Select menu option X X Turn the knob ring to select the menu option you want Connect the control knob to the cooktop 3 2 1 Fig 5 19 Connection the control knob to the cooktop on the rear 1 Connection the control knob for the front ...

Page 20: ...b ring clockwise to increase the value X X Turn the knob ring anticlockwise to decrease the value The following menu options are available Menu options C0 Volume of warning beep C 1 Select operating mode normal mode or demo mode C2 0 or 180 installation C3 Type of control knob display Tab 5 4 Menu options in the configuration menu X X Touch the touch surface on the control knob again for 1 second ...

Page 21: ... out and a beep sounds X X Twist the knob ring to the 12 o clock position 0 appears on the display for 10 seconds The display then goes out with a beep INFO If no settings are changed in a menu or sub menu option for 2 minutes the configuration menu is closed automatically 5 7 Handover to user Once installation is complete X X Explain the main functions to the user X X Explain all safety related a...

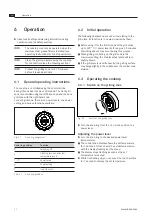
Page 22: ...imer function Tab 6 1 Knob ring positions 6 2 Initial operation The following phenomena are not errors relating to the grill plate its function is in no way impaired by them Q Q Before using it for the first time heat the grill zones up to 220 C power level 8 for approx 25 minutes Disturbing odours may occur during this process Q Q When grilling or heating up the grill zone to the maximum setting ...

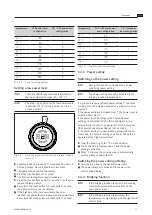
Page 23: ... to the desired power level Q Q The power level set is active and is shown in the control knob display 6 3 3 Bridging function INFO If the bridging function is active both cooking zones will operate at the same time on the same power level INFO If the bridging function is activated the temperature is only displayed on the right hand control knob Temperature C30 power level configuration C31 C32 po...

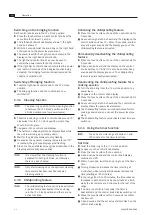
Page 24: ...switches to t X X Press the touch surface within 3 seconds to confirm the time set Q Q A beep sounds and the set value starts to flash on the control knob display Switching on the bridging function Both control knobs are in the 12 o clock position X X Press the touch surface on both control knobs at the same time for at least 1 second Q Q The left hand control knob display shows the right hand one...

Page 25: ...hed off a beep sounds for 2 minutes and the control knob display flashes 000 Q Q The flashing and the beeping can be stopped by pressing the touch area or twisting the knob ring to the 12 o clock position Switching the timer off early X X Twist the knob ring to the 12 o clock position Q Q The control knob display changes to 0 a beep sounds and the cooking zone switches off Activating the short tim...

Page 26: ...them INFO Do not put stainless steel cleaners on the stainless steel surfaces or the stainless steel grill area Slight soiling X X Make sure that the cooktop is switched off see the Operation section X X Wait until the stainless steel grill surface has cooled down sufficiently X X Remove light soiling with a damp cloth and washing up liquid X X To prevent water or limescale marks yellowish colour ...

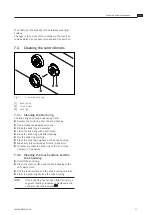
Page 27: ...ring in hot water X X Clean the knob ring with a soft brush X X Rinse the knob ring well after cleaning X X Dry the knob ring carefully X X Place the dry knob ring back on the knob housing X X Make sure it is positioned correctly 0 position X X If necessary twist the knob ring to the 12 o clock position 0 position 7 4 2 Cleaning the touch surface and the knob housing X X Pull off the knob ring X X...

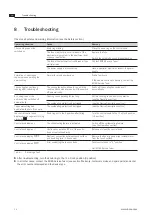
Page 28: ...rating for too long Put the cooking zone back into operation see the Operation section The overheating protection has tripped see the Device Description section The power setting has automatically shut off too early The overheating protection has tripped see the Device Description section the central control knob display shows a segment turning clockwise Knob ring not in the 0 position after fitti...

Page 29: ...mentally friendly disposal Disposal of transport packaging INFO The packaging protects the device from damage in transport The packaging materials have been selected from environmental and disposal perspectives and are therefore recyclable Returning the packaging to the materials cycle saves resources and reduces waste volumes Your specialist supplier will take the packaging back X X Give the pack...

Page 30: ... you are not able to resolve yourself please contact your BORA specialist supplier or the BORA Service Team The BORA Service Team requires the type designation and the build number of your appliance FD number Both pieces of information can be found on the nameplate on the back of the instructions and on the appliance base 10 3 Replacement parts X X Only use original spare parts for repairs INFO Re...

Page 31: ......

Page 32: ...f Austria T 43 0 5373 62250 0 F 43 0 5373 62250 90 mail bora com www bora com Europe BORA Holding GmbH Prof Dr Anton Kathrein Straße 3 6342 Niederndorf Austria T 43 0 5373 62250 0 F 43 0 5373 62250 90 mail bora com www bora com Australia New Zealand BORA APAC Pty Ltd 100 Victoria Road Drummoyne NSW 2047 Australia T 61 2 7900 5580 F 61 2 8076 3514 info boraapac com au www boraapac com au Nameplate ...

Reviews: