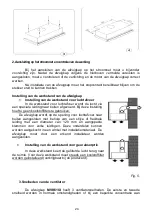
background image


33 

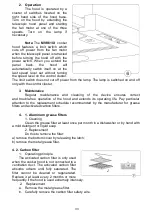
2.  Operation   


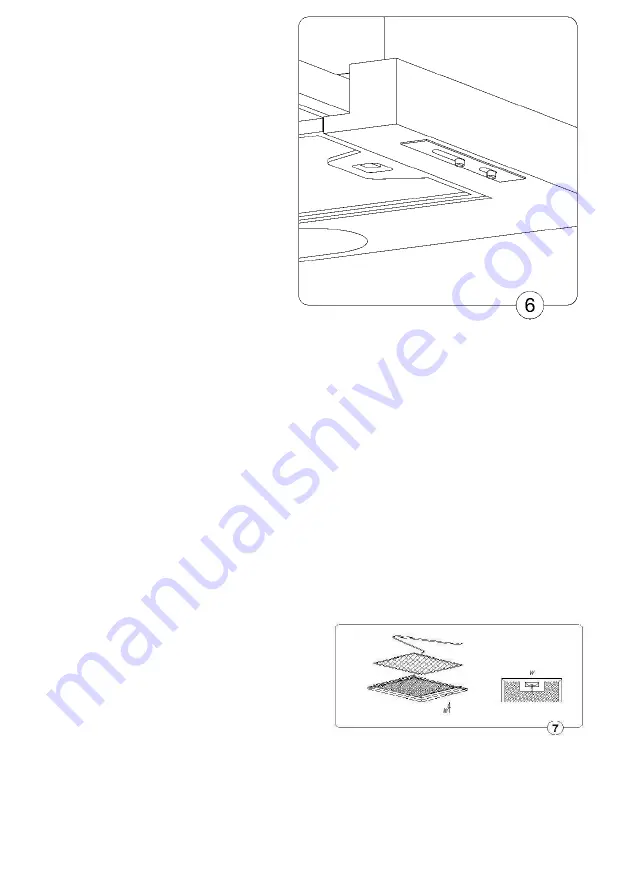
The  hood  is  operated  by  a 

cluster  of  switches  located  on  the 
right  hand  side  of  the  hood  base. 
Turn  on  the  hood  by  extending  the 
telescopic  hood  panel  and  starting 
the  fan  motor  at  one  of  the  three 
speeds. 

Turn 

on 

the 

lamp 

if 

necessary.  


Note: The MVK61IX  cooker 

hood  features  a  limit  switch  which 
cuts  off  power  from  the  fan  motor 
when the telescopic panel is retracted 
before  turning  the  hood  off  with  the 
power  switch.  When  you  extend  the 
panel 

back, 

the 

hood 

will 

automatically  switch  itself  on  at  the 
last  speed  level  set  without  turning 
the speed level on the control cluster. 
The limit switch does not cut off power from the lamp. The lamp is switched on and off 
only with the control cluster.  
  

3.  Maintenance 


Regular  maintenance  and  cleaning  of  the  device  ensures  correct 


and  trouble-free  operation  of  the  hood  and  extends  its  operating  life.  Pay  particular 
attention  to  the  replacement  schedule  recommended  by  the  manufacturer  for  grease 
filters and activated carbon filters. 
 

4.  1. Aluminum grease filters 


1. Cleaning 


Clean the grease filter at least once per month in a dishwasher or by hand with 

a mild detergent or liquid soap. 


2. Replacement  


Do this to remove the filter: 

a) remove the bottom cover by releasing the latch;  
b) remove the metal grease filter

.  


4. 2. Carbon filter 

1.  Operating principle 

       The  activated  carbon  filter  is  only  used 
when the cooker hood is not connected to a 
ventilation  duct.  The  activated  carbon  filter 
absorbs  odours  until  fully  saturated.  The 
filter  cannot  be  cleaned  or  regenerated. 


Replace  it  at  least  every  2  months  or  more 
frequently if the hood is used extremely intensely. 
        2.    Replacement 

a.  Remove the metal grease filter.  
b.  Carefully remove the carbon filter safety wire.  

Summary of Contents for MVK61IX

Page 1: ...DE DUNSTABZUGSHAUBE TYP ...

Page 2: ...Haftung für Beschädigungen die infolge einer der Bedienungsanleitung ungemäßen Montage entstanden sind INHALTSVERZEICHNIS I Charakteristik 4 II Ausrüstung 4 III Technische Daten 5 IV Betriebsbedingungen 5 V Montage 6 VI Bedienung und Wartung 8 ...

Page 3: ...ng nicht erforderlich Die Dunstabzugshaube ist ein Elektrogerät das in der II Schutzklasse gegen elektrischen Schlag ausgeführt wurde Das Gerät verfügt über eine unabhängige Beleuchtung sowie einen Abzugsventilator für den eine der drei Drehgeschwindigkeiten eingestellt werden kann Die Dunstabzugshaube ist für eine dauerhafte Befestigung an dem Küchenschrank über dem Gas oder Elektroherd bestimmt ...

Page 4: ... Geräts aus der Steckdose herausgezogen werden und es soll eventuell abgewartet werden bis der Ventilator ganz stehenbleibt 7 Sollen im Raum außer der Dunstabzugshaube Anlagen mit einer nicht elektrischen Versorgung in Betrieb sein z B Gasherde bzw Herde die mit flüssigen Brennstoffen betrieben werden soll für eine ausreichende Lüftung gesorgt werden Luftzufuhr 8 Ein sicherer Betrieb ist möglich w...

Page 5: ...g 3 Im unteren Teil des Schranks sollen mittels einer Schablone Öffnungen mit einem Durchmesser von 4 5 mm an den Stellen die den Montageöffnungen im Gehäuse der Dunstabzugshaube entsprechen sowie von 120 mm für den Luftauslauf aus der Dunstabzugshaube ausgebohrt werden Die Dunstabzugshaube soll mittels vier Montageschrauben die sich im Satz befinden befestigt werden Die minimale Entfernung des Bo...

Page 6: ...rend des Abzugsbetriebs der Dunstabzugshaube wird die Luft nach außen mit einer speziellen Leitung abgeführt Bei dieser Einstellung sollen die Kohlefilter nicht verwendet werden Die Dunstabzugshaube ist an die nach außen abführende Öffnung mittels einer steifen bzw elastischen Leitung mit einem Durchmesser von 120 mm und entsprechender Leitungsklemmen angeschlossen die an Verkaufsstellen mit Monta...

Page 7: ...zugshaube soll nicht für andere Zwecke als die für die sie bestimmt ist verwendet werden 2 Bedienung Zur Bedienung der Dunstabzugshaube dient ein Satz der Schalter der sich rechts des unteren Teils der Dunstabzugshaube befindet Um den Betrieb zu starten soll das teleskopische Element der Dunstabzugshaube herausgeschoben werden und der Motor mit einer der drei möglichen Geschwindigkeiten eingeschal...

Page 8: ... mindestens einmal pro 2 Monate oder öfter im Fall eines ausnahmsweise intensiven Gebrauchs gewechselt werden 2 Wechsel a Den Metallfettfilter entfernen b Den den Kohlefilter sichernde Draht vorsichtig abnehmen c Den alten Kohlefilter herausnehmen den neuen legen und mit dem Draht wieder sichern d Den Metallfettfilter einbauen 2 Beleuchtung Die Beleuchtungsanlage besteht aus einer Glühlampe mit Le...

Page 9: ...ur Reinigung der aus Edelstahl gefertigten Oberflächen verwenden keinen harten rauen Lappen verwenden Es wird empfohlen spezielle Mittel zur Reinigung der CrNi und Glasoberflächen zu verwenden die in Haushaltswarengeschäften erhältlich sind ...

Page 10: ...10 FR HOTTE ASPIRANTE DE CUISINE TYPE ...

Page 11: ...esponsabilité pour tout dommage causé par un montage non conforme au manuel d utilisation TABLE DES MATIÈRES I Caractéristiques 3 II Équipement 3 III Données techniques 4 IV Conditions d exploitation 4 V Montage 5 VI Manipulation et entretien 7 ...

Page 12: ...re d installer un conduit d évacuation d air La hotte aspirante est un appareil électrique fabriqué dans la IIe classe de protection contre les incendies L appareil est muni d éclairage indépendant et d un ventilateur d échappement qui peut être réglé à l une des trois vitesses de rotation La hotte est conçue pour le montage permanent sur l armoire de cuisine au dessus de la cuisinière à gaz ou él...

Page 13: ...ns 1 fois par mois car les filtres saturés de graisse sont inflammables 6 Avant tout nettoyage remplacement du filtre ou travail de réparation débranchez l appareil de sa prise de courant et éventuellement attendez jusqu à ce que le ventilateur s arrête complètement 7 Si dans la pièce où est installée la hotte sont également exploités des appareils à alimentation non électrique tels que des four à...

Page 14: ...deurs V MONTAGE 1 Montage de la hotte a Le bas du meuble prévu pour le montage de la hotte doit être surélevé de 173 mm par rapport aux autres fig 2 b Au sommet du boîtier se trouvent des trous de montage pour la fixation de la hotte fig 3 En utilisant un patron percez dans le fond du meuble des trous de 4 5 mm de diamètre aux endroits qui correspondent aux trous de montage du boîtier de la hotte ...

Page 15: ...Réglage du mode d aspiration de la hotte En mode d aspiration l air est évacué vers l extérieur par un conduit spécial En ce mode n utilisez pas de filtres au charbon La hotte est connectée au trou d évacuation de l air au moyen d un tube rigide ou flexible d un diamètre de 120 mm et des pinces pour conduits adaptées que vous pouvez acheter dans des magasins de quincaillerie Le montage de la hotte...

Page 16: ...ot car cela entraîne des pertes d énergie inutiles et une concentration dangereuse de la chaleur N utilisez pas la hotte à des fins autres que celles auxquelles elle est destinée 5 Manipulation La manipulation de la hotte aspirante est assurée par un ensemble de commutateurs situés à droite de sa partie basse Pour démarrer l appareil avancez l élément télescopique et mettez le moteur en marche à l...

Page 17: ...destiné à être lavé ni régénéré et doit être remplacé au moins tous les 2 mois ou plus fréquemment dans le cas d un usage très intensif 2 Remplacement e Supprimez le filtre métallique anti graisse f Retirez précautionneusement le fil de protection du filtre au charbon g Retirez le filtre au charbon usé installez le nouveau et remettez en place le fil de protection h Réinstallez le filtre métalliqu...

Page 18: ...8 d utiliser des chiffons raides rugueux Il est recommandé d utiliser des produits spéciaux pour le nettoyage des surfaces en chromo nickel et en verre disponibles dans les magasins de produits ménagers ...

Page 19: ...19 NL AFZUIGKAP TYPE ...

Page 20: ...rakelijk voor beschadigingen indien de afzuigkap niet volgens de bedieningshandleiding is gemonteerd I Eigenschappen 4 II Uitrusting 4 III Technische gegevens 5 IV Gebruiksvoorwaarden 5 V Montage 6 VI Bediening en onderhoud 8 INHOUDSOPGAVE ...

Page 21: ...eerd om de lucht naar buiten af te voeren De afzuigkap is een elektrisch toestel dat conform brandveiligheidsklasse 2 is geproduceerd Het toestel heeft onafhankelijke verlichting en een afzuigventilator die op één van de drie snelheden kan worden ingesteld De afzuigkap is ontworpen om permanent in een kastje boven een gasfornuis of elektrisch fornuis te worden geïnstalleerd De afzuigkap bestaat ui...

Page 22: ...den gereinigd want ze zijn licht ontvlambaar als ze met vet doordrenkt zijn 6 Voor elke reiniging vervanging van de filter of reparatie moet de stekker van het toestel uit het stopcontact worden getrokken U moet eventueel wachten tot de ventilator volledig tot stilstand komt 7 Als er in de ruimte behalve de afzuigkap andere toestellen met niet elektrische voeding worden gebruikt bv gaskachels of k...

Page 23: ...monteerd moet 173 mm worden verhoogd in verhouding tot de andere kastjes fig 2 b In het bovenste deel van de ombouw van de afzuigkap zijn montageopeningen aangebracht die dienen om de afzuigkap te bevestigen fig 3 In de onderkant van het kastje moeten met behulp van het sjabloon openingen met een diameter van 4 5 mm worden geboord op de plaatsen die overeenstemmen met de montageopeningen in de omb...

Page 24: ... deze instelling hoeft u geen koolstoffilters te gebruiken De afzuigkap wordt op de opening voor luchtafvoer naar buiten aangesloten met behulp van een stijve of flexibele leiding met een diameter van 120 mm en aangepaste klemmen voor zulke leidingen Deze onderdelen kunnen worden aangekocht in een winkel met installatiemateriaal De afzuigkap moet door een erkend installateur worden aangesloten Ins...

Page 25: ...afzuigkap bevindt Om te werken met de afzuigkap schuift u het telescopische element van de afzuigkap uit en schakelt u de motor aan op een van de drie snelheden U kunt eventueel ook de verlichting aanschakelen Opgelet De afzuigkap MVK61IX is uitgerust met een eindschakelaar die de voeding van de motor afsluit wanneer u het telescopische element van de afzuigkap inschuift zonder de afzuigkap uit te...

Page 26: ... nieuwe filter aan en beveilig die met de draad d Monteer de metalen vetfilter terug 5 Verlichting De verlichtingsinstallatie bestaat uit een gloeilamp met een vermogen van max 40 W Om een defecte gloeilamp te vervangen gaat u als volgt tewerk a Verwijder de telescopische module en verwijder de aluminium filters b Draai de gloeilamp uit en houd tegelijkertijd de fitting van de lamp vast met de and...

Page 27: ...27 EN COOKER HOOD TYPE ...

Page 28: ...l not accept any responsibility for damage caused by installation against this Guide I Characteristics 4 II Features 4 III Technical data 5 IV Operating conditions 5 V Installation 6 VI Operation and maintenance 8 TABLE OF CONTENTS ...

Page 29: ...ted with the activated carbon filter the hood does not require the air exhaust connection The cooker hood is an electrical device with electrocution protection class II The machine feature independent lighting and an exhaust fan with three selectable speeds The hood is designed for permanent installation in wall mounted cupboards directly over gas or electric ovens The main components of the hood ...

Page 30: ...ning filter replacement or any repairs 7 If another equipment powered by other media is operated in the same room e g gas or liquid fuel ovens stoves ensure adequate ventilation air supply 8 Operation is safe if the cooker hood is simultaneously operated with combustion devices dependent on the air in the room at a maximum negative pressure of 0 004 millibars at the work places of these devices th...

Page 31: ...te to drill 4 5 mm holes in the bottom of the cupboard at the locations corresponding to the assembly holes in the hood body and one 120 mm hole for the hood air exhaust Fasten the hood to the cupboard with four fastening bolts included with the product The minimum distance from the hood base to the electric oven top is 650 mm The minimum distance from the hood base to the gas oven top is 750 mm S...

Page 32: ...d returns to the room Always use the carbon filter in this mode the carbon filter is available from the manufacturer Fig 5 10 Fan speeds The fan of the MVK61IX cooker hood has three running speeds Speed levels one and two are used in normal cooking with small amount of vapours Speed level three is used with large emissions of cooking vapours e g during frying or grilling 1 Safe use Always follow t...

Page 33: ...ng of the device ensures correct and trouble free operation of the hood and extends its operating life Pay particular attention to the replacement schedule recommended by the manufacturer for grease filters and activated carbon filters 4 1 Aluminum grease filters 1 Cleaning Clean the grease filter at least once per month in a dishwasher or by hand with a mild detergent or liquid soap 2 Replacement...

Page 34: ...e hand while holding the bulb fixture with the other then install a new bulb c Reinstall the aluminium filters Be careful the bulb can be hot when replaced 6 Cleaning During regular cleaning of the cooker hood do not Use damp rags or sponges or clean with streams of water Use solvents or alcohol since they may matt coated surfaces Use corrosive agents especially when cleaning stainless steel surfa...

Reviews: