


EN
WWW.BORMANNTOOLS.COM
8
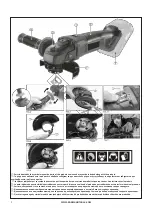
Main Description
1. On / Off Switch
2. Rear hand grip
3. Spindle lock button
4. Locking Flange
5. 20V Li-ion Battery Pack **(Sold Separately)
6. Auxiliary handle
7. Safety Guard
Basic Operation
Auxiliary Handle (Fig 4.)
For reasons of safety, when working with this type of electric power tool, the operator must always use the auxiliary handle
(6).
- Screw the handle clockwise, into one of the three threaded apertures best suited to the application and user comfort.
Warning! This machine must never be operated (cutting off/grinding processes) without the correct guard placed correctly
and operating fully.
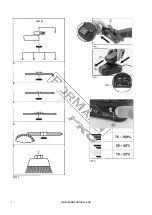
Fitting The Guard (Fig.5-6)
The guard supplied is designed for grinding only, it is not intended to be used for cutting operations. If you intend to perform
cutting operations with this machine, you need to purchase the additional cutting guard, which has a more enclosed design to
contain any fragments if the cutting disc fails.
- Position the guard onto the grinder collar with the quick release lever in the open position.
- Rotate the guard until it is in the correct position and then close the quick release lever to lock the guard.
Warning! Never attempt to operate this machine without the guard securely fitted and correctly positioned*.
*With the exception of wire cup brushes etc. which negate the guards effectiveness.
Fitting/Replacing Accessories (Sold Separately) (Fig.7-9)
Warning! Prior to mounting an abrasive wheel ensure the expiry date has not expired, rendering it potentially hazardous.
Warning! Selection of the correct accessory, suitable for the intended application is vital. Seek guidance if uncertain of
selection.
Warning! The rated (no load) revolutions per minute of the tool must not exceed the speed capacity of the accessory. Please
refer to the accessory manufacturers instructions for information.
Visual Inspection:
- Prior to fitting, abrasive/super-abrasive wheels shall be subject to a visual inspection.
Inspection:
- Each time after mounting, the abrasive/super-abrasive wheel shall be test run for a reasonable time.
- The specified maximum operating speed of the wheel shall not be exceeded.
- Damaged abrasives shall be destroyed.
- Always wear approved safety goggles.
Important information B,C,D (Fig.6):
- For cutting applications, and to comply to current legislation, it is necessary to replace the "grinding" guard supplied with
this machine with a "cutting" guard.
- Press and hold the spindle lock button (3).
- Loosen the locking flange (4) anti-clockwise using the pin spanner (8) supplied.
- The spindle may rotate slightly before the spindle lock fully engages.
- Remove the locking flange only.
- Clean the flanges and spindle prior to fitting any accessory.
• If the rear flange (4.1) is removed for cleaning, ensure it locates correctly on the spindle flats when refitting and does not
spin freely.
- When fitting the appropriate accessory please refer to (FIG.7 for specific details on the locking flange correct orientation as
applicable.
Securely tighten the locking flange clockwise using the pin spanner while holding down the spindle lock (4).
Note: When using wire cup brushes the locking flange is not required due to the design of the brushes. When fitted check the
accessory is correct and, importantly fully secure on the spindle.
Warning! Never press the spindle lock button (4) while the spindle is in motion.
On/Off Switch (Fig.10)
- Push the switch (1) forward to start the grinder.
- Push the switch further forwards and down to lock it in the 'ON' position.
- To stop the grinder, release the switch by pushing down on the back of the switch (1).
Summary of Contents for 027614
Page 3: ...WWW BORMANNTOOLS COM 3 M14 A B C D E...
Page 12: ...WWW BORMANNTOOLS COM 12 EL 1 2 Off...
Page 13: ...WWW BORMANNTOOLS COM 13 EL Bormann 30...
Page 14: ...WWW BORMANNTOOLS COM 14 EL D 80 mm 1 On Off 2 3 4 5 20V 6 7 4 6 5 6...
Page 15: ...WWW BORMANNTOOLS COM 15 EL 7 9 B C D 6 3 4 8 4 1 7 4 4 On Off 10 1 ON 1 ON OFF OFF ON...
Page 17: ...WWW BORMANNTOOLS COM 17 EL 15 0 2 3 50C 300C...
Page 18: ...WWW BORMANNTOOLS COM 18 EL...
Page 31: ...WWW BORMANNTOOLS COM 31 BG 1 2 3 1 2 1 2 3 4 5 1 2 3 4 5 6 7...
Page 32: ...WWW BORMANNTOOLS COM 32 BG Bormann 30...
Page 33: ...WWW BORMANNTOOLS COM 33 BG D 80 mm 1 2 3 4 5 20V 6 7 4 6 5 6 7 9...
Page 34: ...WWW BORMANNTOOLS COM 34 BG B C D 6 3 4 8 4 1 7 4 4 10 1 1 ON OFF G 11 30 25...
Page 35: ...WWW BORMANNTOOLS COM 35 BG 1 2 Bormann 5 5 1 1 9 230 V AC 13amp 9 1 2 9 2 2 9 1 15 0 2 3 5 2...
Page 36: ...WWW BORMANNTOOLS COM 36 BG 1 2 3 1 1 2 2 1 2 3 50C 300C...
Page 37: ...WWW BORMANNTOOLS COM 37 BG...
Page 38: ...WWW BORMANNTOOLS COM 38 SRB 1 2 3 1 2 1 2 3 4 5 1 2 3 4 5 6 7...
Page 39: ...WWW BORMANNTOOLS COM 39 SRB 30...
Page 40: ...WWW BORMANNTOOLS COM 40 SRB 1 2 3 4 5 20 6 7 4 6 5 6 7 9 6 3 4 8 4 1 7 80...
Page 41: ...WWW BORMANNTOOLS COM 41 SRB 4 4 10 1 1 11 30 25 1 2 5 5 1 1...
Page 42: ...WWW BORMANNTOOLS COM 42 SRB 15 0 2 3 5 2 5 30 9 230 13 9 1 2 9 2 2 9 1...
Page 43: ...WWW BORMANNTOOLS COM 43 SRB 1 2 3 1 2 3 1 2 1 2 1 2 1 2...
Page 44: ...WWW BORMANNTOOLS COM 44 1 2 3 1 2 1 2 3 4 5 1 2 3 4 5 6 7 m...
Page 45: ...WWW BORMANNTOOLS COM 45 Bormann 30...
Page 46: ...WWW BORMANNTOOLS COM 46 1 2 3 4 5 20V Li ion 6 7 4 6 5 6 7 9 6 D 80 mm...
Page 47: ...WWW BORMANNTOOLS COM 47 3 4 8 4 1 7 4 4 10 1 ON 1 ON OFF G OFF ON retardant 11 30 25...
Page 49: ...WWW BORMANNTOOLS COM 49 1 2 3 1 2 3 1 2 1 2 1 2 1 2 50 300C WEEE...
Page 56: ......


