www.BormannTools.com
11
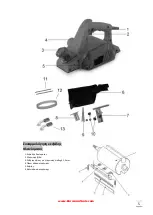
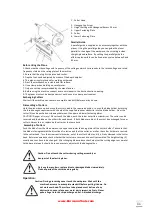
1. Cutter Head
2. Hexagon Cap Screw
3. Height Setting with Hexagonal Recess 2.5 mm
4. Upper Fastening Plate
5. Cutter
6. Lower Fastening Plate
Parallel Guide
A parallel guide is supplied as an accessory together with the
planer. Using the parallel guide you can guide the planer
parallel to the edge of the workpiece, thus creating a clean,
straight
-
planed surface. By setting the parallel guide the
effective plane width can be fixed at any value between 0 and
82 mm.
Before Using the Plane
1.Check, whether the voltage and frequency of the voltage network corresponds to the rated voltage and rated
frequency stated on the rating plate of the machine.
2. Ensure that the plug fits the intended socket.
3. Depth of out can be adjusted by means of the depth adjuster.
4. This planer is only intended for working with wood.
5. Erect the workbench on a stable and flat surface.
6. Use a clamp when working on small pieces.
7. Only use cutters recommended by the manufacturer.
8. Before using the machine connect a vacuum cleaner to the dust
-
extraction opening.
9. The planer must not be damp and must not be used in a damp environment.
Exchanging Cutters
Wait until the machine has come to a complete standstill before you lay it down.
Dismantling of Cut
ters
Hold the planer base up and move the cutter head to the required position. Loosen the blade holder by turning
the three hexagon cap screws with the aid of the supplied spanner clockwise into the blade holder. Now the
cutter (5) can be pushed out sideways between the upper and lower fastening plates.
CAUTION! Danger of Injury! Never touch the blade, push the cutter out with a screwdriver. The cutter can be
reversed and the blade on the other side can be used. If both blades are blunt, they must be
exchanged for new
cutters. Always turn or replace both cutters at the same time.
Assembly of Cutters
Push the blade from the side between the upper and lower fastening plates of the cutter holder. Take care that
the blade is facing towards the direction of rotation and that the cutter, as well as the cutter holder are centred
in the cutter head. Turn the screws anti
-
clockwise, out of the cutter holder until it is firmly clamped in the cutter
head. Before renewed use check whether the cutters are secure and correctly assembled.The height setting (3)
usually does not have to be changed. After changing blades please check whether the cutting edge runs parallel
to the base plate and, should it prove necessary, adjust with the hexagonal key.
Caution: Do not touch the cutters during setting, assembly or
transport of the electric planer.
Only use sharp cutters, replace blunt or damaged blades immediately.
Clean all parts of the cutter head regularly.
Operation:
Caution: During processing never touch the
workpiece. Wait until the
machine has come to a complete standstill before putting it down. Do
not work overhead. The surface to be planed must be free of any
obstructions, never plane over metal parts, screws, nails etc. Never
poke a finger into the chip discharge outlet. A blocked discharge


