background image


Pág. 2 de 20

   Rev. 01


1 – Advertencias para un uso en seguridad 


Cuando  se  usan  aparatos  electrodomésticos  hay  que  respetar  siempre  algunas 
precauciones básicas de seguridad, incluidas las siguientes:


1.


LEA ATENTA Y COMPLETAMENTE LAS INSTRUCCIONES.


2.


Utilice  el  aparato  solo  en  una  instalación  eléctrica  conforme  con  las  características 
indicadas en la etiqueta ubicada en el aparato en cuestión y en el presente manual.


3.


El  aparato  solo  debe  alimentarse  con  una  bajísima  tensión  de  seguridad,  la 
correspondiente al marcado fijado en el aparato, y exclusivamente con la unidad de 
alimentación suministrada.


4.


No toque las superficies calientes (en el aparato hay una resistencia). Incluso después 
de  apagarlo,  espere  al  menos  10  minutos  si  debe  acceder  a  partes  calientes  para 
limpiar o efectuar el mantenimiento.


5.


No coloque el aparato cerca de fuentes de calor.


6.


Mantenga alejado del alcance de los niños.


7.


No deje el aparato sin vigilancia durante mucho tiempo, cuando está conectado a la 
red eléctrica.


8.


Para evitar descargas eléctricas, no sumerja el aparato en agua u otros líquidos.


9.


Desenchufe  la  clavija  de  la  toma  de  corriente  del  alimentador  cuando  no  utilice  el 
aparato y/o antes de abrirlo (levantando la tapa) y de limpiarlo.


10.


No utilice el aparato con cables o enchufes estropeados, o si se ha caído o estropeado 
por cualquier causa. Lleve el aparato al centro de asistencia autorizado más cercano 
para su comprobación o reparación.


11.


El uso de accesorios no recomendados o no vendidos por la empresa fabricante está 
prohibido.


12.


No utilice el aparato al aire libre ni lo transporte cuando está en funcionamiento.


13.


El aparato puede ser utilizado por niños de edad inferior a 8 años y/o por personas 
con  capacidades  físicas,  sensoriales  o  mentales  reducidas,  o  sin  experiencia  o 
conocimientos  necesarios,  siempre  que  estén  bajo  la  vigilancia  de  un  adulto  o 
después de que hayan recibido las instrucciones relativas al uso seguro del aparato y 
que  hayan  comprendido  los  peligros  inherentes.  Las  operaciones  de  limpieza  y 
mantenimiento que deben ser realizadas por el usuario, no deben correr a cargo de 
niños sin vigilancia. 


14.


Antes  de  utilizar  el  aparato  compruebe  siempre  el  estado  de  los  cables  externos. 
Después,  introduzca  el  enchufe  del  alimentador  en  la  toma  de  corriente.  Para 
desconectar la unidad, extraiga el enchufe del alimentador de la toma.


15.


Durante  el  uso,  coloque  el  aparato  en  una  superficie  horizontal,  estable  y  bien 
ventilada, a una altura superior a 500 mm respecto del suelo.


Summary of Contents for Lumia 16

Page 1: ...Pag 1 di 20 Rev 01 Bedienungsanleitung für das künstliche Ausbrüten von Eiern Brutmaschine LUMIA 8 16 aus Wärme isolierendem ABS Übersetzung der originalen Anleitung ...

Page 2: ...enden Sie das Gerät nicht mit beschädigten Kabeln oder Steckern oder wenn es gefallen oder in welcher Weise dann auch beschädigt ist 11 Es ist verboten um Zubehör zu verwenden der nicht durch die Herstellungsfirma empfohlen oder verkauft wird 12 Das Gerät nicht im Freien benutzen und es nicht transportieren wenn es läuft 13 Das Gerät darf durch Kinder im Alter von nicht geringer als 8 Jahren und a...

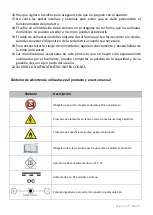
Page 3: ...drücklich vom Produzenten genehmigt sind können den Verfall der Sicherheit und der Währung bezüglich der Nutzung des Produkts durch den Verwender beinhalten 22 BEWAREN SIE DIESE ANLEITUNG SORGFÄLTIG Auf dem Produkt und in dieser Anleitung benutzte Warnungssymbole Symbol Beschreibung Verpflichtung um den Apparat während des Betriebes nicht zu bedecken Anwesenheit von Spannungsteilen mit daraus folg...

Page 4: ...9 4 Ausbrütung der Eier von Wasservögeln Gans Ente usw 15 10 Periodische Kontrolle der Eier während der Ausbrütung Schieren 15 11 Schlüpfphase und Geburt des Kükens 16 12 Erste Lebenstage 17 12 1 Vorteile der Infrarotlampe 17 12 2 Ernährung 17 13 Während der Nutzung vorkommende Probleme 17 13 1 Garantierte NON STOP Stromversorgung 17 14 Probleme die während der Ausbrütung vorkommen können 18 15 Re...

Page 5: ...rantwortung des Produzenten ausgegeben Und ist konform der folgenden Richtlinien Richtlinie 2014 35 UE bekannt als Richtlinie Niederspannung Richtlinie 2014 30 UE bekannt als Richtlinie elektromagnetische Kompatibilität Richtlinie 2011 65 CE ROHS II Die Produkte sind konform der folgenden Regeln hergestellt Regel EN 60335 1 2012 A11 2014 A1 IEC 2013 Sicherheit der elektrischen Haushaltgeräte und Ä...

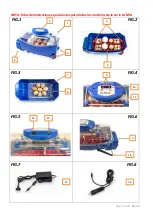
Page 6: ...oduktionsunternehmen erklärt dass die Informationen dieses Handbuches in Einklang mit den technischen Angaben und Sicherheit Spezifikationen der Brutmaschine für Eier sind worauf sich das Handbuch bezieht LEGENDE 1 Deckel der Brutmaschine 2 Steuerungspanel 3 Automatisches Wendesysteem 4 Füllöffnungen der Wasserwännchen mit ihren Verschlusskappen 5 Verbindungsstange 6 Eierhorde 7 Unterseite der Bru...

Page 7: ...Pag 7 di 20 Rev 01 HINWEIS demonstrative gleichwertige Fotos für alle Modelle der LUMIA Serie FIG 1 FIG 2 FIG 3 FIG 4 FIG 5 FIG 6 FIG 7 FIG 8 4 10 00 00 00 1 11 11 7 2 5 9 12 8 13 15 16 6 3 14 4 3 ...

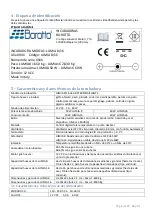
Page 8: ...y Digitale Kontrolle der Temperatur mit Dezimalpunkt Ventilation Axialer Ventilator gedämpfter 12 VDC mit einem Durchschnitt von 60 mm und Autorestart Funktion Thermostat Microcomputer mit PID Technologie und einer Präzision von 0 1 C Heizung LUMIA8 50W Widerstand in einem FLEX Silikonkabel LUMIA16 60W Widerstand in einem FLEX Silikonkabel Bereich Regulierbare Temperatur von einem Minimum 30 C bis...

Page 9: ...rocomputers der letzten Generation angetrieben wird der es ermöglicht die gemittelte interne Temperatur auf eine konstante Weise zu regeln in Übereinstimmung mit dem Wert der mit der Betätigung der Tasten des Steuerungspanels eingestellt wird Die Ventilation wird mittels eines axialen Ventilators bewirkt der die warme und feuchte Luft gleichmäßig verteilt Die natürliche freie Oberflächenbefeuchtun...

Page 10: ...schwankungen bedingte Faktoren wie ebenfalls durch Erstickung gestorbene Embryonen da Eier in einer geschlossenen Verpackung nicht atmen können Im schlimmsten Fall wenn Sie doch Eier gekauft haben die lange gereist haben lassen Sie diese für mindestens 24 Stunden auf einem Eierplateau mit der Ei Spitze nach unten gerichtet ruhen bevor Sie sie inkubieren Wählen Sie Eier von gut entwickelten gut ern...

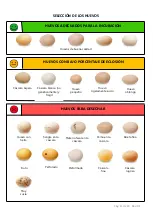
Page 11: ...er Eier schale mit weißer Eierschale nicht gene tisch be stimmt und zerbrechlich kleines Ei leicht ver schmutztes Ei längliches Ei NICHT VERWENDBARE EIER mit Erde ver schmutzt mit Blut be fleckt mit Kot ver schmutzt mit Eigelb verschmutzt mit Rissen gebrochen perforiert verformt mit dünner Eierschale mit geriffelter Eierschale sehr verschmutzt ...

Page 12: ...rde HINWEIS während der Ausbrütung KEINE neuen Eier hinzufügen 9 Vorbereitung und Starten der Brutmaschine Achten Sie bitte darauf dass Sie beim Transport oder der Verlagerung keine Stöße oder Schäden an der Brutmaschine verursachen Stellen Sie die Brutmaschine immer auf eine flache Oberfläche stellen und vermeiden Sie Prellungen u o Brüche Für eine erfolgreiche Schlüpfphase wird empfohlen die Bru...

Page 13: ...stecken Die Ventilation des Gerätes wird sofort starten danach wird die Innentemperatur auf dem Display angezeigt werden ACHTUNG Falls der Ventilator nicht funktionieren sollte hohlen Sie sofort den Stecker aus der Steckdose und kontaktieren Sie bitte die Kundenbetreuung Um die Temperatur einzustellen können die und Tasten auf dem oberen Steuerungspanel verwendet werden 9 Fig 4 Durch auf einer der...

Page 14: ...C Zu haltende Temperatur während der letzten 3 Tage vor dem Schlüpfen Geburt 37 2 C Beziehen Sie sich bitte auf die folgende Tabelle für eine erfolgreiche Ausbrütung Vogelart Ausbrütungsdauer Für eine korrekte Luftfeuchtigkeit zum Anfang der Ausbrütung Die Eier nicht wenden nach Tag Für eine korrekte Luftfeuchtigkeit während der letzten 3 Tage der Ausbrütung der Schlüpfphase Hühner 21 Tage 1 Wännc...

Page 15: ... zu lassen um den Nachzüglern auch noch eine Chance zu geben 9 4 Ausbrutung der Eier von Wasservogeln Gans Ente usw Ab dem zehnten Tag der Ausbrütung bis zu den letzten drei Tagen vor der voraussichtlichen Schlüpfphase sollte die Brutmaschine einmal am Tag geöffnet werden um die Eier 15 20 Minuten abkühlen zu lassen Bevor Sie den Deckel des Gerätes wieder zurücksetzen sollten leicht mit einer Sprü...

Page 16: ... nachfolgende Vorgang ist sehr empfindlich und sollte schnell durchgeführt werden um zu verhindern dass die Eier zu viel abkühlen Es wird empfohlen eine zweite Person einzuschalten um den Vorgang zu beschleunigen A Währende der letzten 3 Tage der vorgesehenen Geburt schalten Sie bitte den Wendemotor aus indem Sie den Stecker aus dem Anschluss auf der Rückseite des Deckels entfernen wenn möglich we...

Page 17: ... in den Karton das Gehege eine Tränke und einen Futtertrog mit Küken Futter Wir empfehlen um auch etwas Futter auf den Boden auf das Zeitungspapier zu streuen Futtertröge und Tränken sind auf der Webseite www borotto com erhältlich Wenn Sie andere Tränken verwenden vergewissern Sie sich dass diese nicht höher als 3 4 cm sind da die Küken ansonsten ertrinken oder nass werden könnten Um dies zu verh...

Page 18: ...etem Futter verwenden Sie spezielles Futter für Elterntiere Eier die einen langen Abstand abgelegt haben Brüten Sie lokale Eier aus Falsches Luftfeuchtigkeitsniveau während der Ausbrütung Folgen Sie den Informationen zur Füllung der Wasserwännchen Die Brutmaschine ist mehrmals während der Schlüpfphase geöffnet worden Öffnen Sie die Brutmaschine höchstens 1 Mal am Tag um die geborenen und trockenen...

Page 19: ...igung des Deckels der Brutmaschine Die Außenseite des Deckels sorgfältig mit einem mit Spiritus befeuchteten weichen Tuch abwischen Säubern Sie die Innenseite des Deckels entlang des Umfangs des Schutzgitters mit einem Luftkompressor um die Daunen die die Küken Während des Schlüpfens verloren haben zu entfernen Sie können auch Druckluft in der Dose verwenden die auch für PC Tatsturen verwendet wir...

Page 20: ... vorgenommen wurden höhere Gewalt Erdbeben Überschwemmungen Brände usw Verwenden Sie den Inkubator nur für den Zweck für den er vorgesehen ist Andere Verwendungen die von den in dieser Anleitung angegebenen abweichen gelten als gefährlich und der Hersteller lehnt jede Haftung für Schäden an Personen Tieren oder Sachen ab die durch Nichtbeachtung dieser Warnung entstehen Der Hersteller übernimmt ke...

Page 21: ...Page 1 of 20 Rev 01 Instructions manual for the artificial egg incubator LUMIA 8 16 Incubator in HEAT RESISTANT ABS Translation of the original instructions ...

Page 22: ...ed in some way Consign the appliance to the nearest authorised service centre requesting check or repair 11 Use of accessories not recommended or not sold by the manufacturer is forbidden 12 Do not use the appliance outdoors and do not move the appliance when in operation 13 The appliance can be used by children older than 8 years of age and persons with reduced physical or mental capacity or with...

Page 23: ...n its use by the user 22 STORE THESE INSTRUCTIONS WITH CARE Warning symbols used on the product and in this manual Symbol Description Obligation not to cover the appliance during operation Presence of live parts with consequent electrical hazard Presence of hot surfaces fire hazard Obligation to read the operating instructions before using the product Class III appliance powered by 12VDC DC direct...

Page 24: ...tion eggs of all exotic birds 15 9 4 Incubation of palmiped eggs goose duck etc 15 10 Periodic egg inspection during incubation candling 15 11 Chick hatching 16 12 First days of life 17 12 1 Benefits of the infra red lamp 17 12 2 Nutrition 17 13 Problems that may be encountered during use 17 13 1 Guaranteed NON STOP power supply 17 14 Problems that may be encountered during incubation 18 15 Cleani...

Page 25: ...facturer And it conforms to the following directives Directive 2014 35 EU known as Low Voltage Directive Directive 2014 30 EU known as Electromagnetic compatibility Directive Directive 2011 65 EC ROHS II The products are made in compliance with the following standards Standard EN 60335 1 2012 A11 2014 A1 IEC 2013 Safety of electrical appliances for household use and similar Safety Part 1 General R...

Page 26: ...er The manufacturer declares that the information contained herein is consistent with the technical and safety specifications of the egg incubator the manual refers to PREMISE These instructions help acquiring familiarity with the incubator Carefully reading these instructions results in high hatching yield therefore this manual must not only be followed to the letter but seriously complied with N...

Page 27: ...Page 7 of 20 Rev 01 NOTE demonstrative photos equivalent for all models of the LUMIA series FIG 1 FIG 2 FIG 3 FIG 4 FIG 5 FIG 6 FIG 7 FIG 8 4 3 10 00 00 00 11 11 7 5 9 12 8 13 6 3 1 14 2 15 16 ...

Page 28: ...se A weighted noise pressure level emitted from the device below 60dB A Display Digital temperature control with decimal point Ventilation 12 VDC silenced axial fan 60 mm diameter with Auto restart function Thermostat Microcomputer with PID technology with an accuracy of 0 1 C Heater LUMIA 8 50W FLEX silicone cable resistor Heater LUMIA 16 60W FLEX silicone cable resistor Range Temperature modifia...

Page 29: ...eration digital PID microcomputer control that makes it possible to regulate in a constant and precise manner the average internal temperature setting it with the buttons on the control panel Ventilation takes place by means of an axial fan that distributes the warm and humid air evenly The natural free surface humidification takes place thanks to the water contained in the trays stamped on the bo...

Page 30: ...ration temperature changes embryos that have died from asphyxiation because eggs that are closed inside packaging do not breathe If you have actually taken eggs that have travelled let them rest on an egg platform for at least 24 hours with the tip downwards before incubating them Choose eggs from breeders that are well developed well fed and healthy NOTE The breeders must not be inbred no brother...

Page 31: ... dirty egg Oblong egg Soiled egg Good quality eggs EGGS WITH LOW HATCHING PERCENTAGE White not genetically and fragile shell Blood on the shell EGGS SUITABLE FOR INCUBATION Faecal material on the shell Yolk on the shell Broken Thin shell Coarse shell Very dirty Slight crack Pierced Misshapen ...

Page 32: ...duction in hatchings NOTE during incubation DO NOT add eggs at a later time 9 Preparation and commissioning of the incubator During transportation pay attention not to cause collisions and or damage to the incubator Always position flat avoiding crushing and or breakage For successful hatchings it is recommended to keep the incubator in residential premises not in sheds porches or garages The room...

Page 33: ...lug the appliance and contact the service To set the temperature use the and buttons on the upper control panel 9 Fig 4 Press one of the two buttons to access the Program the letter P will appear next to the degrees Keep pressing until the desired temperature is obtained Once the temperature has been set wait for it to be stored Wait a few seconds for the current internal temperature and the lette...

Page 34: ...ct humidity at the start of incubation Do not turn the eggs after For correct humidity during the last 3 days before hatching Hen 21 days Fill 1 tray of water Day 18 Also fill the second tray with water Pheasant 23 25 days Fill 1 tray of water Day 20 Quail rock partridge 17 days Fill 1 tray of water Day 14 Guinea fowl 26 28 days Fill 1 tray of water Day 23 Turkey 28 days Fill 1 tray of water Day 2...

Page 35: ... 9 4 Incubation of palmiped eggs goose duck etc From the tenth day of incubation to the last three days before hatching open the incubator once a day and let the eggs cool down for 15 20 minutes Before repositioning the cover plate spray a thin layer of drinking water ATTENTION NEVER MOISTEN THE EGGS WHEN THEY ARE STILL WARM WAIT FOR THEM TO COOL DOWN During this operation the two electrical conta...

Page 36: ...the embryo is underdeveloped and the egg must be scrapped 11 Chick hatching The operation below is very delicate and must be carried out quickly to prevent the egg from cooling too much It is recommended to carry out this operation with another person to speed up the process A In the last 3 days before the expected hatching stop the egg turning motor by unplugging it from the socket on the cover p...

Page 37: ...ww borotto com 12 2 Nutrition Chicks usually start eating and drinking from the second third day of life Place in the box pen a water trough and a manger with chick feed We suggest scattering some feed also on the newspaper Manger and water troughs are available on the website www borotto com If other water troughs are used ensure the pan is not higher than 3 4 cm otherwise the chicks will risk ge...

Page 38: ...eeders must not be older than 3 years Nutritional deficiencies Feed breeders with adequate feed use breeding feed Eggs have travelled long distances Incubate local eggs Incorrect humidity during incubation Comply with the information provided on filling the water trays The incubator has been opened several times during hatching Open once a day at most to remove properly dry hatchlings The incubato...

Page 39: ...th alcohol Blow the inside of the cover plate along the perimeter of the protective grid with compressed air to remove the down lost by chicks during hatching You can also use compressed air cylinders those used to clean PC keyboards NOTE SANITISING MUST BE PERFORMED BEFORE INCUBATING STORAGE perfectly dry the inside of the incubator operating it dry for 2 3 hours Store the incubator in a dry and ...

Page 40: ...by the Manufacturer force majeure earthquakes floods fires etc Only use the incubator for the purpose it is intended for uses other than indicated in these instructions shall be deemed as hazardous and the Manufacturer disclaims any and all liability for any damage to persons animals or property arising from failure to comply with this warning The Manufacturer shall not be deemed liable nor shall ...

Page 41: ...Str 1 z20 Rew 01 Instrukcja obsługi inkubatora do jaj Inkubator do jaj LUMIA 8 16 z TERMOIZOLOWANEGO ABS Oryginalna instrukcja ...

Page 42: ...rządzenia z uszkodzonymi przewodami lub wtyczkami lub jeśli spadło na ziemię bądź zostało uszkodzone w jakikolwiek inny sposób W celu naprawy lub sprawdzenia funkcjonalności urządzenia należy je przekazać do autoryzowanego punktu serwisowego 11 Zakazuje się używania niehomologowanych akcesoriów lub niesprzedawanych przez producenta 12 Nie używać urządzenia na zewnątrz ani nie transportować pracują...

Page 43: ...kie niedozwolone prze Producenta zmiany w produkcie mogą obniżyć jego bezpieczeństwo i spowodować utratę gwarancji przez użytkownika 22 PRZECHOWYWAĆ ZGODNIE Z INSRUKCJAMI Symbole ostrzegawcze umieszczone na urządzeniu i w instrukcji Symbol Opis Zakazuje się przykrywania działającego urządzenia Urządzenie pod napięciem grozi porażeniem elektrycznym Obecność gorących powierzchni zagrożenie pożarem P...

Page 44: ...ych 15 9 4 Wylęganie jaj ptakow płetwonogich gęs kaczka itp 15 10 Okresowa kontrola jajek w trakcie wylęgania prześwietlenie 15 11 Wylęganie i pojawienie się pisklęcia 16 12 Pierwsze dni życia 17 12 1 Korzyści z zastosowania lampy na podczerwień 17 12 2 Odżywanie 17 13 Problemy jakie mogą pojawić się w trakcie użycia 17 13 1 Zasilanie NON STOP gwarantowane 17 14 Problemy jakie mogą pojawić się w t...

Page 45: ...z następującymi dyrektywami Dyrektywą 2014 35 WE znaną jako Dyrektywa o niskim napięciu Dyrektywą 2014 30 WE znaną jako Dyrektywa o kompatybilności elektromagnetycznej Dyrektywą 2011 65 WE ROHS II Urządzenia są wykonane zgodnie z następującymi normami Normą EN 60335 1 2012 A11 2014 A1 IEC 2013 Bezpieczeństwo urządzeń gospodarstwa domowego i podobnych Bezpieczeństwo Część 1 Normami ogólnymi Normą E...

Page 46: ...zgody producenta Producent oświadcza że informacje zawarte w niniejszej dokumentacji technicznej są zgodne z warunkami technicznymi i warunkami bezpieczeństwa inkubatora do jaj do którego odnosi się niniejsza instrukcja WSTĘP Niniejsza instrukcja pozwala zaznajomić się z działaniem domowego inkubatora do jaj Uważne przeczytanie instrukcji pozwala uzyskać wysoką wydajność wylęgu dlatego nie tylko n...

Page 47: ...Str 7 z20 Rew 01 UWAGA zdjęia mają charakter orientacyjny dla wszystkich modeli serii LUMIA 8 16 RYS 1 RYS 2 RYS 3 RYS 4 RYS 5 RYS 6 RYS 7 RYS 8 4 10 00 00 00 1 11 11 7 2 5 9 12 8 13 15 16 6 3 3 14 4 ...

Page 48: ...o z krzywą ważoną A emitowanego przez urządzenie poniżej 60 dB A Wyświetlacz Cyfrowa kontrola temperatury z punktem dziesiętnym Wentylacja Wentylator osiowy 12 VDC cichy o średnicy 60 mm z funkcją automatycznego włączania Termostat Mikrokomputer technologii PID z dokładnością 0 1 C Podgrzewacz LUMIA 8 Opór na przewodzie silikonowym FLEX 50W LUMIA 16 Opór na przewodzie silikonowym FLEX 60W Zakres T...

Page 49: ...recyzyjną regulację średniej temperatury wewnętrznej według wartości ustawionych przez naciśnięcie odpowiednich klawiszy znajdujących się na panelu sterowniczym Wentylacja odbywa się za pomocą wirnika osiowego rozprowadzającego jednolicie ciepłe powietrze i wilgotność Naturalne nawilżanie odbywa się dzięki wodzie zawartej w zbiorniczkach wytłoczonych na dnie inkubatora napełnianych przez dwa znajd...

Page 50: ...ż jaja zamknięte w paczce nie oddychają W przypadku jaj transportowanym można ewentualnie położyć je na płaskiej powierzchni końcówką do dołu na co najmniej 24 godziny przed inkubacją Wybierać jaja ptaków odżywionych zdrowych i w doskonałej kondycji fizycznej WAŻNE Reproduktory NIE mogą pochodzić z chowu wsobnego nie może być pokrewieństwa to znaczy że samce muszą zawsze pochodzić z innej hodowli ...

Page 51: ... i delikatna niegenetycznie skorupka Małe jaja Jajo lekko zabrudzone Jajo podłużne JAJA NADAJĄCE SIĘ DO WYLĘGU Jajo zabrudzone ziemią Skorupka pomazana krwią Jajo zabrudzone odchodami Żółto na skorupce Cienkie pęknięcie Jajo pęknięte Jajo dziurawe Jajo zdeformowa ne Delikatna skorupka Chropowata skorupka Jajo bardzo brudne ...

Page 52: ...o zmniejszenie liczby urodzeń UWAGA podczas inkubacji NIE dokładać jajek 9 Przygotowanie i uruchamianie inkubatora Podczas transportu uważać aby nie uszkodzić w żaden sposób inkubatora Ustawiać go na płasko unikając zmiażdżenia i lub pęknięcia Aby wylęganie jajek powiodło się zalecamy ustawienie inkubatora w pomieszczeniu mieszkalnym a nie w stodole ganku czy garażu Idealną temperaturą jest temper...

Page 53: ...li jest on używany Włóż wtyczkę zasilacza do gniazda na pokrywie sterowania inkubatora 12 Rys 5 a następnie podłączyć zasilacz wkładając wtyczkę do normalnego gniazdka Wentylacja uruchomi się natychmiast a na wyświetlaczu pojawi się temperatura wewnętrzna UWAGA Jeśli wentylator nie działa odłączyć niezwłocznie wtyczkę i skontaktować się z serwisem Aby ustawić temperaturę użyć przycisków i znajdują...

Page 54: ...ra do utrzymania podczas wylęgu 37 7 C Temperatura do utrzymania w ciągu ostatnich 3 dni od pojawienia się piskląt wyklucia 37 2 C Patrz poniższa tabela przedstawiająca prawidłowy proces wylęgania Gatunek Czas wylęgania Prawidłowa wilgotność na początku okresu wylęgania Nie obracać jajek po Prawidłowa wilgotność w ciągu ostatnich 3 dni przed wykluciem Kura 21 dni Napełnić wodą 1 zbiorniczek Dzień ...

Page 55: ...ć się również pozostałe pisklaki 9 4 Wylęganie jaj ptakow płetwonogich gęs kaczka itp Od dziesiątego dnia inkubacji do ostatnich trzech dni przed wykluciem otwierać inkubator raz dziennie i pozostawić jajka do ostygnięcia przez 15 20 minut Przed ponownym zamknięciem pokrywy rozpylić trochę wody pitnej UWAGA NIGDY NIE ZANURZAĆ W WODZIE JESZCZE CIEPŁYCH JAJEK POCZEKAĆ AŻ OSTYGNĄ Podczas tej czynnośc...

Page 56: ...ostało zużyte oznacza to że zarodek jest słabo rozwinięty i jajo należy wyrzucić 11 Wylęganie i pojawienie się pisklęcia Poniższa czynność jest bardzo delikatna i musi być szybko wykonywana aby nie doszło do nadmiernego wychłodzenia jajek Zaleca się skorzystanie z pomocy drugiej osoby aby przyspieszyć czynność A W ciągu ostatnich 3 dni przed przewidzianym wykluciem zatrzymać silnik obrotnicy jaj w...

Page 57: ...czynają jeść i pić od drugiego trzeciego dnia życia Umieścić w pudełku ogrodzeniu poidło i karmidełko z karmą dla piskląt Sugerujemy rozłożenie karmy również na gazetach Zarówno poidełka jak i karmidełka są dostępne na stronie www borotto com Jeśli używane są inne poidła należy upewnić się że taca nie ma więcej niż 3 4 cm wysokości w przeciwnym razie pisklęta mogą zamoczyć się lub utonąć Aby unikn...

Page 58: ...duktory nie mogą mieć więcej niż 3 lata Niedobory żywieniowe Odżywiać we właściwy sposób reproduktory stosować karmę dla reproduktorów Jaja przewożone dla duże odległości Stosować miejscowe jaja do wylęgu Niewłaściwa wilgotność podczas wylęgu Przestrzegać informacji podanych przy zbiorniczkach na wodę Inkubator był wielokrotnie otwierany w fazie wylęgu Otwierać maks 1 raz dziennie aby wyjąć wyklut...

Page 59: ...nym powietrzem wewnętrzną cześć pokrywy wzdłuż obwodu siatki ochronnej w celu usunięcia piór gubionych przez pisklęta podczas wykluwania Do przedmuchiwania można także używać pojemników ze sprężonym powietrzem używanych do przedmuchiwania klawiatur komputerowych WAŻNE PRZED ROZPOCZĘCIEM WYLĘGANIA ZDEZYNFEKOWAĆ INKUBATOR PRZECHOWYWANIE dokładnie osuszyć wnętrze inkubatora pozostawiając go włączonym...

Page 60: ...celu do którego jest przeznaczony inne zastosowania niż wskazane w niniejszej instrukcji należy uważać za niebezpieczne a Producent nie ponosi żadnej odpowiedzialności za jakiekolwiek obrażenia ludzi zwierząt lub straty materialne wynikające z nieprzestrzegania tego ostrzeżenia Producent nie ponosi odpowiedzialności ani nie udziela żadnej gwarancji ani zwrotu kosztów za uszkodzenia wynikające z ni...

Page 61: ...Str 1 z 20 Rev 01 Návod na použitie pre umelú inkubáciu vajec Inkubátor LUMIA 8 16 v ABS TEPELNOIZOLAČNÝ Originál návodu ...

Page 62: ...potrebič nepoužívajte ak sú káble alebo zástrčky poškodené ani v prípade pádu zariadení na zem alebo ak sú nejakým spôsobom poškodené O kontrolu alebo opravu spotrebiča požiadajte najbližšie autorizované centrum pomoci 11 Použitie prídavných zariadení ktoré sa neodporúčajú alebo ich nepredáva výrobca je zakázané 12 Zariadenie nepoužívajte v exteriéri a neprepravujte do keď je v prevádzke 13 Spotre...

Page 63: ...uvky 21 Prípadné úpravy tohto produktu ktoré výrobca výslovne nepovolil môžu spôsobiť že použitie zo strany používateľa nebude bezpečné a záruka nebude platiť 22 TENTO NÁVOD STAROSTLIVO USCHOVAJTE Varovné symboly použité na produkte a v tomto návode Symbol Opis Povinnosť nezakrývať zariadenie počas prevádzky Výskyt častí pod napätím v dôsledku čoho vzniká elektrické riziko Výskyt horúcich plôch ne...

Page 64: ...yčh druhov 15 9 4 Inkubačia vaječ vodnyčh vtakov s plavačími blanami hus kačiča atď 15 10 Pravidelná kontrola vajec počas inkubácie presvecovanie 15 11 Liahnutie a narodenie kuriatka 16 12 Prvé dni života 17 12 1 Benefity infračervenej lampy 17 12 2 Výživa 17 13 Problémy ktoré sa môžu vyskytnúť počas použitia 17 13 1 Zaručene napajanie NON STOP 17 14 Problémy ktoré sa môžu vyskytnúť počas inkubáci...

Page 65: ...obcu A je v zhode s nasledujúcimi smernicami Smernicou 2014 35 EÚ známou ako smernica o nízkom napätí Smernicou 2014 30 EÚ známou ako smernica o elektromagnetickej kompatibilite Smernicou 2011 65 ES ROHS II Produkty sú vyrobené v zhode s nasledujúcimi normami Norma EN 60335 1 2012 A11 2014 A1 IEC 2013 Elektrické spotrebiče pre domácnosť a na podobné účely Bezpečnosť Časť 1 Všeobecné normy Norma EN...

Page 66: ...e že informácie obsiahnuté v tomto návode sú zhodné s technickými a bezpečnostnými špecifikáciami inkubátora pre vajcia na ktoré sa tento manuál vzťahuje ÚVOD Tieto pokyny vám pomôžu zoznámiť sa s inkubátorom Dôkladné prečítanie týchto pokynov vám umožní získať vysoký stupeň vyliahnutia preto by sa tento návod nemal dodržiavať iba podľa písmena ale mal by sa vážne rešpektovať Stačí zanedbať alebo ...

Page 67: ...Str 7 z 20 Rev 01 POZNÁMKA predvádzacie fotografie ekvivalentné pre všetky modely série LUMIA 8 16 OBR 1 OBR 2 OBR 3 OBR 4 OBR 5 OBR 6 OBR 7 OBR 8 4 10 00 00 00 1 11 11 7 2 5 9 12 8 13 15 16 6 3 3 14 4 ...

Page 68: ...ivkou váženej hladiny A vysielanej zariadením nižšia ako 60 dB A Displej Digitálna regulácia teploty s desatinnou čiarkou Ventilácia Tlmený axiálny ventilátor 12 VDC priemer 60 mm s funkciou Autorestart Termostat Mikropočítač s technológiou PID s presnosťou 0 1 C Ohrievač LUMIA 8 Odpor v silikónovom kábli FLEX 50 W LUMIA 16 Odpor v silikónovom kábli FLEX 60W Rozsah Teplota sa dá meniť od minimálne...

Page 69: ...ítačov PID najnovšej generácie ktoré umožňuje konštantné a presné nastavenie priemernej vnútornej teploty na hodnotu nastavenú zadaním klávesov na ovládacom paneli Vetranie sa uskutočňuje pomocou axiálneho ventilátora ktorý rovnomerne distribuuje horúci a vlhký vzduch Prirodzené zvlhčovanie s voľným povrchom sa deje vďaka vode obsiahnutej v zásobníkoch tlačených na spodku inkubátora ktorej plnenie...

Page 70: ...odumretých embryí v dôsledku zadusenia nakoľko vajcia uzavreté v balení nedýchajú Ak ste už odobrali vajcia ktoré cestovali nechajte ich na inkubačnej ploche najmenej 24 hodín odpočívať so špičkou smerujúcou dole pred ich inkubáciou Vyberte si vajcia z chovných zvierat ktoré sú dobre vyvinuté dobre kŕmené a zdravé POZNÁMKA Jedince NEMÔŽU byť pokrvne príbuzné žiadni príbuzní to znamená že musia vžd...

Page 71: ...Hrubý obal Biela škrupina nie geneticky a krehká Malé vajce Mierne znečistené vajce Podlhovasté vajce VAJCIA VHODNÉ NA INKUBÁCIU Vajce znečistené od zeme Krv na škrupine Fekálny materiál na obale Žĺtok na škrupine Tenká prasklina Prasknuté Prederavené Deformované Tenká škrupina Zvrásnená škrupina Veľmi znečistené ...

Page 72: ...a neskôr 9 Príprava a spustenie inkubatora Počas prepravy buďte opatrní aby nedošlo k nárazom a poškodeniu inkubátora Vždy ho položte na rovnú plochu aby nedošlo k jeho stlačeniu a alebo pokazeniu Aby boli liahnutia úspešné odporúča sa držať inkubátor v obývanej miestnosti nie v stajniach arkádach alebo garážach Miestnosť musí mať ideálnu teplotu medzi 20 C a 25 C a musí byť bez vzdušných prúdov V...

Page 73: ...ického zvlhčovača SIRIO ak sa toto príslušenstvo použije Vložte napájací konektor prívodu do zásuvky umiestnenej na ovládacom kryte inkubátora 12 obr 5 potom zapnite napájanie a zástrčku vložte do normálnej zásuvky Ventilácia sa spustí okamžite potom sa na displeji zobrazí vnútorná teplota POZOR Ak ventilátor nefunguje okamžite ho odpojte a obráťte sa na podporu Na nastavenie teploty použite tlači...

Page 74: ...ov Teplota ktorá sa má udržiavať počas inkubácie 37 7 C Teplota ktorá sa má udržiavať v posledných 3 dňoch pred narodením vyliahnutie 37 2 C Odkazujeme na nasledujúcu tabuľku aby inkubácia bola úspešná Druh Inkubačný čas Pre správnu vlhkosť na začiatku inkubácie Neotáčajte vajcia po Pre správnu vlhkosť počas posledných 3 dní pred vyliahnutím Sliepka 21 dní Naplňte 1 nádržku na vodu Deň 18 Naplňte ...

Page 75: ...orené jedince 9 4 Inkubačia vaječ vodnyčh vtakov s plavačími blanami hus kačiča atď Od desiateho dňa inkubácie do posledných troch dní pred narodením otvorte inkubátor raz denne a nechajte vajcia vychladnúť na 15 20 minút Pred nasadením krytu sprejom rozprášte tenkú vrstvu pitnej vody POZOR NIKDY NENAMÁČAJTE EŠTE TEPLÉ VAJCIA POČKAJTE KÝM VYCHLADNÚ Počas tohto úkonu musia byť dva elektrické konekt...

Page 76: ...o vyvinuté a vajce sa musí zlikvidovať 11 Liahnutie a narodenie kuriatka Nasledujúci úkon je veľmi jemný a vykonáva sa rýchlo aby sa zabránilo tomu aby sa vajcia príliš ochladili Odporúča sa pomoc jednej osoby na urýchlenie úkonu A V posledných 3 dňoch pred predpokladaným narodením zastavte motor otáčania vajec vytiahnutím konektora zo zásuvky nachádzajúcej sa na kryte pokiaľ možno keď vajcia budú...

Page 77: ...zvyčajne začnú jesť a piť od druhého tretieho dňa života Do škatule ohrady vložte jednu misku na pitie a jednu misku na jedlo s jedlom pre kuriatka Odporúčame roztrúsiť trochu jedla aj na novinový papier Misky na jedlo a na pitie sú k dispozícii na webovom sídle www borotto com Ak sa používajú iné misky na pitie uistite sa či nádržka nie je vyššia ako 3 4 cm inak existuje riziko že kuriatka sa nam...

Page 78: ...Staré jedince Jedince nesmú byť staršie ako 3 roky Nedostatočná výživa Reprodukčným jedincom podávajte primeranú potravu používajte potravu pre reprodukčné jedince Vajcia ktoré cestovali na veľké vzdialenosti Inkubujte miestne vajcia Nesprávna vlhkosť počas inkubácie Rešpektujte informácie uvedené na plničoch nádržiek na vodu Inkubátor ste otvorili viackrát vo fáze liahnutia Inkubátor otvorte maxi...

Page 79: ...enou v alkohole Ofúknite vnútornú časť krytu po obvode ochrannej mriežky stlačeným vzduchom aby ste odstránili stratené perie z kuriatok počas vyliahnutia Na ofukovanie môžete použiť aj nádoby so stlačeným vzduchom ten ktorý sa používa na ofukovanie klávesníc PC POZNÁMKA DEZINFEKCIA SA VYKONÁVA PRED INKUBOVANÍM SKLADOVANIE vnútro inkubátora úplne osušte spustením na 2 3 hodiny nasucho Inkubátor zn...

Page 80: ...i požiarmi atď Inkubátor používajte iba na účel na ktorý je určený použitia iné ako uvedené v tomto návode sa považujú za nebezpečné a Výrobca odmieta akúkoľvek zodpovednosť za prípadné poškodenia osôb zvierat alebo vecí spôsobených nedodržaní tohto upozornenia Výrobca sa nebude považovať za zodpovedného ani nepovolí žiadny zásah záruky alebo náhrady za nepriaznivé výsledky spôsobené nedodržaním t...

Page 81: ...Page 1 sur 20 Rév 01 Manuel d instructions de l incubateur artificiel d œufs Incubateur LUMIA 8 16 en ABS À ISOLATION THERMIQUE Traduction des instructions originales ...

Page 82: ... est pas utilisé et ou avant de procéder à l ouverture soulèvement du couvercle et au nettoyage 10 Ne pas utiliser l appareil avec des câbles ou des fiches endommagés ou s il est tombé ou qu il est d une quelque manière endommagée Confier l appareil au centre d assistance agréé le plus proche pour demander le contrôle ou la réparation 11 L utilisation d accessoires non conseillés ou non vendus par...

Page 83: ...che de l alimentateur la saisir directement et la détacher de la prise murale 21 Toute modification à ce produit non expressément autorisée par le Fabricant peut impliquer l annulation de la sécurité et de la garantie de son utilisation de la part de l utilisateur 22 CONSERVER SOIGNEUSEMENT CES INSTRUCTIONS Symboles de mise en garde utilisés sur le produit et dans ce manuel Symbole Description Obl...

Page 84: ... œufs exotiques 15 9 4 Incubation des œufs de palmipèdes oie canard etc 15 10 Contrôle périodique des œufs pendant l incubation mirage 15 11 Éclosion et naissance du poussin 16 12 Premiers jours de vie 17 12 1 Bénéfices de la lampe à rayons infrarouges 17 12 2 Nutrition 17 13 Problèmes susceptibles de se présenter pendant l utilisation 17 13 1 Alimentation garantie NON STOP 17 14 Problèmes suscept...

Page 85: ...esponsabilité exclusive du fabricant Et qu il est conforme aux Directives suivantes Directive 2014 35 UE connue comme étant la Directive Basse tension Directive 2014 30 UE connue comme étant la Directive Compatibilité électromagnétique Directive 2011 65 CE ROHS II Les produits sont réalisés conformément aux normes suivantes Norme EN 60335 1 2012 A11 2014 A1 IEC 2013 Sécurité des appareils électrod...

Page 86: ... incubateur à œufs auquel le manuel se réfère Légende 1 Couvercle de l incubateur 2 Panneau de contrôle 3 Dispositif automatique pour retourner les œufs 4 Bouches de remplissage des bacs avec bouchons de fermeture correspondants 5 Tiges d assemblage des éléments 6 Élément plateau porte œufs 7 Fond de l incubateur 8 Grille de fond à n utiliser qu à l éclosion les 3 derniers jours 9 Boutons de régla...

Page 87: ...e 7 sur 20 Rév 01 REMARQUE photos de démonstration identiques pour tous les modèles de la série LUMIA FIG 1 FIG 2 FIG 3 FIG 4 FIG 5 FIG 6 FIG 7 FIG 8 4 10 00 00 00 11 11 7 5 9 12 8 13 6 3 14 4 3 15 16 1 2 ...

Page 88: ...nore Niveau de pression acoustique avec courbe de pondération A émis par le dispositif inférieur à 60dB A Écran Contrôle numérique de la température avec un point décimal Ventilation Ventilateur axial 12 VDC silencieux diamètre 60 mm avec fonction Autorestart Thermostat Micro ordinateur à technologie PID avec précision 0 1 C Réchauffeur LUMIA8 Résistance en câble silicone FLEX de 50W LUMIA16 Résis...

Page 89: ...mmandée par un micro ordinateur de commande numérique PID de dernière génération qui permet de régler de manière constante et précise la température moyenne intérieure à la valeur qui est configurée en appuyant sur les touches placées sur le panneau de contrôle La ventilation est produite par un ventilateur axial qui distribue l air chaud et humide de manière uniforme L humidification naturelle su...

Page 90: ... 50 en raison des facteurs dus au stress du voyage aux vibrations écarts de température embryons morts par asphyxie car les œufs enfermés dans un emballage ne respirent pas À la limite si vous avez pris des œufs qui ont voyagé faites les reposer dans un plateau porte œufs pendant 24 heures au moins avec la pointe tournée vers le bas avant de les incuber Choisir des œufs provenant de reproducteurs ...

Page 91: ... POURCENTAGE D ÉCLOSION Coque blanche fragile Coque rêche ŒUFS ADAPTÉS À L INCUBATION Œuf petit Œuf légèrement sale Œuf oblong Œuf sale de terre Sang sur la coquille Matière fécale sur la coquille Jaune d œuf sur la coquille Coque fine Coque rugueuse Très sale Légère fissure Cassé Percé Déformé ...

Page 92: ...t mise en marche de l incubateur Pendant le transport faire attention de ne pas heurter et endommager l appareillage Le positionner toujours à plat en évitant des écrasements et ou des ruptures Pour le succès des éclosions il est conseillé de garder l incubateur dans un local d habitation pas dans une étable sous un porche ou dans un garage Le local doit avoir une température idéale comprise entre...

Page 93: ...troduisant la fiche dans une prise de courant normale La ventilation se met immédiatement en marche puis l écran affiche la température intérieure ATTENTION Si le ventilateur ne fonctionne pas débrancher immédiatement la fiche et contacter l assistance Pour configurer la température intervenir sur les boutons et situés sur le petit panneau supérieur de contrôle 9 Fig 4 Appuyer sur l un des deux bo...

Page 94: ...n correcte œufs de toutes volailles Température à maintenir pendant l incubation 37 7 C Température à maintenir les 3 derniers jours avant la naissance éclosion 37 2 C Faire référence au tableau suivant pour réussir l incubation Espèce Temps d incubation Pour une humidité correcte au début de l incubation Ne pas tourner les œufs après le Pour une humidité correcte pendant les 3 derniers jours avan...

Page 95: ...À partir du dixième jour d incubation jusqu aux trois derniers jours précédant l éclosion ouvrir l incubateur une fois par jour et laisser les œufs refroidir pendant 15 20 minutes Avant de replacer le couvercle nébuliser une fine couche d eau potable avec un pulvérisateur ATTENTION NE JAMAIS MOUILLER LES ŒUFS ENCORE CHAUDS ATTENDRE QU ILS REFROIDISSENT Pour cette opération débrancher les deux conn...

Page 96: ...la signifie que l embryon est sous développé et l œuf doit être écarté 11 Éclosion et naissance du poussin L opération ci dessous est très délicate et il faut l exécuter rapidement afin d éviter que les œufs ne refroidissent trop Il est conseillé de se faire aider par une seconde personne pour accélérer l opération A Les 3 derniers jours avant l éclosion prévue arrêter le moteur pour retourner les...

Page 97: ... www borotto com 12 2 Nutrition D habitude les poussins commencent à boire et à manger à partir du deuxième troisième jour Placer dans la boîte l enceinte un abreuvoir et une mangeoire avec des aliments pour poussins Il est conseillé de répandre un peu d aliments sur les feuilles de journal aussi Les mangeoires et les abreuvoirs sont disponibles sur le site www borotto com Si vous utilisez d autre...

Page 98: ...ivent pas avoir plus de 3 ans Carences nutritives Alimenter les reproducteurs avec une alimentation adéquate utiliser des aliments pour reproducteurs Les œufs ont voyagé sur de longues distances Incuber des œufs locaux Humidité incorrecte pendant l incubation Respecter les informations fournies concernant le remplissage des bacs d eau L incubateur a été ouvert plusieurs fois pendant l éclosion Ouv...

Page 99: ...prégné d alcool Souffler la partie intérieure du couvercle le long du périmètre de la grille de protection avec de l air comprimé pour éliminer le duvet perdu par les poussins pendant l éclosion Pour souffler on peut également utiliser les bonbonnes d air comprimé utilisées pour souffler les claviers des ordinateurs REMARQUE IL FAUT DÉSINFECTER AVANT D INCUBER STOCKAGE faire sécher entièrement l i...

Page 100: ...r lequel il est prévu tout usage autre que celui indiqué dans ces instructions doit être considéré comme dangereux et le Producteur n assume aucune responsabilité en cas de dommages aux personnes aux animaux ou aux biens issus du non respect de cet avertissement Le Producteur e sera pas tenu responsable et il n accordera aucune intervention sous garantie ou de remboursement en cas de résultats nég...

Page 101: ...Pag 1 di 20 Rev 01 Manuale d istruzioni per l incubazione artificiale di uova Incubatrice LUMIA 8 16 in ABS TERMOISOLANTE Istruzioni originali ...

Page 102: ...chio e alla pulizia 10 Non usare l apparecchio con cavi o spine danneggiati oppure se caduto o in qualche modo danneggiato Affidare l apparecchio al centro di assistenza autorizzato più vicino richiedendone la verifica o la riparazione 11 È vietato l uso di accessori non raccomandati o non venduti dalla ditta produttrice 12 Non utilizzare l apparecchio all aperto e non trasportarlo quando è in fun...

Page 103: ...dotto non espressamente autorizzate dal produttore possono comportare il decadimento della sicurezza e della garanzia del suo utilizzo da parte dell utente 22 CONSERVARE CON CURA QUESTE ISTRUZIONI Simboli di avvertimento utilizzati sul prodotto ed in questo manuale Simbolo Descrizione Obbligo di non coprire l apparecchiatura durante il funzionamento Presenza di parti in tensione con conseguente ri...

Page 104: ...uova di tutti gli esotici 15 9 4 Incubazione delle uova di palmipedi oca anatra ecc 15 10 Controllo periodico delle uova durante l incubazione speratura 15 11 Schiusa e nascita del pulcino 16 12 Primi giorni di vita 17 12 1 Benefici della lampada a raggi infrarossi 17 12 2 Nutrizione 17 13 Problemi che si possono incontrare durante l uso 17 13 1 Alimentazione garantita NON STOP 17 14 Problemi che ...

Page 105: ...siva del fabbricante Ed è conforme alle seguenti direttive Direttiva 2014 35 UE nota come Direttiva bassa tensione Direttiva 2014 30 UE nota come Direttiva compatibilità elettromagnetica Direttiva 2011 65 CE ROHS II I prodotti sono realizzati in conformità alle seguenti norme Norma EN 60335 1 2012 A11 2014 A1 IEC 2013 Sicurezza degli apparecchi elettrici d uso domestico e similare Sicurezza Parte ...

Page 106: ...ice dichiara che le informazioni contenute in questo manuale sono congruenti con le specifiche tecniche e di sicurezza dell incubatrice per uova cui il manuale si riferisce PREMESSA Le presenti istruzioni aiutano ad acquisire dimestichezza con l incubatrice Un attenta lettura di queste istruzioni consente di ottenere un alta resa di schiusa quindi questo manuale non va solo seguito alla lettera ma...

Page 107: ...Pag 7 di 20 Rev 01 NOTA foto dimostrative equivalenti per tutti i modelli della serie LUMIA 8 16 FIG 1 FIG 2 FIG 3 FIG 4 FIG 5 FIG 6 FIG 7 FIG 8 4 10 00 00 00 1 11 11 7 2 5 9 12 8 13 15 16 6 3 3 14 4 ...

Page 108: ...sa dal dispositivo inferiore a 60dB A Display Controllo digitale della temperatura con punto decimale Ventilazione Ventilatore assiale 12 VDC silenziato diametro 60 mm con funzione Autorestart Termostato Microcomputer a tecnologia PID con precisione 0 1 C Riscaldatore LUMIA 8 Resistenza in cavo siliconico FLEX da 50W LUMIA 16 Resistenza in cavo siliconico FLEX da 60W Range Temperatura modificabile...

Page 109: ...che permette di regolare in maniera costante e precisa la temperatura media interna al valore che viene impostato digitando i tasti posti sul pannello di controllo La ventilazione avviene per mezzo di una ventola assiale che distribuisce in maniera uniforme l aria calda e umida L umidificazione naturale a superficie libera avviene grazie all acqua contenuta nelle vaschette stampate sul fondo dell ...

Page 110: ...ura embrioni morti per asfissia in quanto le uova stando chiuse dentro in un imballaggio non respirano Al limite se avete preso uova che hanno viaggiato fatele riposare in un plateau porta uova per almeno 24 ore con la punta rivolta verso il basso prima di incubarle Scegliere uova provenienti da riproduttori che siano ben sviluppati ben nutriti e sani NOTA I riproduttori NON devono essere consangu...

Page 111: ...CHIUSA Guscio ruvido Guscio bianco non geneticamente e fragile Uovo piccolo Uovo leggermente sporco Uovo oblungo UOVA ADATTE ALL INCUBAZIONE Uovo sporco di terra Sangue sul guscio Materiale fecale sul guscio Tuorlo sul guscio Sottile incrinatura Rotto Forato Deformato Guscio sottile Guscio rugoso Molto sporco ...

Page 112: ...durante l incubazione NON inserire uova in un secondo tempo 9 Preparazione e messa in funzione dell incubatrice Durante il trasporto prestare attenzione a non causare urti e danneggiamenti all incubatrice Posizionarla sempre in piano evitando schiacciamenti e o rotture Per il successo delle schiuse è consigliato tenere l incubatrice in un locale abitativo non in stalle portici o garage Il locale d...

Page 113: ... il connettore di alimentazione dell alimentatore nella presa posta sul coperchio comandi dell incubatrice 12 Fig 5 alimentare quindi l alimentatore inserendo la spina in una normale presa di corrente La ventilazione si avvierà immediatamente di seguito sul display comparirà la temperatura interna ATTENZIONE Se il ventilatore non dovesse funzionare staccare immediatamente la spina e rivolgersi all...

Page 114: ...azione uova di tutti gli avicoli Temperatura da mantenere durante l incubazione 37 7 C Temperatura da mantenere negli ultimi 3 giorni prima della nascita schiusa 37 2 C Fare riferimento alla seguente tabella per ottenere un incubata di successo Specie Tempo di incubazione Per una corretta umidità all inizio dell incubazione Non girare le uova dopo il Per una corretta umidità durante gli ultimi 3 g...

Page 115: ...ardatari di nascere 9 4 Incubazione delle uova di palmipedi oca anatra ecc Dal decimo giorno d incubazione fino agli ultimi tre giorni precedenti la nascita aprire l incubatrice una volta al giorno e lasciare le uova raffreddare per 15 20 minuti Prima di riposizionare il coperchio nebulizzare un velo d acqua potabile con uno spruzzino ATTENZIONE MAI BAGNARE LE UOVA ANCORA CALDE ASPETTARE CHE SI RA...

Page 116: ...e l embrione è sottosviluppato e l uovo deve essere scartato 11 Schiusa e nascita del pulcino L operazione di seguito è molto delicata e va fatta velocemente per evitare che le uova si raffreddino troppo È consigliato farsi aiutare da una seconda persona per velocizzare l operazione A Negli ultimi 3 giorni dalla prevista nascita fermare il motore gira uova togliendo il connettore dalla presa posta...

Page 117: ...www borotto com 12 2 Nutrizione Di solito i pulcini iniziano a mangiare e bere dal secondo terzo giorno di vita Mettere nella scatola recinto un abbeveratoio e una mangiatoia con del mangime per pulcini Suggeriamo di spargere un po di mangime anche sui fogli di giornale Mangiatoie e abbeveratoi sono disponibili sul sito www borotto com Se si utilizzano altri abbeveratoi accertarsi che la vaschetta...

Page 118: ...duttori non devono avere più di 3 anni Carenze nutritive Alimentare i riproduttori con una alimentazione adeguata usare mangime per riproduttori Uova che hanno viaggiato per lunghe distanze Incubare uova locali Umidità incorretta durante l incubazione Rispettare le informazioni date sul riempimento delle vaschette d acqua L incubatrice è stata aperta più volte in fase di schiusa Aprire al massimo ...

Page 119: ...idito di alcool Soffiare la parte interna del coperchio lungo il perimetro della griglia di protezione con dell aria compressa per rimuovere il piumino perso dai pulcini durante la schiusa Per soffiare si può usare anche le bombolette di aria compressa quella usata per soffiare le tastiere dei PC NOTA LA SANIFICAZIONE VA ESEGUITA PRIMA DI INCUBARE STOCCAGGIO asciugare perfettamente l interno dell ...

Page 120: ...uttore cause di forza maggiore terremoti inondazioni incendi ecc Usare l incubatrice solo per lo scopo cui è destinata altri usi diversi da quanto indicato in queste istruzioni sono da intendersi pericolosi e il Produttore respinge ogni e qualsiasi responsabilità per eventuali danni a persone animali o cose derivanti dalla mancata osservanza di quest avvertimento Il Produttore non sarà ritenuto re...

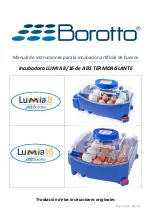
Page 121: ...Pág 1 de 20 Rev 01 Manual de instrucciones para la incubación artificial de huevos Incubadora LUMIA 8 16 de ABS TERMOAISLANTE Traducción de las instrucciones originales ...

Page 122: ...do no utilice el aparato y o antes de abrirlo levantando la tapa y de limpiarlo 10 No utilice el aparato con cables o enchufes estropeados o si se ha caído o estropeado por cualquier causa Lleve el aparato al centro de asistencia autorizado más cercano para su comprobación o reparación 11 El uso de accesorios no recomendados o no vendidos por la empresa fabricante está prohibido 12 No utilice el a...

Page 123: ...ctamente y desenchúfela de la toma de la pared 21 Las modificaciones eventuales en este producto que no hayan sido expresamente autorizadas por el fabricante pueden comportar la pérdida de la seguridad y de la garantía de su uso por parte del usuario 22 GUARDE CON ATENCIÓN ESTAS INSTRUCCIONES Símbolos de advertencia utilizados en el producto y en este manual Símbolo Descripción Obligatorio no cubr...

Page 124: ...exóticas 15 9 4 Incubación de los huevos de palmípedos oca pato etc 15 10 Controlperiódicodeloshuevosdurantelaincubación inspecciónaltrasluz 15 11 Eclosión y nacimiento del polluelo 16 12 Primeros días de vida 17 12 1 Beneficios de la lámpara de rayos infrarrojos 17 12 2 Nutrición 17 13 Problemas que se pueden encontrar durante el uso 17 13 1 Alimentación garantizada NON STOP 17 14 Problemas que s...

Page 125: ...abricante Y es conforme con las directivas siguientes Directiva 2014 35 UE conocida como Directiva de baja tensión Directiva 2014 30 UE conocida como Directiva de compatibilidad electromagnética Directiva 2011 65 CE ROHS II Los productos han sido realizados en conformidad con las normas siguientes Norma EN 60335 1 2012 A11 2014 A1 IEC 2013 Seguridad de los aparatos eléctricos de uso doméstico y af...

Page 126: ...cas y de seguridad de la incubadora de huevos a la que se refiere el manual PREMISA Estas instrucciones ayudan a familiarizarse con la incubadora Una lectura atenta de estas instrucciones permite obten er un elevado rendimiento de eclosión por tanto este manual no solo debe seguirse al pie de la letra sino respetarse exhaustivamente Si descuida u omite una sola de las indicaciones notará la difere...

Page 127: ...Pág 7 de 20 Rev 01 NOTA fotos demostrativas equivalentes para todos los modelos de la serie LUMIA FIG 1 FIG 2 FIG 3 FIG 4 FIG 5 FIG 6 FIG 7 FIG 8 4 3 10 00 00 00 11 11 7 5 9 12 8 13 15 16 6 3 14 4 1 2 ...

Page 128: ...A Pantalla Control digital de la temperatura con punto decimal Ventilación Ventilador axial 12 VCC silenciado diámetro 60 mm con función Autorestart Termostato Microordenador con tecnología PID con precisión 0 1 C Calentador LUMIA 8 Resistencia en cable de silicona FLEX de 50W LUMIA 16 Resistencia en cable de silicona FLEX de 60W Intervalo Temperatura modificable desde un Mín de 30 C a un Máx de 4...

Page 129: ...cro ordenador PID de última generación que permite regular de forma constante y exacta la temperatura media interna en el valor que se configura mediante las teclas ubicadas en el panel de control La ventilación se obtiene mediante un ventilador axial que distribuye de manera uniforme el aire caliente y húmedo La humidificación natural en la superficie ocurre gracias al agua contenida en las cubet...

Page 130: ...o durante km con medios de transporte tendrán eclosiones inferiores al 50 a causa de factores debidos al estrés del viaje vibraciones fluctuaciones de la temperatura embriones muertos por asfixia ya que los huevos encerrados dentro de un embalaje no respiran En el caso de huevos que hayan viajado déjelos reposar en una bandeja portahuevos por al menos 24 horas con la punta dirigida hacia abajo ant...

Page 131: ... DE ECLOSIÓN Cáscara blanca no genéticamente y frágil Cáscara áspera Huevo pequeño Huevo ligeramente sucio Huevo oblongo Huevo con tierra Sangre en la cáscara Materia fecal en la cáscara Yema en la cáscara Cáscara fina HUEVOS ADECUADOS PARA LA INCUBACIÓN Cáscara rugosa Muy sucia Grieta fina Roto Perforado Deformado ...

Page 132: ...duzca huevos en un segundo momento 9 Preparacion y puesta en funcionamiento de la incubadora Durante el transporte hay que evitar golpes y daños en la incubadora Colóquela siempre en una superficie plana evitando aplastamientos y o roturas Para conseguir buenas eclosiones se aconseja colocar la incubadora en un lugar de la vivienda no en establos cobertizos o garajes El lugar debe estar a una temp...

Page 133: ...ción del alimentador en la toma situada en la tapa de mandos de la incubadora 12 Fig 5 después alimente el alimentador introduciendo el enchufe en una toma normal de corriente La ventilación se activará inmediatamente después en la pantalla aparecerá la temperatura interna ATENCIÓN Si el ventilador no funciona desconecte de inmediato el enchufe y diríjase a un centro de asistencia Para programar l...

Page 134: ...homogeneidad de eclosión 9 2 Informacion para una incubacion correcta huevos de todas las aves Temperatura que debe mantenerse durante la incubación 37 7 C Temperatura que debe mantenerse en los 3 últimos días antes del nacimiento eclosión 37 2 C Consulte la siguiente tabla para obtener una incubación perfecta Especie Tiempo de incubación Para una correcta humedad al principio de la incubación No ...

Page 135: ...os de palmípedos oca pato etc Desde el décimo día de incubación hasta los tres últimos días anteriores al nacimiento abra la incubadora una vez al día y deje que se enfríen los huevos durante 15 20 minutos Antes de volver a colocar la tapa nebulice una capa fina de agua potable con uno rociador ATENCIÓN NUNCA MOJE LOS HUEVOS AÚN CALIENTES ESPERE A QUE SE ENFRÍEN Durante esta operación hay que desc...

Page 136: ...brión está subdesarrollado y habrá que descartar el huevo 11 Eclosion y nacimiento del polluelo La siguiente operación es muy delicada y debe realizarse rápidamente para evitar que los huevos se enfríen demasiado Se aconseja la ayuda de una segunda persona para agilizar la operación A En los 3 últimos días del para el nacimiento previsto detenga el motor del girador de huevos quitando el conector ...

Page 137: ... disponibles en la página www borotto com 12 2 Nutricion Normalmente los polluelos empiezan a comer y a beber a partir del segundo tercer día de vida Ponga en la caja recinto un abrevadero y un comedero para pienso fino Recomendamos esparcir un poco de pienso también en las hojas de periódico Los comederos y abrevaderos están disponibles en la página www borotto com Si se usan otros abrevaderos as...

Page 138: ...cianos Los reproductores no deben tener más de 3 años Carencias nutritivas Alimente los reproductores con una alimentación adecuada use piensos para reproductores Huevos que han viajado un largo tramo Incube huevos del lugar Humedad incorrecta durante la incubación Respete las informaciones facilitadas sobre el llenado de las cubetas de agua La incubadora se ha abierto varias veces durante la fase...

Page 139: ...te interna de la tapa a lo largo del perímetro de la rejilla de protección para eliminar el plumón desprendido de los polluelos durante la eclosión Para soplar se pueden utilizar también las bombonas de aire comprimido las utilizadas para limpiar los teclados de los PC NOTA EL SANEAMIENTO DEBE REALIZARSE ANTES DE LA INCUBACIÓN ALMACENAMIENTO seque perfectamente el interior de la incubadora poniénd...

Page 140: ...ausas de fuerza mayor terremotos inundaciones incendios etc Utilizar la incubadora solo para la finalidad a la que está destinada otros usos diferentes de cuanto se indica en estas instrucciones deben considerarse peligrosos y el fabricante no se responsabiliza por daños a personas animales o cosas derivados del incumplimiento de esta advertencia El Fabricante no podrá considerarse responsable ni ...

Page 141: ...Pag 1 di 20 Rev 01 Mesterséges tojás inkubáció használati útmutatója Inkubátor LUMIA 8 16 ABS szigeteléssel Általános ismertető ...

Page 142: ...azott tartozékok használata tilos 12 Ne használja a készüléket szabadban és ne hordozza működés közben 13 A készüléket 8 évesnél fiatalabb gyermekek és csökkentett fizikai értelmi vagy mentális képességű személyek illetve tapasztalatok és szükséges ismeretek híján levő személyek csak felügyelettel vagy a készülék biztonságos használatára vonatkozó megfelelő tájékoztatás esetén használhatják A kész...

Page 143: ...ólum Leírás Használat közben tilos a készüléket letakarni Az alkatrészek érintése áramütést okozhat Forró felület tűzveszély Használati utasítás elolvasása a készülék üzembe helyezése előtt III érintésvédelmi osztályú 12VDC DC egyenáramú tápellátás Pozitív polaritás a tápcsatlakozó közepén ...

Page 144: ...ormáció a helyes inkubációról egzotikus állatok tojásai 15 9 4 Úszólábúak tojásainak inkubációja liba kacsa stb 15 10 Időszakos tojásvizsgálat az inkubálás alatt lámpázás 15 11 Keltetés és a fióka születése 16 12 Kikelés utáni első napok 17 12 1 Az infravörös lámpa előnyei 17 12 2 Táplálás 17 13 A használat során esetlegesen felmerülő problémák 17 13 1 Garantált ellátás NON STOP 17 14 Az inkubáció...

Page 145: ...e tartozik És megfelel az alábbi rendeleteknek Kisfeszültségű elektromos berendezésekre vonatkozó irányelv 2014 35 EU Elektromágneses kompatibilitási irányelv 2014 30 UE ROHS II irányelv 2011 65 CE A készülék megfelel az alábbi szabványoknak Szabvány EN 60335 1 2012 A11 2014 A1 IEC 2013 Háztartási és hasonló elektromos készülékek biztonsága Biztonság 1 rész Általános szabályok Szabvány EN 60335 2 ...

Page 146: ...enti hogy a kézikönyvben szereplő információk megfelelnek a mesterséges keltetőgépekre vonatkozó műszaki és biztonsági előírásoknak amelyekre a jelen kézikönyv hivatkozik Megjegyzés A használati kézikönyv fontos információkat tartalmaz és bemutatja az inkubátor használatát A használati útmutató betartása lehetővé teszi hogy magas keltetési hozamot érjünk el ezért fontos a kézikönyvben leírtak beta...

Page 147: ...Pag 7 di 20 Rev 01 MEGJEGYZÉS a LUMIA széria minden modelljére érvényes bemutató képek Ábra 1 Ábra 2 Ábra 3 Ábra 4 Ábra 5 Ábra 6 Ábra 7 Ábra 8 10 00 00 00 4 11 11 9 5 7 1 12 2 8 13 15 16 6 3 3 14 ...

Page 148: ...b mint 60dB A A súlyozási görbén Kijelző Hőmérséklet digitális vezérlése és szabályozása egy tizedesvesszőig Ventilazione Axiális ventilátor 12 VDC némított átmérő 60 mm Autorestart funkcióval Szellőzés Microcomputer a tecnologia PID con precisione 0 1 C Fűtés LUMIA 8 Ellenállás 50W os FLEX szilikonkábellel LUMIA 16 Ellenállás 50W os FLEX szilikonkábellel Hőmérséklet tartomány Állítható hőmérsékle...

Page 149: ... szükséges hő elektromos ellenállás következtében jön létre ami egy minőségi megbízható mikroszámítógépes PID irányítással vezérelhető A belső hőmérséklet szükség esetén a kezelőfelületen levő gombokkal szabályozható A szellőztetés axiális ventilátorral történik amely egyenletesen osztja el a mleg és párás levegőt A felszíni természetes párásítás az inkubátor aljára helyezett tálcákban lévő víznek...

Page 150: ... 50 alatti kikelést eredményeznek többnyire az utazási stressz rázkódások hőingadozások miatt valamint a nem szellőző csomagolások megfojtják az embriókat Amennyiben rendelt utaztatott tojásokkal inkubálnánk a keltetés előtt a tojásokat célszerű 24 órát pihentetni egy egyszerű tojástartóban úgy hogy a tojás csúcsa lefelé nézzen Jól fejlett és táplált egészséges tenyészállatok tojásait vásárolja a ...

Page 151: ...TOJÁSOK Durva héjú tojás Genetikailag nem fehér héjú és törékeny tojás MEGFELELŐ TOJÁSOK AZ INKUBÁLÁSHOZ Kicsi tojás Kissé piszkos tojás Hosszúkás tojás Vékonyhéjú tojás Földdel szennyezett Ráncos héjú tojás Véres tojás Fekáliával szennyezett Koszos tojás Tojássárgával szennyezett Repedt tojás Törött tojás Lyukas tojás Deformált tojás ...

Page 152: ...pedt törött ráncos lágy vékony vagy kék pöttyös öreg tojás 8 Hideg tojások esetén meg kell várni hogy tojások lassan és külső beavatkozás nélkül érjék el a szobahőmérsékletét és csak utána szabad elhelyezni őket az inkubátorba 12 C fokról 38 C fokra történő túl gyors azaz éles váltás kondenzációt eredményezhet a héjon ami csökkenti a sikeres keltetést Megjegyzés Az inkubáció alatt később ne helyez...

Page 153: ...inkubátor kezelőpanelén levő aljzatba 12 ábra 5 majd a tápegységet dugja be a konnektorba A szellőztetés azonnal elindul majd a belső hőmérséklet megjelenik a kijelzőn Figyelem Ha a ventilátor nem működik azonnal húzza ki a tápkábelt és vegye fel a kapcsolatot az eladóval A kívánt hőmérsékleti érték beállításához érintse meg a vezérlőpanelen a és gombokat lásd 9 ábra 4 A vagy gombok lenyomásával b...

Page 154: ...középre ezáltal jobb keltetési egyenletességet biztosíthatunk 9 2 Informáciok á megfelelo inkúbáciohoz minden típúsú báromfihoz Ajánlott hőmérséklet az inkubáció elején 37 7 C Ajánlott hőmérséklet a kikelést megelőző utolsó három napban 37 2 C Kövesse a táblázat utasításait a sikeres inkubáció érdekében Faj Inkubációs időtartam A megfelelő páratartalom eléréséhez az inkubáció elején Ne fordítsa a ...

Page 155: ...ni az előre jelzettnél így esélyt adva a későn kikelőknek 9 4 Úszolábúák tojásáinák inkúbáciojá libá kácsá stb Az inkubálás tízedik napjától az utolsó három napig a keltetés előtt nyissa ki az inkubátort naponta egyszer és 15 20 percig hagyja hűlni a tojásokat Mielőtt lezárná a készülék a fedelét permetezzen be egy vizes réteget a tojásokra FIGYELEM A FORRÓ TOJÁSOKRA TILOS PERMETEZNI MEG KELL VÁRN...

Page 156: ...végrehajtani nehogy túlságosan kihűljenek a tojások célszerű valaki segítségét kérni hogy felgyorsuljon a művelet A Az utolsó 3 napban az előre jelzett kikelés előtt már nem forgatunk Állítsa le a tojásforgató motort húzza ki a csatlakozót lehetőleg akkor amikor a tojások függőleges helyzetbe vannak B Vegye ki a tojásokat a tojástartóból és gyengéden helyezze őket egy takaróra C Távolítsa el a toj...

Page 157: ...agy harmadik napján kezdenek enni és inni Helyezzen a dobozba vagy az elkerített területre egy itatót és etetőt a finom takarmánynak Ajánlatos az újságpapírokra is szórni egy kis takarmányt Etetőket és itatókat a www borotto com oldalon is találhat Amennyiben más itatót használ győződjön meg arról hogy a tálka ne legyen magasabb 3 4cm nél hogy a fiókák ne tudjanak benne fürödni vagy esetlegesen be...

Page 158: ...vnél idősebbek Takarmányozási hiányosságok Megfelelő takarmánnyal táplálja a tenyészállatokat használjon tenyészállatok számára készített takarmányt Nagy távolságot megtett tojások Inkubáljon helyi tojásokat Nem megfelelő páratartalom az inkubáció alatt Kövesse a megadott értékeket a vízfeltöltésnél Az inkubátort többször nyitották fel a keltetési fázis alatt Naponta egyszer nyissa fel az inkubáto...

Page 159: ...ő felületét alkoholos puha szövettel Fújja át a fedő belsejét sűrített levegővel hogy eltávolítsa az elhullajtott pelyheket pihéket A számítógépek billentyűzetének tisztítására használt sűrített levegős spray is használható a tisztításhoz MEGJEGYZÉS A FERTŐTLENÍTÉST AZ INKUBÁLÁS ELŐTT KELL ELVÉGEZNI TÁROLÁS az inkubátor belsejét tökéletesen szárítsa meg majd hagyja a készüléket üresen tojások nélk...

Page 160: ...ek árvizek tűzvészek stb A készüléket csak a használati útmutatóban megjelölt célra lehet használni A gyártó nem vállal felelősséget a nem rendeltetésszerű használatból adódó meghibásodásokra Továbbá a gyártó elutasít minden felelősséget amennyiben a készüléket más tevékenységre használják A gyártó nem vállal felelősséget nem fogad el jótállási illetve visszafizetési igényt amennyiben a meghibásod...

Reviews: