23
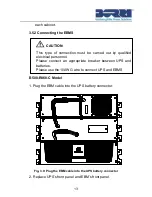
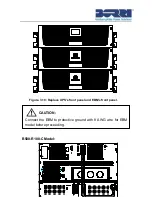
Make sure that EBMS are connected properly.
1)
Set the upstream circuit breaker (not included) to the “I” position
(ON).
The LCD will display panel illuminates and shows a menu of
“Welcome”
2) Verify that the UPS transfers to Bypass mode.
3) Press and hold the
button on the UPS front panel for at least
three seconds.
4) Check the UPS display for active alarms or notices. Resolve any
active alarms before continuing. See “Troubleshooting”
5) Verify that the UPS is operating normally and any load is
powered.
6) To change any other factory-
set defaults, see “Operation”
Online series recommends setting the date and time.
At initial startup, the UPS sets system frequency according to
input line frequency (input frequency auto-sensing is enabled by
default). After initial startup, auto-sensing is disabled until
manually re-enabled by output frequency setting.
At initial startup, input voltage auto-sensing is disbaled by default.
When manually enabled by output voltage setting, at the next AC
startup the UPS sets output voltage according to input line
voltage. After the subsequent startup, auto-sensing is disabled
until manually re-enabled by output voltage setting.
7) If you connect the REPO port, test the REPO function:
Activate the external REPO switch. Verify that the status change
on the UPS display.
4.6 Parallel Installation and Operation
4.6.1 Brief introduction to the redundancy
Summary of Contents for B500-R060-C
Page 1: ...B500 Online UPS User Manual B500 R060 C B500 R100 C 208 220 230 240VAC ...
Page 2: ......
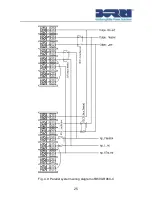
Page 29: ...25 Fig 4 9 Parallel systerm wiring diagram of B500 R060 C ...
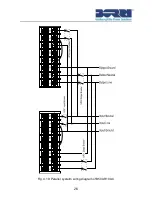
Page 30: ...26 Fig 4 10 Parallel systerm wiring diagram of B500 R100 C ...
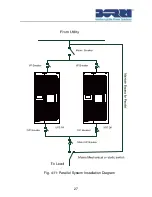
Page 31: ...27 Fig 4 11 Parallel System Installation Diagram ...
Page 43: ...39 Fig 5 14 Main menu tree ...
Page 50: ...46 ...


