27
support@borrowedspaces.com
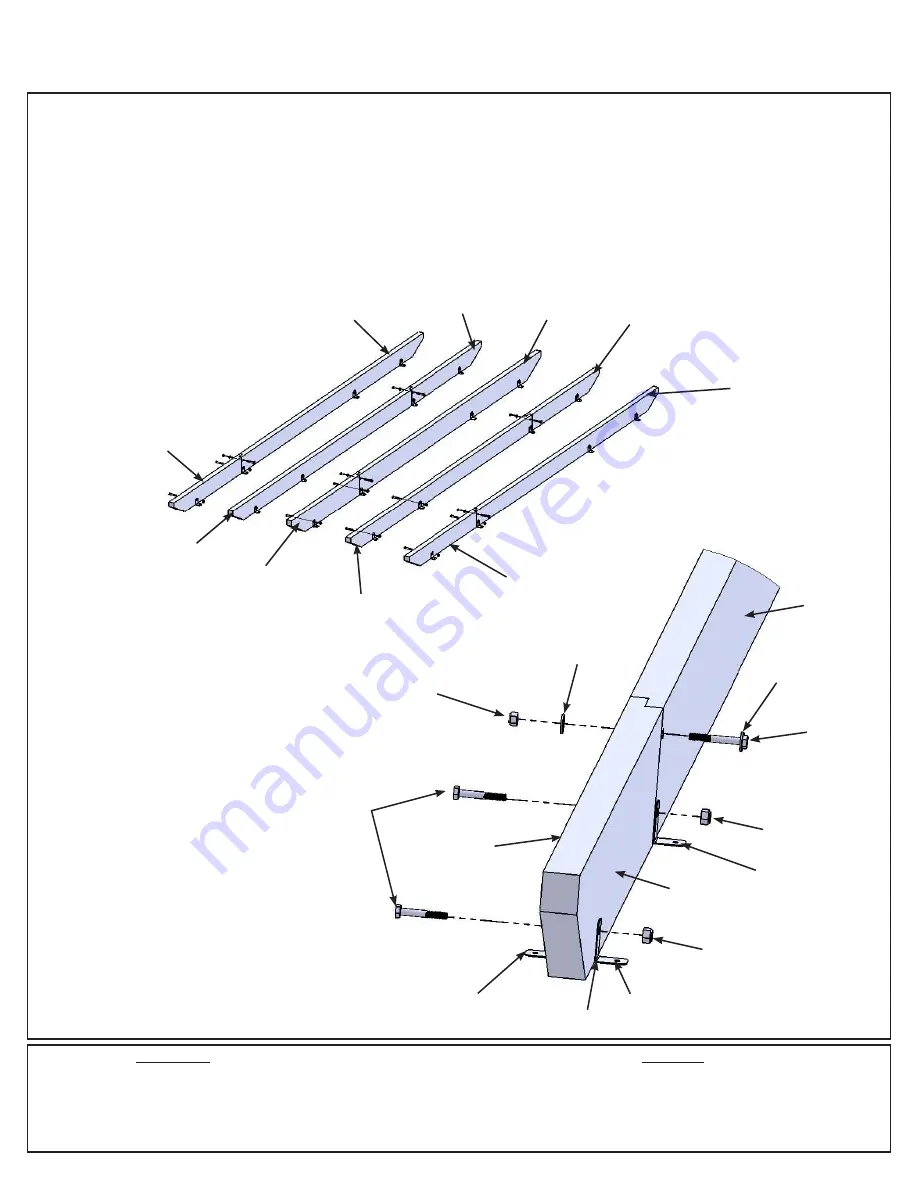
Step 11: Trellis Assembly
Part 1
A:
Interlock one (490) Short Trellis A with one (491) Long Trellis A then attach with one 1/4 x 1-3/4” Hex Bolt
(with
two
5/16” flat washer
and one 1/4” lock nut) in the top hole and one
Trellis Clip, in the bottom hole, on each side
connecting with one 1/4 x 1-3/4” Hex Bolt
(with one 1/4” lock nut). Trellis Clip should be flush to the bottom of the
board.
(fig. 11.1 and 11.2)
B:
Place three more Trellis Clips on each side of the Trellis A Asssembly and attach with one 1/4 x 1-3/4” Hex Bolt
(with one 1/4” lock nut) per pair of clips.
(fig. 11.1 and 11.2)
C:
Repeat Steps A and B with four (492) Short Trellis B and four (493) Long Trellis B to create four Trellis B
Assemblies. (fig. 11.1 and 11.2)
Hardware
5 x 1/4 x 1-3/4” Hex Bolt (
5/16” flat washer
x 2, 1/4” lock nut)
20 x 1/4 x 1-3/4” Hex Bolt (1/4” lock nut)
40 x Trellis Clip
1 x (490) Short Trellis A 34.9 x 133.4 x 857.2 mm (1-3/8 x 5-1/4 x 33-3/4”)
1 x (491) Long Trellis A 34.9 x 133.4 x 2203.5 mm (1-3/8 x 5-1/4 x 86-3/4”)
4 x (492) Short Trellis B 34.9 x 108 x 857.2 mm (1-3/8 x 4-1/4 x 33-3/4”)
4 x (493) Long Trellis B 34.9 x 108 x 2203.5 mm (1-3/8 x 4-1/4 x 86-3/4”)
Wood Parts
Fig. 11.1
Fig. 11.2
(490) Short
Trellis A
(491) Long
Trellis A
(492) Short
Trellis B
(493) Long
Trellis B
(492) Short
Trellis B
(493) Long
Trellis B
(492) Short
Trellis B
(493) Long
Trellis B
(492) Short
Trellis B
(493) Long
Trellis B
Trellis Clip
1/4 x 1-3/4”
Hex Bolt
1/4” Lock
Nut
5/16” Flat
Washer
Trellis Clip
5/16” Flat
Washer
Trellis
Clip
Trellis Clip
(hidden)
1/4 x 1-3/4”
Hex Bolt
1/4” Lock
Nut
Long
Trellis
Short
Trellis
There are eight (8)
Trellis Clips per
Trellis Assembly
1/4” Lock
Nut
Flush


