7
bis Sie die installiert haben Buchsen mit
ordnungsgemäßer Erdung.
• Wenn das Netzkabel beschädigt ist, muss es im
Kundendienst ausgetauscht werden.
HINWEIS:
Der Zugang zu einer geerdeten Steck-
dose ist erforderlich. Installation aller zusätzlichen
Steckdosen müssen von einem qualiizierten Elekt-
riker ausgeführt werden und alle Steckdosen müs-
sen ordnungsgemäß geerdet sein.
Schalten Sie das Gerät ein / aus
In Abhängigkeit vom Modell werden die Abfal-
lentsorger mit zwei Steuerungsarten komplettiert:
Funkschalter (wird an der Wand platziert) oder Luft-
schalter.
Funkschalter (Wandschalter)
Die Abfallentsorger der „Control” und “FullControl“
Serien sind mit einem drahtlosen Wandschalter
ausgestattet.
Der Schalter sollte sich an einem gelegenen (siche-
ren für Kinder) Ort über der Tischplatte beinden.
Um den Schalter an der Wand zu befestigen, ver-
wenden Sie doppelseitiges Klebeband.
Um das Gerät an- oder abzuschalten, halten Sie die
Taste 2-3 Sekunden lang gedrückt. Typ des Einspei-
seelements: Batterie; Spannung: 12V; Typ: A27
Luftschalter
Die Disposer sind mit einem luftschalter und einem
Verbindungsrohr ausgestattet. (außer „Control“ -Se-
rie).
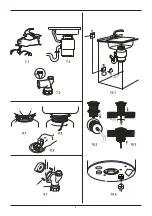
INSTALLATION OF AIR SWITCH
1. Drill a hole with a diameter of 25 mm in suitable
top or top the panel of a sink. Some sinks may alrea-
dy have a suitable A hole for the opening of which
is necessary remove the cover.
2. Unscrew the nut from the body of the push but-
ton, while holding the stainless steel washer and
rubber gasket in place. Place one end of the PVC
tube on the spout on the body Press the other end
to A hole in the table top and a nut located under
the countertop. (Fig.10.2)
3. Place the push button housing in the hole and
tighten the nut underneath countertop (enough
arm efort). Do not use the key to tighten nut.
(Fig.10.3)
4. Take the other end of the duct and tightly put it
on the spout of the air switch located on the bot-
tom of the disposer. (Fig.10.4) Hand tighten the
clamping nut. The disposer installation is complete.
Before using the product, read all of the instruc-
tions. operation and safety contained in paragraph
10 of this manual. In conclusion, install the plug in
the sink in the Closed position. Fill the sink with wa-
ter, Remove the plug and check the connections on
the a water leakage.
10. ATTENTION! IMPORTANT INSTRUCTIONS
FOR
SAFETY
• If the air switch does not work, remove the plug
power supply from the outlet and check the air
duct pneumatic switch and delivered to the outlet
electricity.
• This product is designed for grinding food
residues at home; the ingress of substances other
than food into the disposer may cause injury and
/ or damage property. To reduce the risk of Do not
use a washer with an installed disposer not for
food purposes (for example, for bathing a child or
washing your head).
• Children should be supervised adults and should
not play with a disposer. To reduce the risk of
injury
- It is necessary to keep a watchful eye on children
use of the product.
- If the wedging in the disposer is eliminated,
turn of the appliance and disconnect it from the
electrical network.
• Use a wrench for self-removal of jammed
waste according to description in the section
„Elimination of jamming disposer „.
• Use tongs or pliers to remove foreign objects from
the product.
• To reduce the risk of injury from particles that are
thrown out by the disposer, it is prohibited to use
grinders without noise shielding screen (Fig.8.3).
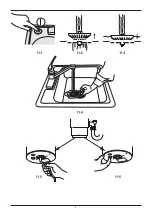
• Place the plug in the drain hole, as shown in Fig.
11.2 or 11.4. Do not allow the following items
to fall into the disposer: shells, including oyster,
caustic means for cleaning pipes or similar
chemical products, glass, porcelain or plastic,
large (hollow) bones, metal objects (bottle caps,
cans, or kitchen appliances), hot fat or other hot
liquids.
• Replace worn noise glossy screen / installation
gasket / protective relector if they are worn and
are no longer able to prevent waste or water.
• Wenn der Entsorger ausgeschaltet ist, verwenden
Sie einen Stopper, um dies zu verhindern
Fremdkörper beim Schleifen Kamera. Stellen
Sie sicher, dass die Macht des Entsorgers ist
behindert.
• Bevor Sie den Reset-Knopf drücken, den
Stau beseitigen oder Fremdkörper aus der
Zerkleinerungskammer entfernen, stellen Sie
sicher, dass Das Essen ist ausgeschaltet.
Summary of Contents for 91275752
Page 3: ...3 25...
Page 4: ...4...
Page 22: ...22 RU FR DE GB Garantiebedingungen Warranty terms Conditions de garantie...
Page 29: ...29...
Page 32: ...32...
Page 33: ...33 bort global com...


