background image

-9-

Assembly

Disconnect  the  plug

from  the  power  source

before  making  any  assembly,  adjustments
or  changing  accessories.

Such  preventive

safety measures reduce the risk of starting the
tool accidentally.

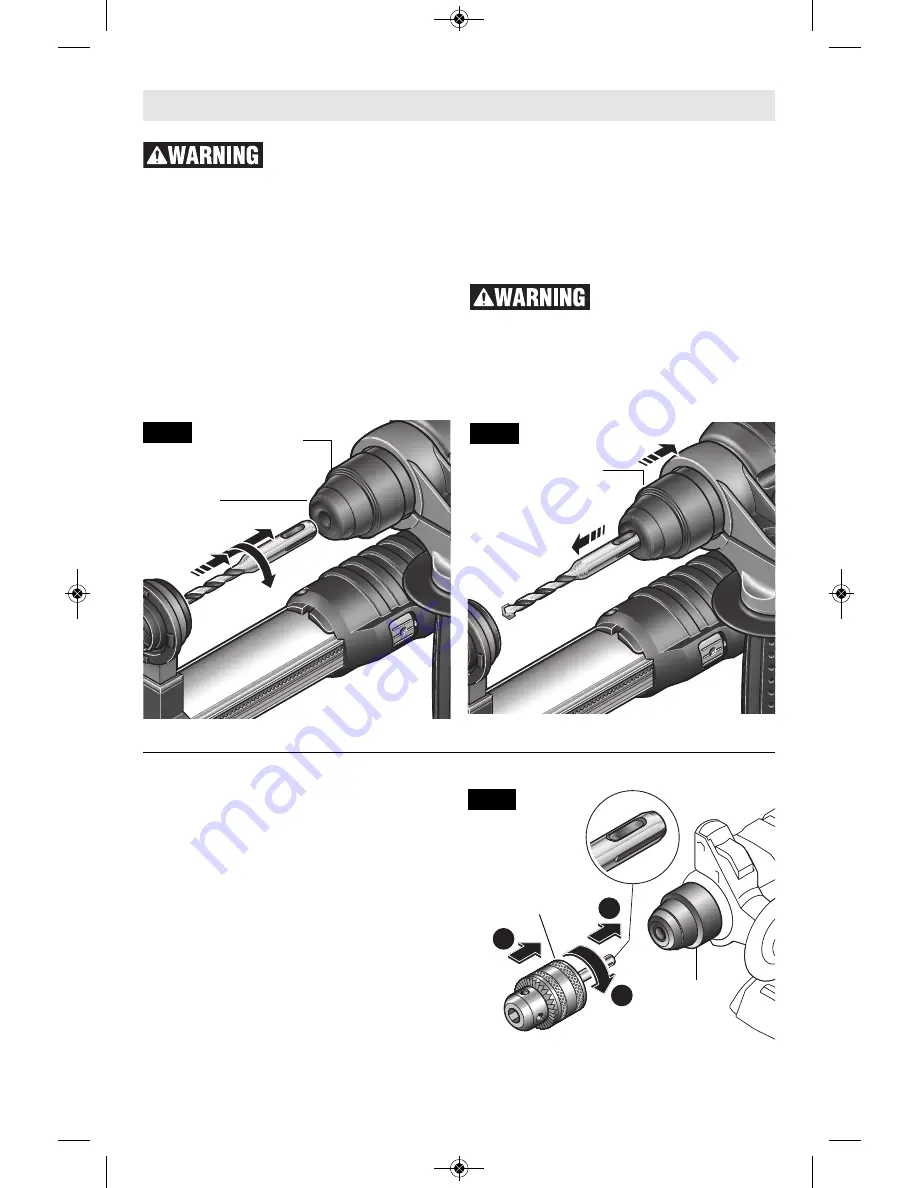
INSTALLING SDS-plus

® 

ACCESSORIES

Clean the insert shank end of the accessory to
remove  any  debris,  then  lightly  grease  with  a
light oil or lubricant

Insert  accessory  into  the  chuck  through  the
dust  shield,  while  twisting  and  pushing  inward
until  it  locks  automatically  into  place.  Pull
outward  on  the  accessory  to  be  certain  it  is
locked into the chuck (Fig. 3).

NOTE:

The high efficiency available from the

rotary  hammers  can  only  be  obtained  if  sharp
and  undamaged  accessories  are  used.    The
"cost"  to  maintain  sharp  and  undamaged
accessories  is  more  than  offset  by  the  "time
saved"  in  operating  the  tool  with  sharp
accessories.

REMOVING SDS-plus

® 

ACCESSORIES

Accessories  may  be  hot

after  use.    Avoid  contact

with  skin  and  use  proper  protective  gloves  or
cloth to remove.

To  remove  an  accessory,  pull  locking  sleeve
backward and pull bit forward. All accessories
should be wiped clean after removing (Fig. 4).

BBB

BBB

BBB

BBB

B

FIG. 3

FIG. 4

DUST

SHIELD

LOCKING

SLEEVE

SDS-plus

®

CHUCK

INSTALLING & REMOVING 3-JAW CHUCK

(Not included, available as accessory)

The 3 Jaw Chuck with SDS Shank can convert
your tool for use with straight shank bits.

Clean the insert shank end of the accessory to
remove  any  debris,  then  lightly  grease  with  a
light oil or lubricant

Insert  accessory  into  the  chuck  through  the
dust  shield,  while  twisting  and  pushing  inward
until  it  locks  automatically  into  place.  Pull
outward  on  the  accessory  to  be  certain  it  is
locked into the chuck (Fig. 5).

To  remove  the  chuck,  pull  the  locking  sleeve
backward  (towards  the  rear  of  tool),  while
pulling the chuck forward.

1

2

3

LOCKING

SLEEVE

3-JAW CHUCK

(Not included, available

as accessory)

FIG. 5

2610047982.qxp_11250VSR,VSRD  10/2/17  1:01 PM  Page 9

Summary of Contents for 11250VSRD

Page 1: ...CH99 1 877 267 2499 www boschtools com Call Toll Free for Consumer Information Service Locations Pour obtenir des informations et les adresses de nos centres de service après vente appelez ce numéro gratuit Llame gratis para obtener información para el consumidor y ubicaciones de servicio Boschhammer Boschhammer Boschhammer Boschhammer Boschhammer Boschhammer Boschhammer Boschhammer Boschhammer Bo...

Page 2: ...voidable use a Ground Fault Circuit Interrupter GFCI protected supply Use of an GFCI reduces the risk of electric shock Personal safety Stay alert watch what you are doing and use common sense when operating a power tool Do not use a power tool while you are tired or under the influence of drugs alcohol or medication A moment of inattention while operating power tools may result in serious persona...

Page 3: ... control of the power tool in unexpected situations Dress properly Do not wear loose clothing or jewelry Keep your hair clothing and gloves away from moving parts Loose clothes jewelry or long hair can be caught in moving parts If devices are provided for the connection of dust extraction and collection facilities ensure these are connected and properly used Use of dust collection can reduce dust ...

Page 4: ...essory Accessories may be hot after prolonged use Do not run the tool while carrying it at your side A spinning bit could become entangled with clothing and injury may result 4 Additional Safety Warnings GFCI and personal protection devices like electrician s rubber gloves and footwear will further enhance your personal safety Do not use AC only rated tools with a DC power supply While the tool ma...

Page 5: ...inable speed min Revolutions or reciprocation per minute revolutions strokes surface speed orbits etc per minute 0 Off position zero speed zero torque 1 2 3 I II III Selector settings speed torque or position settings Higher number means greater speed 0 Infinitely variable selector with off speed is increasing from 0 setting Arrow action in the direction of arrow Alternating current type or a char...

Page 6: ...on This symbol designates that this tool is listed by Underwriters Laboratories This symbol designates that this tool is listed by Underwriters Laboratories to United States and Canadian Standards This symbol designates that this tool is listed by the Canadian Standards Association This symbol designates that this tool is listed by the Canadian Standards Association to United States and Canadian S...

Page 7: ...le SDS Plus Maximum Capacities Concrete 3 4 Steel 1 2 Wood 3 4 Carbide tipped bits 3 4 Thin wall core bits 1 1 2 3 Jaw Chuck adaptor required NOTE For tool specifications refer to the nameplate on your tool Boschhammer Boschhammer REVERSING SWITCH LEVER VENTILATION OPENINGS RELEASE BUTTON SELECTOR DIAL DUST SHIELD LOCKING SLEEVE DRILL HAMMER DRILL SELECTION DIAL VARIABLE SPEED CONTROLLED TRIGGER S...

Page 8: ...ecifications refer to the nameplate on your tool Boschhammer Boschhammer Boschhammer Boschhammer Boschhammer Boschhammer Boschhammer Boschhammer Boschhammer Boschhammer REVERSING SWITCH LEVER VENTILATION OPENINGS RELEASE BUTTON SELECTOR DIAL DUST SHIELD LOCKING SLEEVE DRILL HAMMER DRILL SELECTION DIAL VARIABLE SPEED CONTROLLED TRIGGER SWITCH DEPTH STOP BUTTON DUST EXTRACTION RELEASE BUTTON DUST CA...

Page 9: ...ORIES Accessories may be hot after use Avoid contact with skin and use proper protective gloves or cloth to remove To remove an accessory pull locking sleeve backward and pull bit forward All accessories should be wiped clean after removing Fig 4 B B B B B B B B B B B B B FIG 3 FIG 4 DUST SHIELD LOCKING SLEEVE SDS plus CHUCK INSTALLING REMOVING 3 JAW CHUCK Not included available as accessory The 3...

Page 10: ...it shank Fig 6 To tighten chuck insert key into each of the three key holes in succession and tighten clockwise firmly The chuck can be released by using one hole only Note The 3 Jaw Chuck is for use only in Drill only mode The 3 Jaw Chuck is not for use when drilling with hammering action 2 FIG 6 VARIABLE SPEED CONTROLLED TRIGGER SWITCH Your tool is equipped with a variable speed trigger switch T...

Page 11: ...ondition leading to the bit binding DRILL HAMMER DRILL SELECTION DIAL The selector dial allows the tool to be set for various drilling hammer drilling applications Depress release button and turn selector dial right or left depending on the below applications Do not operate the selection dial until the tool come to a complete stop Shifting during rotation of the chuck can cause damage to the tool ...

Page 12: ...wn in figures 11 12 Example for an SDS plus drill bit Max total length approx 160 mm working length approx 100 mm Pay attention that the dust cap faces flush against the workpiece or the wall At the same time this makes working at a right angle easier After reaching desired drilling depth first pull the drill bit out of the hole and then switch the tool off Check the condition of the microfilter r...

Page 13: ...ter gently strike or tap it against a firm surface to loosen the dust from the microfilter Open the transparent door and empty the dust canister Close transparent door Check the microfilter for damage Replace it immediately when damaged INSTALLING DUST CANISTER To install dust canister push canister upward into the dust extraction system until you hear it lock into place Fig 15 CHANGING THE MICROF...

Page 14: ... and continue running the drill as the bit is withdrawn Materials such as glass porcelain ceramics tiles plastics etc should be drilled at low speeds with specially designed drill bits and lubricants Also replace the microfilter when the vacuuming performance is insufficient even when the dust canister is empty VACUUM ADAPTER DUST CANISTER Not included available as accessory For dust extraction wi...

Page 15: ...l within a short time When drilling a larger hole it is faster and easier on your power pack to first make a smaller hole and enlarge it to the required size Lubricate the tip of the bit occasionally with CUTTING OIL for easier metal drilling If bit binds reverse the drilling to help remove the bit from the work DRILLING MASONRY Use carbide tipped masonry bit for cinder block mortar common brick s...

Page 16: ...ed air Ventilation openings and switch levers must be kept clean and free of foreign matter Do not attempt to clean by inserting pointed objects through openings Certain cleaning agents and solvents damage plastic parts Some of these are gasoline carbon tetrachloride chlorinated cleaning solvents ammonia and household detergents that contain ammonia Maintenance 360 Auxiliary Handle Dust extraction...

Page 17: ...e de choc électrique augmente Ne maltraitez pas le cordon Ne vous en servez jamais pour transporter l outil électroportatif pour le tirer ou pour le débrancher Éloignez le cordon de la chaleur des huiles des arêtes coupantes ou des pièces mobiles Les cordons abîmés ou emmêlés augmentent les risques de choc électrique Si vous utilisez un outil électroportatif à l extérieur employez une rallonge con...

Page 18: ...tive réduisent le risque de démarrage intempestif de l outil électroportatif Rangez les outils électroportatifs dont vous ne vous servez pas hors de portée des enfants et ne permettez pas à des personnes qui ne connaissent pas l outil électroportatif ou qui ignorent ces consignes de s en servir Les outils électroportatifs sont dangereux dans les mains d utilisateurs inexpérimentés Entretenez les o...

Page 19: ...sés ou endommagés Les forets émoussés ou endommagés ont tendance à gripper dans l ouvrage En retirant le foret de l outil évitez tout contact avec la peau et utilisez des gants protecteurs appropriés en saisissant le foret ou l accessoire Les accessoires peuvent être chauds après une utilisation prolongée Ne laissez pas l outil en marche tout en le portant à votre côté Le foret en rotation peut s ...

Page 20: ... pouvant être atteinte min Tours ou mouvement alternatif par minute tours coups vitesse en surface orbites etc par minute 0 Position d arrêt vitesse zéro couple zéro 1 2 3 I II III Réglages du sélecteur Réglages de vitesse de couple ou de position Un nombre plus élevé signifie une vitesse plus grande 0 Sélecteur variable à l infini avec arrêt La vitesse augmente depuis le réglage 0 Flèche action d...

Page 21: ... porter des lunettes de sécurité Ce symbole signifie que cet outil est approuvé par Underwriters Laboratories Ce symbole signifie que cet outil est approuvé par Underwriters Laboratories selon les normes des États Unis et du Canada Ce symbole signifie que cet outil est approuvé par l Association canadienne de normalisation Ce symbole signifie que cet outil est approuvé par l Association canadienne...

Page 22: ...s maximales Béton 19 mm Acie 13 mm Bois 19 mm Mèches à pointe au carbure 19 mm Mèches creuses à paroi mince 38 mm Porte mandrin 3 mors requis REMARQUE Pour spécifications de l outil reportez vous à la plaque signalétique de votre outil Boschhammer Boschhammer LEVIER DE L INTERRUPTEUR D INVERSION DE MARCHE PRISES D AIR BOUTON DE DECLENCHEMENT PARE POUSSIÈRE MANCHON DE VERROUILLAGE CADRAN DE SÉLECTI...

Page 23: ...ique de votre outil Boschhammer Boschhammer Boschhammer Boschhammer Boschhammer Boschhammer Boschhammer Boschhammer Boschhammer Boschhammer LEVIER DE L INTERRUPTEUR D INVERSION DE MARCHE PRISES D AIR BOUTON DE DECLENCHEMENT PARE POUSSIÈRE MANCHON DE VERROUILLAGE CADRAN DE SÉLECTION DE PERCEUSE PERCEUSE À PERCUSSION GÂCHETTE DE COMMANDE À VITESSE VARIABLE BOUTON DE LA BUTÉE DE PROFONDEUR BOUTON DE ...

Page 24: ...s pour déposer Pour retirer un accessoire tirez et tenez le manchon de verrouillage vers l arrière et tirez le embout vers l avant Essuyez tous les accessoires pour les nettoyer après les avoir enlevés Fig 4 24 Assemblage B B B B B B B B B B B B B FIG 3 FIG 4 PARE POUSSIÈRE MANCHON DE VERROUILLAGE MANDRIN SDS plus INSTALLATION ET DÉMONTAGE D ACCESSOIRES MANDRIN À 3 MORS Non fourni disponible à tit...

Page 25: ...er le mandrin mettez la clé à mandrin successivement dans les trois trous de clé et serrez fermement Le mandrin peut être relâché en utilisant un trou seulement Remarque le mandrin à 3 mors ne doit être utilisé que dans le mode Perçage seulement Il ne doit pas être utilisé pendant une action de perçage avec percussion 2 FIG 6 Consignes de fonctionnement GÂCHETTE DE COMMANDE À VITESSE VARIABLE Votr...

Page 26: ...menant au grippage de la mèche CADRAN DE SÉLECTION DE PERCEUSE PERCEUSE À PERCUSSION Le cadran sélecteur permet de régler l outil en fonction de différentes applications de perçage ou de perçage à percussion Appuyez sur le bouton de déclenchement et tournez le cadran sélecteur à droite ou à gauche suivant les applications ci après N actionnez pas le cadran sélecteur avant que l outil ne se soit ar...

Page 27: ...PETITE TAILLE Votre outil est muni d un pare poussière standard pour emploi avec les mèches de perçage de petite taille Pour changer le pare poussière appuyez sur le bouton de retrait et tirez sur le pare poussière pour le faire sortir du dispositif d extraction de la poussière Pour insérer le pare poussière appuyez dessus pour le faire entrer dans le bout du dispositif d extraction de la poussièr...

Page 28: ...SIÈRE Avant d ouvrir le réservoir à poussière tapotez le doucement contre une surface ferme afin de détacher la poussière du microfiltre Ouvrez la porte transparente et videz le réservoir à poussière Fermez la porte transparente Inspectez le microfiltre pour déterminer s il est endommagé ou non Remplacez le immédiatement s il est endommagé INSTALLATION DU RÉSERVOIR À POUSSIÈRE Pour installer le ré...

Page 29: ...priés et de l huile Remplacez également le microfiltre lorsque la performance d aspiration n est pas satisfaisante même si le réservoir à poussière est vide RÉSERVOIR À POUSSIÈRE COMPATIBLE AVEC UN ASPIRATEUR non inclus disponible comme accessoire Pour dépoussiérer avec un l extracteur de poussière l aspirateur un réservoir à poussière compatible avec un aspirateur en option peut être inséré dans ...

Page 30: ...pidement Pour percer un trou de dimensions plus grandes il est plus rapide et plus facile pour votre bloc piles de pratiquer d abord un trou plus petit puis de l agrandir aux dimensions nécessaires Lubrifiez parfois la pointe du foret à l aide d HUILE DE COUPE pour faciliter le perçage des métaux Si le foret se grippe inversez l opération de perçage pour aider à retirer le foret de la pièce PERÇAG...

Page 31: ...e ventilation et les leviers de l interrupteur doivent rester propres et exempts de corps étrangers Ne tentez pas de les nettoyer en enfonçant des objets pointus dans les orifices Certains agents de nettoyages et certains dissolvants abîment les pièces en plastique Parmi ceux ci se trouvent l essence le tétrachlorure de carbone les dissolvants de nettoyage chlorés l ammoniaque ainsi que les déterg...

Page 32: ...ramientas mecánicas a la lluvia o a condiciones mojadas La entrada de agua en una herramienta mecánica aumentará el riesgo de que se produzcan sacudidas eléctricas No maltrate el cordón de energía No use nunca el cordón para transportar la herramienta mecánica tirar de ella o desenchufarla Mantenga el cordón alejado del calor el aceite los bordes afilados o las piezas móviles Los cordones dañados ...

Page 33: ...lhajas holgadas o el pelo largo pueden quedar atrapados en las piezas móviles Si se proporcionan dispositivos para la conexión de instalaciones de extracción y recolección de polvo asegúrese de que dichas instalaciones estén conectadas y se usen correctamente El uso de dispositivos de recolección de polvo puede reducir los peligros relacionados con el polvo Uso y cuidado de las herramientas mecáni...

Page 34: ...ice brocas ni accesorios desafilados o dañados Las brocas o accesorios desafilados o dañados pueden atascarse frecuentemente en la pieza de trabajo causando una reacción de par motor Al sacar la broca de la herramienta evite el contacto con la piel y use guantes de protección adecuados al agarrar la broca o el accesorio Los accesorios pueden estar calientes después de un uso prolongado No tenga en...

Page 35: ...uciones o alternación por minuto revoluciones golpes velocidad de superficie órbitas etc por minuto 0 Posición off velocidad cero par motor cero 1 2 3 I II III Graduaciones del selector graduaciones de velocidad par motor o posición Un número más alto significa mayor velocidad 0 Selector infinitamente variable con apagado la velocidad aumenta desde la graduación de 0 Flecha Acción en la dirección ...

Page 36: ... de los ojos Este símbolo indica que esta herramienta está catalogada por Underwriters Laboratories Este símbolo indica que Underwriters Laboratories ha catalogado esta herramienta indicando que cumple con las normas estadounidenses y canadienses Este símbolo indica que esta herramienta está catalogada por la Canadian Standards Association Este símbolo indica que la Canadian Standards Association ...

Page 37: ...adera 19 mm Brocas con punta de carburo 19 mm Brocas huecas de pared delgada 38 mm Adaptador de mandril de 3 mordazas necesario NOTA Para obtener las especificaciones de la herramienta consulte la placa del fabricante colocada en la herramienta Boschhammer Boschhammer PALANCA DEL INTERRUPTOR DE INVERSIÓN ABERTURAS DE VENTILACIÓN BOTÓN DE LIBERACIÓN DEL DIAL SELECTOR PROTECTOR ANTIPOLVO MANGUITO DE...

Page 38: ...icante colocada en la herramienta Boschhammer Boschhammer Boschhammer Boschhammer Boschhammer Boschhammer Boschhammer Boschhammer Boschhammer Boschhammer PALANCA DEL INTERRUPTOR DE INVERSIÓN ABERTURAS DE VENTILACIÓN BOTÓN DE LIBERACIÓN DEL DIAL SELECTOR PROTECTOR ANTIPOLVO MANGUITO DE FIJACIÓN DIAL DE SELECCION DE TALADRO TALADRO DE PERCUSION INTERRUPTOR GATILLO DE VELOCIDAD VARIABLE BOTÓN DEL TOP...

Page 39: ...tilice guantes de protección o un paño protector adecuados para quitar dichos accesorios Para quitar un accesorio tire hacia atrás del mango de fijación sujételo y tire de la broca hacia adelante Todos los accesorios deben limpiarse después de quitarlos Fig 4 39 Ensamblaje B B B B B B B B B B B B B FIG 3 FIG 4 PROTECTOR ANTIPOLVO MANGUITO DE FIJACIÓN MANDRIL SDS plus INSTALACIÓN Y REMOCIÓN DE MAND...

Page 40: ...ujeros para llave y apriete firmemente girando en el sentido de las agujas del reloj El mandril se puede soltar usando un solo agujero Nota El mandril de 3 mordazas está diseñado para utilizarse en el modo de Taladrado solamente El mandril de 3 mordazas no está diseñado para utilizarse cuando se taladre con acción de percusión 2 FIG 6 Instrucciones de funcionamiento INTERRUPTOR GATILLO DE VELOCIDA...

Page 41: ...a se atasque DIAL DE SELECCION DE TALADRO TALADRO DE PERCUSION El dial selector permite ajustar la herramienta para varias aplicaciones de taladrado y taladrado de percusión Oprima el botón de liberación y gire el dial selector hasta la derecha o hacia la izquierda según las aplicaciones que se indican a continuación Fig 1 y 2 No accione el dial de selección hasta que la herramienta se haya deteni...

Page 42: ...ional RECIPIENTE PARA POLVO CON ADAPTADOR DE ASPIRACIÓN accesorio opcional PESTILLO DE LIBERACIÓN FIG 12 Instrucciones de funcionamiento El sistema de extracción de polvo se retrae durante la utilización para que la tapa antipolvo se mantenga siempre cerca de la superficie que se esté taladrando El sistema de extracción de polvo se enciende y apaga automáticamente con la herramienta eléctrica Para...

Page 43: ...o dele un golpe suave o golpéelo suavemente contra una superficie firme para aflojar el polvo que esté en el microfiltro Abra la puerta transparente y vacíe el recipiente para polvo Cierre la puerta transparente Compruebe si el microfiltro está dañado Reemplácelo inmediatamente cuando esté dañado INSTALACIÓN DEL RECIPIENTE PARA POLVO Para instalar el recipiente para polvo empújelo hacia arriba hac...

Page 44: ...e lesiones del operador NOTA La alta eficiencia proporcionada por los martillos giratorios sólo se puede obtener si se utilizan accesorios afilados y sin daños El costo de mantener accesorios afilados y sin daños es sobradamente compensado por el tiempo que se ahorra al hacer funcionar la herramienta con accesorios afilados Todos los martillos requieren un corto período de tiempo para calentarse S...

Page 45: ...rande es más rápido y gasta menos el paquete de baterías hacer primero un agujero más pequeño y agrandarlo hasta el tamaño requerido Lubrique la punta de la broca de vez en cuando con ACEITE PARA CORTAR para taladrar metal más fácilmente Si la broca se atasca invierta el taladrado para ayudar a sacar la broca de la pieza de trabajo TALADRADO DE MAMPOSTERIA Utilice una broca para mampostería con pu...

Page 46: ...palancas de interruptor deben mantenerse limpias y libres de materias extrañas No intente limpiar introduciendo objetos puntiagudos a través de las aberturas Ciertos agentes de limpieza y disolventes dañan las piezas de plástico Algunos de estos son gasolina tetracloruro de carbono disolventes de limpieza clorados amoníaco y detergentes domésticos que contienen amoníaco Mantenimiento Mango auxilia...

Page 47: ...Notes Remarques Notas 47 2610047982 qxp_11250VSR VSRD 10 2 17 1 02 PM Page 47 ...

Page 48: ...E DURÉE À UN AN À COMPTER DE LA DATE D ACHAT CERTAINS ÉTATS AMÉRICAINS CERTAINES PROVINCES CANADIENNES N ADMETTANT PAS LE PRINCIPE DE LA LIMITATION DE LA DURÉE DES GARANTIES IMPLICITES IL EST POSSIBLE QUE LES LIMITATIONS CI DESSUS NE S APPLIQUENT PAS À VOTRE CAS EN AUCUN CAS LE VENDEUR NE SAURAIT ÊTRE TENU POUR RESPONSABLE DES INCIDENTS OU DOMMAGES INDIRECTS INCLUANT MAIS NE SE LIMITANT PAS AUX PE...

Reviews: