background image

Sanding Tips

SELECTING THE SANDING BELT

It is very important that you select the proper
belt for each particular application. To do this
you should understand the method of marking
or coding on the back of most belts. “CLOSED
COAT” means the surface is densely covered
with as much grit as the adhesive will hold.
“OPEN COAT” means the grit has been
applied evenly, but openly to the surface. An

“open coat” will not clog or fill as readily as
“closed coat”. In general, aluminum oxide
abrasive belts are best for woodworking
because they are tougher and last longer.
Sanding belts should be stored in a cool, dry
place. Do not store near heat or near a window
where the sun can reach them. 

TECHNIQUE

Grasp the handles firmly. Start the sander with
the belt off the work (NOTE: never start or stop

-8-

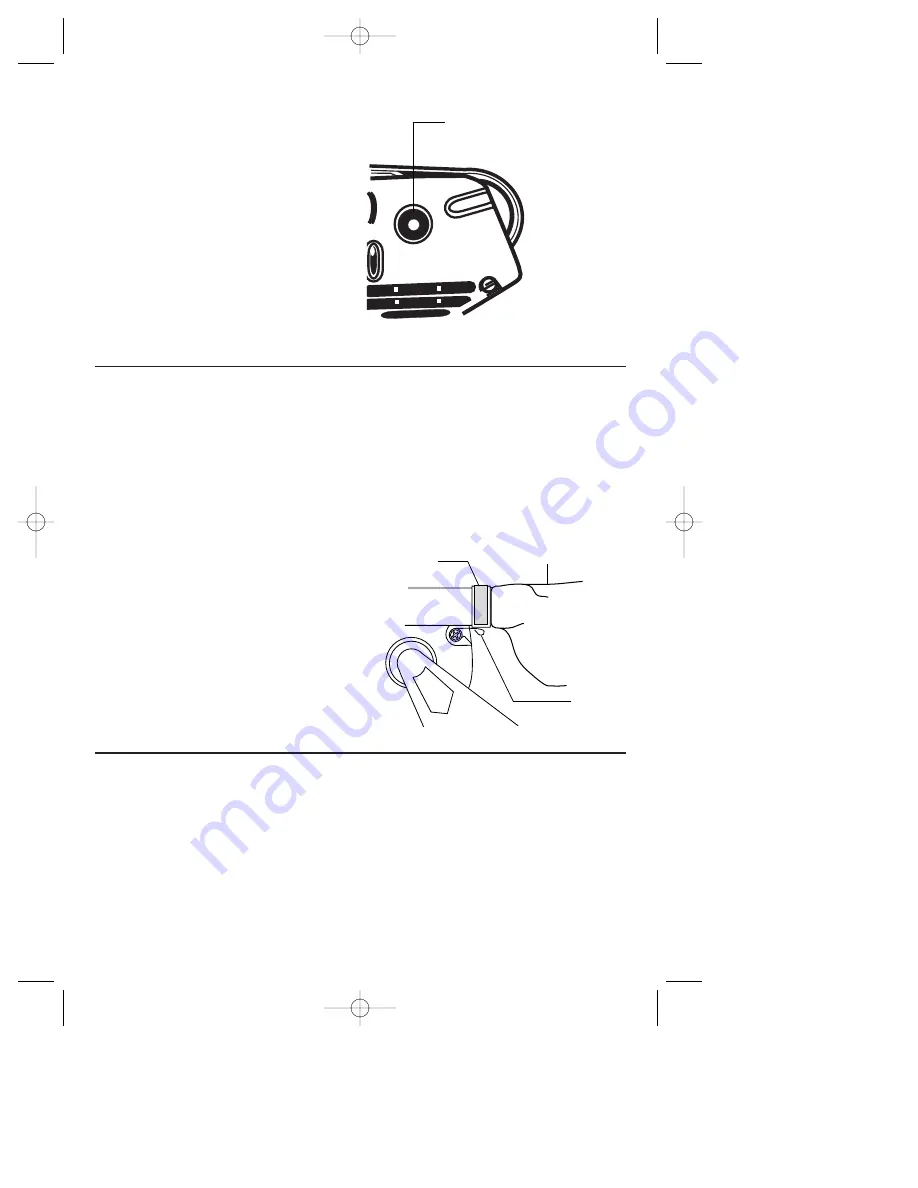
TRACKING ADJUSTMENT

Turn sander upside down and plug it into the
power source.  Hold the sander firmly with one
hand, engage trigger switch to turn the tool
“ON”, and note the tracking of the sanding
belt.  If the belt runs outward (towards the
open side of the sander) turn tracking
adjustment knob counter-clockwise. If the belt
runs inward, turn the knob clockwise. Adjust
the belt in this manner until the edge of the belt
runs flush with the outer edge of both pulleys
and covers the platen protector. Your sander is
now ready for use. In some cases, the belt will
require a slight readjustment after it is applied
to the work surface, so note the tracking
carefully during the first minutes of operation
and readjust as required.

ADJUSTABLE TOP HANDLE 

The top handle provided should always be
used to guide and balance the tool. Grip the
tool by the multi-position top handle, and the
rear handle, for safe control and ease of
operation.   To adjust the top handle, loosen
wing knob at least two full turns, position
handle and retighten knob firmly.

DUST EXTRACTION

Proper dust removal will extend abrasive life
and produce more consistent results. The
integral dust extraction system collects
sanding dust in the dust bag assembly. Bag
should be emptied when it is no more than half
full, and should be replaced when the surface
becomes clogged with dust or efficiency will
be reduced. To empty or replace bag, pull the
bag free of dust port. Open the zipper on the
rear of the bag, and empty contents into
suitable receptacle. 

To install bag, firmly push the bag into place
on the dust port so that it covers the "O" ring
to create a seal and the metal flange on dust

bag makes contact with the static clip as
shown. The static clip is provided to dissipate
static electricity that accumulates in the bag
and can cause annoying shock to the user. 

For added efficiency, a vacuum hose and
adaptor (optional accessories) are also
available which will allow your sander to be
connected to a shop vacuum system. See
your Bosch catalog for optional Bosch
Airsweep accessories.

TRACKING

ADJUSTMENT KNOB

DUST BAG

STATIC

CLIP

METAL

FLANGE

BM 2610967913 9/03  9/26/03  4:56 PM  Page 8

Summary of Contents for 1275DVS

Page 1: ...t usage Leer antes de usar For English Parlez vous français Habla español See page 2 Voir page 11 Ver página 20 Consumer Information Renseignement des consommateurs Información para el consumidor Toll Free Number Appel gratuit Número de teléfono gratuito 1 877 BOSCH99 1 877 267 2499 http www boschtools com 1275DVS 1276D 1276DVS BM 2610967913 9 03 9 26 03 4 56 PM Page 1 ...

Page 2: ...the tools or pull the plug from an outlet Keep cord away from heat oil sharp edges or moving parts Replace damaged cords immediately Damaged cords increase the risk of electric shock When operating a power tool outside use an outdoor extension cord marked W A or W These cords are rated for outdoor use and reduce the risk of electric shock Refer to Recommended sizes of Extension Cords in the Access...

Page 3: ...s may create a risk of electric shock or injury Certain cleaning agents such as gasoline carbon tetrachloride ammonia etc may damage plastic parts Hold tool by insulated gripping surfaces when performing a operation where the cutting tool may contact hidden wiring or its own cord Contact with a live wire will make exposed metal parts of the tool live and shock the operator If your tool is equipped...

Page 4: ...ed always clamp or secure sander when inverted and bench mounted for use as a table sander Be aware of switch location and know how to shut off the tool in emergency situations Always follow directions included with the accessory Use sanding fence stop or guide when sanding short or small workpieces Some dust created by power sanding sawing grinding drilling and other construction activities conta...

Page 5: ...sing from 0 setting Arrow Action in the direction of arrow Alternating current Type or a characteristic of current Direct current Type or a characteristic of current Alternating or direct current Type or a characteristic of current Class II construction Designates Double Insulated Construction tools Earthing terminal Grounding terminal Warning symbol Alerts user to warning messages Ni Cad RBRC sea...

Page 6: ...mber 1275DVS 1276DVS 1276D Voltage rating 120 V 50 60Hz 120 V 50 60Hz 120 V 50 60Hz Amperage rating 10 5 A 10 5 A 10 5 A No load speed n0 1 150 1 550 min n0 1 150 1 550 min n0 1 550 min Belt size 3 x 24 4 x 24 4 x 24 SANDING BELT WING KNOB BELT TENSION RELEASE LEVER PLATEN PROTECTOR VARIABLE SPEED DIAL 1275DVS 1276DVS ADJUSTABLE TOP HANDLE LOCK ON BUTTON DUST BAG VENTILATION OPENINGS TRIGGER SWITC...

Page 7: ...roperly positioned push lever back into its recess to apply proper tension to the belt TRIGGER SWITCH AND LOCK ON BUTTON Your sander can be turned ON or OFF by squeezing or releasing the trigger Your sander is also equipped with a Lock ON button located just above the trigger that allows continuous operation without holding the trigger TO LOCK SWITCH ON squeeze trigger depress Lock ON button and r...

Page 8: ...tment after it is applied to the work surface so note the tracking carefully during the first minutes of operation and readjust as required ADJUSTABLE TOP HANDLE The top handle provided should always be used to guide and balance the tool Grip the tool by the multi position top handle and the rear handle for safe control and ease of operation To adjust the top handle loosen wing knob at least two f...

Page 9: ...nsists of several layers remove as much as possible with a paint solvent or varnish remover before using the belt sander Use a hand scraper to remove the residue left by the solvent and allow surface to dry completely before sanding GUIDE FOR WOOD SANDING OPERATIONS Abrasive Belt Material Application Open coat Rough fast stock 36 to 60 grit removal removal of old finishes Open coat Intermediate fi...

Page 10: ... effectively with compressed dry air Always wear safety goggles when cleaning tools with compressed air Ventilation openings and switch levers must be kept clean and free of foreign matter Do not attempt to clean by inserting pointed objects through openings Certain cleaning agents and solvents damage plastic parts Some of these are gasoline carbon tetrachloride chlorinated cleaning solvents ammon...

Page 11: ... le cordon N exposez pas le cordon à la chaleur à des huiles à des arêtes vives ou à des pièces en mouvement Remplacez immédiatement un cordon endommagé Un cordon endommagé augmente le risque de choc électrique Lorsque vous utilisez un outil électrique à l extérieur employez un prolongateur pour l extérieur marqué W A ou W Ces cordons sont faits pour être utilisés à l extérieur et réduisent le ris...

Page 12: ...ation au cours de laquelle l outil de coupe peut venir en contact avec les fils cachés ou son propre cordon Le contact avec un fil sous tension rendra les pièces métalliques exposées de l outil sous tension et causera des chocs à l opérateur Si votre outil est équipé d un sac à poussière videz le souvent et au terme du ponçage Procédez extrêmement soigneusement dans l évacuation de la poussière le...

Page 13: ...se lorsqu elle est inversée et montée sur un établi pour utilisation comme ponceuse de table Soyez au courant de l emplacement de l interrupteur et connaissez la façon de mettre l outil à l arrêt dans des cas d urgence Suivez toujours les instructions fournies avec l accessoire Utilisez une butée ou un guide de ponçage en ponçant des ouvrages courts ou petits Les travaux à la machine tel que ponça...

Page 14: ...a vitesse augmente depuis le réglage 0 Flèche Action dans la direction de la flèche Courant alternatif Type ou caractéristique du courant Courant continu Type ou caractéristique du courant Courant alternatif Type ou caractéristique du courant ou continu Construction classe II Désigne des outils construits avec double isolation Borne de terre Borne de mise à la terre Symbole d avertissement Alerte ...

Page 15: ...e 120 V 50 à 60Hz 120 V 50 à 60Hz 120 V 50 à 60Hz Intensité nominale 10 5 A 10 5 A 10 5 A Vitesse à vide n0 1 150 1 550 min n0 1 150 1 550 min n0 1 550 min Demension de la bande 76 x 609 mm 101 x 609 mm 101 x 609 mm Ponceuse à courroie COURROIE DE PONÇAGE BOUTON À OREILLES LEVIER DE DESSERRAGE DE LA COURROIE PROTECTEUR DE PLAQUE MÉTALLIQUE CADRAN À VITESSE VARIABLE MODELE 1275DVS 1276DVS POIGNÉE A...

Page 16: ...nt bien positionnée repoussez le levier dans son renfoncement pour tendre la courroie Consignes de fonctionnement AVERTISSEMENT GÂCHETTE DE COMMANDE ET BOUTON DE BLOCAGE EN MARCHE Vous pouvez mettre la ponceuse sous ou hors tension en appuyant ou relâchant respectivement la gâchette Votre ponceuse est également équipée d un bouton de blocage en marche situé immédiatement au dessus de la gâchette q...

Page 17: ...ur le dégager de l orifice à poussière Ouvrez la fermeture éclair àl arrière du sac et videz le contenu dans un récipient adéquat Pour poser le sac poussez fermement le sac en place sur l orifice poussières de manière à ce qu il couvre le joint torique pour créer un scellement et que la bride métallique sur le sac à poussière vienne en contact avec la pince statique comme illustré La pince statiqu...

Page 18: ...vêtement consiste de plusieurs couches enlevez le plus gros avec un dissolvant pour peinture ou décapant pour vernis au préalable Servez vous d un grattoir à main pour enlever le résidu laissé par le dissolvant et attendez que la surface soit complètement sèche avant de la poncer GUIDE POUR LE PONÇAGE DU BOIS Bande de ponçage Matériau application Revêtement ouvert Ponçage grossier Grain 36 à 60 ra...

Page 19: ... air comprimé sec Il faut toujours porter des lunettes de protection quand on utilise de l air comprimé Les ouïes de ventilation et les leviers de l interrupteur doivent rester propres et exempts de corps étrangers Ne tentez pas de les nettoyer en enfonçant des objets pointus dans les orifices Certains agents de nettoyages et certains dissolvants abîment les pièces en plastique Parmi ceux ci se tr...

Page 20: ... eléctricas No abuse del cordón Nunca use el cordón para llevar las herramientas ni para sacar el enchufe de un tomacorriente Mantenga el cordón alejado del calor el aceite los bordes afilados o las piezas móviles Cambie los cordones dañados inmediatamente Los cordones dañados aumentan el riesgo de que se produzcan sacudidas eléctricas Al utilizar una herramienta mecánica a la intemperie utilice u...

Page 21: ...las instrucciones que aparecen en la sección Mantenimiento de este manual El uso de piezas no autorizadas o el incumplimiento de las instrucciones de Mantenimiento puede ocasionar un peligro de que se produzcan sacudidas eléctricas o lesiones Ciertos agentes de limpieza tales como gasolina tetracloruro de carbono amoníaco etc pueden dañar las piezas de plástico Sujete la herramienta por las superf...

Page 22: ...que pueden convertir ciertas lijadoras de correa portátiles para uso estacionario ocasional Si se utilizan dichos accesorios fije con abrazaderas o sujete la lijadora cuando ésta se invierta y se monte en un banco para usarla como lijadora de mesa Sepa la ubicación del interruptor y cómo apagar la herramienta en situaciones de emergencia Siga siempre las instrucciones que se incluyen con el acceso...

Page 23: ...gado graduación de 0 Flecha Acción en la dirección de la flecha Corriente alterna Tipo o una característica de corriente Corriente continua Tipo o una característica de corriente Corriente alterna o continua Tipo o una característica de corriente Construcción de clase II Designa las herramientas de construcción con aislamiento doble Terminal de toma de tierra Terminal de conexión a tierra Símbolo ...

Page 24: ...120 V 50 60Hz 120 V 50 60Hz 120 V 50 60Hz Amperaje nominal 10 5 A 10 5 A 10 5 A Velocidad sin carga n0 1 150 1 550 min n0 1 150 1 550 min n0 1 550 min Tamaño de correa 76 x 609 mm 101 x 609 mm 101 x 609 mm Lijadoras de correa FIG 1 CORREA PARA LIJAR BOTÓN DE MARIPOSA DISMINUCION DE TENSION DE LA CORREA PROTECTOR DEL PLATO DIAL DE VELOCIDAD VARIABLE 1275DVS 1276DVS MANGO AUXILIAR BOTON DE FIJACION ...

Page 25: ... correa colocada adecuadamente empuje la palanca de vuelta a su hueco para aplicar la tensión adecuada a la correa INTERRUPTOR GATILLO Y BOTÓN DE FIJACIÓN EN ON La lijadora se puede encender posición ON o apagar posición OFF apretando o soltando el gatillo La lijadora también está equipada con un botón de Fijación en ON ubicado justo sobre el gatillo el cual permite un funcionamiento continuo sin ...

Page 26: ...ia cuidadosamente durante los primeros minutos de funcionamiento y reajuste según se requiera MANGO SUPERIOR AJUSTABLE El mango superior suministrado se debe usar siempre para guiar y equilibrar la herramienta Agarre la herramienta por el mango superior multiposición y el mango trasero para lograr un control con seguridad y un manejo fácil Para ajustar el mango superior afloje el botón de mariposa...

Page 27: ... a quitar pintura barniz o laca viejos sin embargo si el revestimiento consta de varias capas quite tanto como pueda con un disolvente de pinturas o con un quitabarniz antes de utilizar la lijadora de correa Use un rascador de mano para quitar los residuos dejados por el disolvente y deje que la superficie se seque completamente antes de lijar GUIA PARA OPERACIONES DE LIJADO DE MADERA Correa abras...

Page 28: ...aire comprimido seco Use gafas de seguridad siempre que limpie herramientas con aire comprimido Las aberturas de ventilación y las palancas de interruptor deben mantenerse limpias y libres de materias extrañas No intente limpiar introduciendo objetos puntiagudos a través de las aberturas Ciertos agentes de limpieza y disolventes dañan las piezas de plástico Algunos de estos son gasolina tetracloru...

Page 29: ... 29 BM 2610967913 9 03 9 26 03 4 56 PM Page 29 ...

Page 30: ... 30 BM 2610967913 9 03 9 26 03 4 56 PM Page 30 ...

Page 31: ... 31 BM 2610967913 9 03 9 26 03 4 56 PM Page 31 ...

Page 32: ... À VOTRE CAS EN AUCUN CAS LE VENDEUR NE SAURAIT ÊTRE TENU POUR RESPONSABLE DES INCIDENTS OU DOMMAGES INDIRECTS INCLUANT MAIS NE SE LIMITANT PAS AUX PERTES DE PROFITS CONSÉCUTIFS À LA VENTE OU L USAGE DE CE PRODUIT CERTAINS ÉTATS AMÉRICAINS ET CERTAINES PROVINCES CANADIENNES N ADMETTANT PAS LE PRINCIPE DE LA LIMITATION NI L EXCLUSION DES DOMMAGES INDIRECTS ET CONSÉQUENTIELS IL EST POSSIBLE QUE LES ...

Reviews: