en
Installation instructions
42
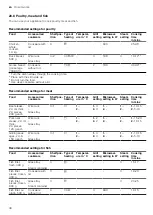
Recommended settings for grilling
Food
Accessories/cookware
Shelf posi-
tion
Type of
heating
Grill set-
ting
Cooking
time
in mins
Toast, browned
Wire rack
3
3
4-5
Beef burgers, x 12
Wire rack
+
Glass tray
3+1
3
35-45
1
1
Turn the dish halfway through the cooking time.
21 Installation instructions
Observe this information when installing the appliance.
21.1 Safe installation
Follow these safety instructions when in-
stalling the appliance.
¡
The appliance can only be used safely if it
is correctly installed according to the safety
instructions. The installer is responsible for
ensuring that the appliance works perfectly
at its installation location.
¡
Check the appliance for damage after un-
packing it. Do not connect the appliance if
it has been damaged in transit.
¡
Before starting up the appliance, remove
any packaging material and adhesive film
from the cooking compartment and the
door.
¡
Proceed in accordance with the installation
sheets for installing accessories.
¡
Fitted units must be temperature-resistant
up to 90 °C, and adjacent unit fronts up to
65 °C.
¡
Do not install the appliance behind a decor-
ative door or the door of a kitchen unit.
There is a risk of overheating.
¡
Cut-out work on the units should be carried
out before installing the appliance. Remove
any shavings. Otherwise, the correct opera-
tion of electrical components may be ad-
versely affected.
¡
Only a licensed professional may connect
appliances without plugs. Damage caused
by incorrect connection is not covered un-
der the warranty.
WARNING ‒ Risk of injury!
Parts that are accessible during installation
may have sharp edges and may lead to cut-
ting injuries.
▶
Wear protective gloves
WARNING ‒ Risk of fire!
It is dangerous to use an extended power
cord and non-approved adapters.
▶
Do not use extension cables or multiple
socket strips.
▶
If the power cord is too short, contact Cus-
tomer Service.
▶
Only use adapters approved by the manu-
facturer.
21.2 Appliance dimensions
You will find the dimensions of the appliance here
21.3 Fitted units
This appliance is only intended to be fully fitted in a kit-
chen. It is not intended to be used as a tabletop appli-
ance or within a cupboard.
Ensure that the fitted cabinet behind the appliance
does not have a back panel. Maintain a clearance of at
least 35 mm between the wall and the cabinet base or
the rear panel of the cabinet situated above.
Ensure that the fitted cabinet has a ventilation opening
of 50 cm² on the front. To create a ventilation opening,
trim the base panel or fit a ventilation grille.


