background image

Display DDU 10

Manual

Version 1.0 14/03/2019

Summary of Contents for DDU 10

Page 1: ...Display DDU 10 Manual Version 1 0 14 03 2019 ...

Page 2: ...nfiguring computed sources 41 6 4 Hysteresis 42 7 Online Measurement 46 7 1 Setting up an online measurement 46 7 2 Online calibration of measurement channels 51 7 3 Online calibration of multipoint adjustment channels 53 8 Error Memory 55 8 1 Error memory representation in RaceCon 55 8 2 Information on errors available from the error memory 57 8 3 Analog Input Diagnosis 61 9 Technical Data 63 10 ...

Page 3: ...ple OpenGL Library License SOIL 144 19 3 FreeType License 145 19 4 Lua License 146 19 5 BSD 4 Clause License getopt 146 19 6 BSD 3 Clause License getsubopt 147 19 7 Imagination OpenGL License 148 19 8 GNU LESSER GENERAL PUBLIC LICENSE pthread win32 148 19 9 GNU LESSER GENERAL PUBLIC LICENSE 151 20 Lap Trigger 159 20 1 Lap trigger timing beacon 159 20 2 Counting outing laps fragments 166 20 3 Lap t...

Page 4: ...Motorsport 24 Clone the Unit 181 25 Fuel Consumption Calculation 183 25 1 Setting up fuel consumption calculation and tank management 183 25 2 Fuel consumption diagnosis counter reset 184 25 3 Example 185 26 RaceCon Shortcuts 186 ...

Page 5: ...inal Electric Loads IGN Switch KL15 SENSPWR5 SENSGND active Sensor ANA_IN xx NTC Sensor ANA_IN xy switched pos terminal Star connection dig sensors e g wheelspeed µC As short as possible SENSPWR10 UBATT_FUSE KL30 LS_SWITCH1 4 Bosch Motorsport diagnosis connector PC Device NOTICE This schematic is not device specific please see the section Technical Data for the spe cifications of your device ...

Page 6: ...tted when they have been determined to be compliant from a performance and safety standpoint by a representative from Bosch Motorsport Read the manual carefully and follow the application hints step by step Do not hesitate to contact us contact data can be found on the last page of this document Disclaimer Due to continuous enhancements we reserve the rights to change any illustrations pho tos and...

Page 7: ...e free from dirt grease paint anodizing etc Use large diameter wire More metal to metal contact is better The following notations for power signals are used KL 15 is a switched battery rail controlled by the IGN switch KL 30 is an unswitched battery positive rail same as battery positive terminal KL 31 is an unswitched ground rail same as battery negative terminal Be careful to observe current lim...

Page 8: ...SA Box or ethernet cable Connection via MSA Box 1 Reassure that the MSA Box is installed properly on your computer If needed down load the MSA Box Diver from www bosch motorsport com 2 Connect an ethernet line of the device to the ethernet line of the MSA Box Please note that the MSA Box also requires power supply on the MSA Box connector of your wiring loom 3 Open RaceCon and connect the MSA Box ...

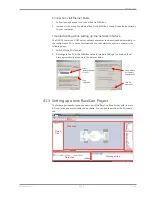
Page 9: ... problems during the network connection please try the following steps 1 Switch off the PC s firewall 2 Reconfigure the PC or the MSA Box network interface settings to obtain an IP ad dress automatically as shown in the pictures below Select Internet Protocol TCP IP Click Properties Select Obtain an IP adress automatically Click OK when done 4 1 3 Setting up a new RaceCon Project The following scr...

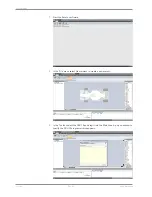
Page 10: ...ch Motorsport 1 Start the RaceCon software 2 In the File menu select New project to create a new project 3 In the Toolbox select the DDU 10 and drag it into the Main Area A pop up window to specify the DDU 10 program archive appears ...

Page 11: ...r the DDU 10 from www bosch motorsport com An information shows if the archive is valid or not 5 Click Next 6 Select Race track or Testbench mode according to your application 7 Click Finish The DDU 10 is inserted into the project and RaceCon tries to connect to the device ...

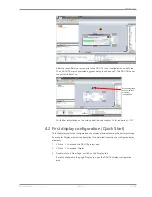
Page 12: ... for data download 8 Click Yes to download the configurations to the device or No to continue without downloading the data Successful ethernet connection DDU talks to PC If the device turns red you might need to do a firmware update on the device For more information see chapter Firmware update 178 The download starts and the DDU 10 carries out a reset ...

Page 13: ...ion on the color indication see chapter Color indication 22 4 2 First display configuration Quick Start This chapter explains the configuration of a display element showing the battery voltage See chapter Display element configuration for a detailed instruction to configure display elements 1 Click on to expand the DDU 10 project tree 2 Click on to expand Display 3 Double click on New Page or clic...

Page 14: ...us signal in the upper left corner switches from green to orange because the configuration in the tool differs from the configuration of the device Drag Drop 5 Use the search bar in the Data window to search for ub measurement channel for battery voltage Search for ub 6 Drag the ub measurement channel from the Data window and drop it on the dis play element ...

Page 15: ...ner switches to green The value of the battery voltage is displayed on the DDU 10 4 3 First recording Quick Start This chapter explains the configuration of the recording of the battery voltage channel See chapter Recording for a detailed instruction to configure recordings 1 Click on the Logger tab to go to the page Logger 2 Use the search bar in the Data window to search for ub measurement chann...

Page 16: ...ecording area Drag Drop 4 Click on the Download button in the upper left corner The configuration download starts and the DDU 10 carries out a reset Now you can find the ub measurement channel in the Data Area As we did not define global start conditions recording starts immediately 5 Start the WinDarab software ...

Page 17: ...our logger and click OK when done Click read data from logging device The Data Logger Import dialog opens NOTICE Refer to the WinDarab V7 manual for instructions on how to use the Data Logger Import dialog and for more detailed descriptions and instructions 9 Choose the device and the IP address for the device 10 Click Apply changes when done ...

Page 18: ...matically Measurement files are stored automatically in the folder defined under Settings 14 Click on Close when the transmission has finished 15 Click on the Start button and choose Open measurement file 16 Select the measurement files from the storage folder 17 Click on Open 18 Click on New Desktop to open a new measurement data window 19 Drag the ub measurement channel from the channel list and...

Page 19: ...e only As the activation key is device specific a key delivered with one DDU 10 does not work on any other DDU 10 When purchasing a software feature package you have to tell Bosch the ECU ID code The ECU ID code is device specific and can be found in the features info window shown in the screenshots below If you have not purchased an optional software feature package the next steps can be skipped ...

Page 20: ...ck on the feature you want to activate A feature unlock window appears 5 Enter the activation key you received for this feature on this device and click OK when done The feature s status changes to unlocked 6 Perform these steps to activate other features you purchased 7 Switch the car s ignition off and on again to cycle the power of DDU 10 ...

Page 21: ... supply of the display Date Time can be programmed by RaceCon Reassure that the time is set correctly if the device has not been used for more than two weeks 1 Connect the DDU 10 to the PC 2 Click on the Set date button in the System tab menu 3 Alternatively click on Set Date Time in the context menu of the device A Set Date Time menu opens 4 Set the current local date and time as coordinated univ...

Page 22: ...lizes different messages such as differences between tool and device status of the device configuration or the accrual of errors Visible color indications In the status area in the upper left corner As a background as well as a little dot around the display icon in the System win dow As a colored stripe beside the device name in the project tree As a colored background around the device name in th...

Page 23: ...nfiguration between device and project Red A different firmware between device and project Colored background with orange stripes Matching configuration with stored inact ive errors in the device Blinking colored background with orange stripes Matching configuration with active errors in the device Black MIL No errors Orange MIL Inactive Errors Error entries existing but not longer active Blinking...

Page 24: ...n an item in the project tree 2 Select Export from menu An Export Selection window opens 3 Click on Export to select a destination to store 4 Specify the filename 5 Click Save when done 5 2 Import in RaceCon You can choose to import into the whole project or you can import into specific parts of the project Proceed with the following steps to perform an import 1 Click with the right mouse button o...

Page 25: ...nd drop the channel to CAN Input of desired CAN bus on right hand side 6 Click Finish If a measurement channel belongs to more than one source e g DDU 10 and MS 5 1 the Solve Label Ambiguity window opens 7 Assign the ambiguous channels to the desired source 8 Click Finish ...

Page 26: ...l subchannels are available Measurement labels with the characters raw show the exact values in mV Measurement labels with the characters _fi show filtered values The word name in the table is a placeholder for the channel s name Measurement label Function raw_name mV value of sensor raw_name_fi Filtered mV value of sensor name Physical value of sensor name_fi Filtered physical value Filtered chan...

Page 27: ...ch sensor with the Bosch Sensor Wizard 1 Click on Measurement Sources in the Toolbox 2 To expand the list of I O Channels click on in the DDU 10 Project Tree 3 Drag the Bosch Sensor Wizard from the Toolbox and drop it on the desired analog input channel in the DDU 10 Project Tree Drag Drop The Bosch Sensor Wizard opens ...

Page 28: ...eate channel window opens 5 Enter the channel name and description 6 Click Ok when done The channel is inserted into the DDU 10 Project Tree Channel is linked to ANA03 Input pin Pull up resistor is activated Calculation of physical value with characteristic curve Available measurements for channel Measurement label Function raw_name mV value of sensor raw_name_fi Filtered mV value of sensor name P...

Page 29: ...0 Project Tree 3 Drag the Sensitivity Offset analog signal source from the Toolbox and drop it on the desired analog input channel in the DDU 10 Project Tree A Sensitivity Offset Wizard opens 4 To activate the internal pullup resistor check the box The internal pullup resistor is used to get a 5 V signal at the analog channel of the DDU 10 It allows you to use a push button The fixed value of the ...

Page 30: ...Enter physical limits of the sensor Choose data type of the measurement variable Check box to enable online calibration of offset and enter desired physical offset value Enter name to automatically create a new measurement sheet NOTICE Working with automatically created measurement sheets is ex plained in chapter Setting up an online measurement 46 7 Click Finish when done 8 Enter a channel name a...

Page 31: ...ame_fi filtered physical value 6 2 3 Configuring a generic nonlinear sensor Example Thermistor 5 kOhm From sensor data sheet resistance values over temperature The sensor has a nonlinear behavior Use characteristic curve for linearization Input voltage is the ratio between pull up resistor and thermistor Pin Thermistor 5V 3 kOhm 1 Click Measurement Sources in the Toolbox 2 To expand the list of I ...

Page 32: ...k the box The DDU 10 pull up resistor is used to get a 5 V signal at the analogue channel of the DDU 10 It allows you to use a push button The fixed value of the internal pull up resistor is 3 010 Ohm If using an additional external pull up resistor set up the overall resistance 5 Click Next when done The second part of the Sensitivity Offset Wizard opens ...

Page 33: ...teristic Curve Wizard opens Physical limits of channel Enter physical limits of the channel Choose data type of the measurement variable This sensor does not need offset calibration Enter name to auto matically create a new measurement sheet 7 Click Finish when done 8 Enter channel name and description 9 Click OK when done The channel is inserted into the DDU 10 Project Tree Channel is linked to A...

Page 34: ...6 2 4 Configuring a multipoint adjustment Example Measurement of wheel force Physical property wheel force not directly measureable Load transfer through suspension kinematics Physical value at sensor position defined by vehicle Curve definition by online adjustment at vehicle 1 Click on Measurement Sources in the Toolbox 2 Expand the list of I O Channels by clicking on in the DDU 10 Project Tree ...

Page 35: ...k the box The internal pullup resistor is used to get a 5 V signal at the analog channel of the DDU 10 It allows you to use a push button The fixed value of the internal pullup resistor is 3 01 kOhm If using an additional external pullup resistor set up the overall resistance 5 Click Next when done The second part of the Multipoint Adjustment Wizard opens ...

Page 36: ...zard opens Physical limits of channel Enter physical limits of the sensor Choose data type of the measurement variable Enable additional online calibration Enter name to auto matically create a new measurement sheet 7 Click Finish when done 8 Enter channel name and description 9 Click OK when done The channel is inserted into the DDU 10 Project Tree Channel is linked to ANA06 Input pull up resisto...

Page 37: ...filtered mV value of sensor name physical value of sensor name_fi filtered physical value Online definition of the curve is covered in the chapter Online calibration of measurement channels 51 of this manual NOTICE Working with automatically created measurement sheets is ex plained in chapter Setting up an online measurement 46 ...

Page 38: ...ear phase no signal distortion 0 500 1000 1500 2000 2500 3000 2 1 5 1 0 5 0 0 5 1 1 5 2 Abtastwerte roh Wert 10000Hz Abtastrate 0 5 10 15 20 25 30 1 5 1 0 5 0 0 5 1 1 5 Abtastwerte gefiltert Wert 100Hz Abtastrate 0 5 10 15 20 25 30 1 5 1 0 5 0 0 5 1 1 5 Abtastwerte dezimiert Wert 100Hz Abtastrate Sensor signal with noise Recorded signal 100Hz unfiltered Recorded signal 100Hz filtered Latency compe...

Page 39: ... 6 2 6 Configuring a frequency input Example measurement of wheel speed Pulse wheel attached to wheel Each passing tooth of pulse wheel triggers hall sensor Calculation of wheel speed with wheel circumference 1 Click on Measurement Sources in the Toolbox 2 To expand the list of I O Channels click on the in the DDU 10 Project Tree 3 Drag the Velocity digital signal source from the Toolbox and drop ...

Page 40: ...alculation Choose data type of the measurement variable Enter name to automatically create a new measurement sheet 7 Click Finish when done 8 Enter the channel name and description 9 Click OK when done The channel is inserted into the DDU 10 Project Tree Channel is linked to REV01 Input pin has hall interface Number of teeth Wheel circumference Available measurements for channel ...

Page 41: ... receive data from a measurement channel rather than an input pin Sensitivity Offset calculation on input channel Characteristic curve calculation on input channel Computed vehicle speed Lap trigger covered in a special separate section Example Sensitivity offset calculation on input channel 1 Click Measurement Sources in the Toolbox 2 Drag the Sensitivity Offset computed source from the Toolbox a...

Page 42: ...atically create a new measurement sheet 4 Click Finish when done 5 Enter channel name and description 6 Click OK when done The channel is inserted into the DDU 10 Project Tree NOTICE Working with automatically created measurement sheets is ex plained in chapter Setting up an online measurement 6 4 Hysteresis The hysteresis function avoids the high frequent switchover of the measurement channel val...

Page 43: ...rom B to A i Enter time when the hysteresis function is activated after vehicle s startup j Enter the channel s state A or B at startup 3 Click Next when done The second part of the Hysteresis Wizard opens Choose data type of the measurement variable Check the box to force the channel s quantization if the quantization should be a fixed value in the whole CAN system Enter name to automatically cre...

Page 44: ... input Calculated speed is average of both speeds if speed difference between wheels limit Calculated speed is maximum of both speeds if speed difference between wheels limit Calculating vehicle speed of 4 wheel drive Wheel speeds of all wheels as input Calculated speed is speed of 2nd fastest wheel 6 4 2 Setting up calculated speed 1 Click on tab System Overview 2 Click on Measurement Sources in ...

Page 45: ... Choose driven axle Choose individual wheel speed channels Set limit for speed difference for calculation 4 Click Finish when done The speed calculation is inserted into the DDU 10 Project Tree Speed calculation in DDU Project Tree Measurement channels calculated speed and calculated distance Configuration window ...

Page 46: ...se RaceCon for diagnosis online measurement and calibration Communication interface Ethernet Communication protocol XCP 7 1 Setting up an online measurement DDU 10 supports online measurement of sensor values and diagnostic variables 1 Expand Measurement Container and Measurement Folder 1 in the Project Tree and double click on Sheet1 Alternatively click on the Calibration Measuring tab to open th...

Page 47: ... sheets click on the tabs on the bottom of the Calibra tion Measuring window Tabs to switch between sheets To add an element to a measurement sheet perform the following steps 5 Drag a measurement element from the Toolbox and drop it on the measurement sheet Drag Drop 6 Select the desired measurement channel from the Data area and drop it on the measurement element If the DDU 10 shows the green st...

Page 48: ...ph style Temperature gauge Horizontal Bar graph style Circular gauge Numeric indicator Measurement label Oscilloscope Chart 7 1 1 Automatic creation of measurement sheets RaceCon can create measurement sheets automatically You can create and use measurement sheets with the DDU 10 as well as with all other devices connected to RaceCon ...

Page 49: ...orsport DDU 10 49 188 Drag Drop 1 During the configuration of a measurement channel select a measurement sheet from the list box or enter a name for a new measurement sheet Select existing sheet from list or enter name of new sheet ...

Page 50: ...urement Container and Device Channels If the DDU 10 is connected to RaceCon and the status is green live values of the channels are shown 7 1 2 Using the measurement sheets 1 When RaceCon is online press the F11 key to switch from Design Mode into Race Mode The measurement sheet is extended to full screen The button for offset calib ration is active 2 Switch between different sheets using the tabs...

Page 51: ...on of measurement channels Analog sensors drift with age temperature etc Manual calibration is necessary Solution online offset calibration Example acceleration sensor 7 2 1 Enable online offset calibration for measurement channel During creation of the measurement channel ...

Page 52: ...calibration DDU 10 has to be connected to RaceCon to calibrate the sensor s offset 1 Apply the desired physical condition to the sensor e g 1 G to an acceleration sensor 2 Open the measurement channel s online page by double clicking on the measure ment channel name in the Data Area 3 Enter the physical target value e g 1 G and press the Calibrate button Calibration target value Initiate calibrati...

Page 53: ...uring a multipoint adjustment 34 2 Download the configuration on the DDU 10 To connect the DDU 10 to RaceCon see chapter Setting up a new RaceCon Project 9 3 Click on the desired channel in the DDU 10 Project Tree 4 Double click on a measurement channel in the Data Area to open the online view Click to open measurement channels in data view Double click to open online view Click to open calibratio...

Page 54: ...U 10 Bosch Motorsport 8 Press the Calibrate button of the desired calibration point 9 Repeat for all curve points 10 Click Close when done The calibration curve is displayed in the online view Adjustment points vs offset adjustment ...

Page 55: ...his and replace the product name DDU 8 in this case with the name of your product 8 1 Error memory representation in RaceCon Bosch Motorsport devices feature an error memory Information on errors can be visual ized via RaceCon online measurement or can be transmitted via telemetry 8 1 1 Accessing the memory The error memory can be accessed as shown in the illustration ...

Page 56: ...en after a power cycle The error state will then reflect if the error is still active or not An error is deleted from the list when the user actively clears the error memory the user updates the firmware The error memory is not cleared by a configuration download and is not cleared by a power cycle 8 1 2 Clearing the error memory There are two ways of clearing the error memory both are shown in th...

Page 57: ...inguished 8 2 1 Error Memory Properties The following property is available for the error memory itself Error Status device measurement label error_state 0 no error present in memory 1 at least one inactive error present in memory no active errors 2 at least one active error present in memory If displayed in a measurement sheet this property s value 0 1 or 2 is translated into a verbal description...

Page 58: ...thin RaceCon provided RaceCon is online with the system 0 no error present in memory No orange border MIL off black No entries 1 at least one inactive error present in memory no active errors Constantly orange border Info cycling through errors present in error memory MIL constantly orange ...

Page 59: ..._rotate e g ANA01 for an error concerning the first ANA channel Error durations How long has the error been active If an error encounters a non active period before being cleared from the memory and is then detected again the error duration keeps on accumulating The number of active periods can be seen from the number of oc currences Number of occurrences How many times has the error been detected...

Page 60: ...t the respective property of each error period ically The following screenshot shows error properties which can be displayed or logged Labels hold information on error 1 an ANA3 error Labels hold information on error 2 n 1 Labels hold information on error n a CAN error After the last error and its error properties have been displayed the labels will start again with the first error in the error me...

Page 61: ...hortcut Detection Cable Breakage The pin diagnosis functionality check whether measurement is within the desired range can be activated in the ANA pin setup wizard to allow for a diagnosis regarding shortcut to ground shortcut to battery voltage and cable breakage a minimum maximum has to be defined ...

Page 62: ... pull up resistors being activated and deactivated evaluating the behavior of the measured value detects cable breakage regardless of the pull up resistor being activated by the user 1 Open the Error Memory of the Device 2 Click start detection of cable 3 Check the Error Memory for new fault entries regarding Open line errors ...

Page 63: ...nu structure and the user can reset for example laptime fuel consumption and many more without having to connect a laptop to the DDU The user can also install own graphics pictures etc on the 12 freely configurable display pages For quick data transfer from the car e g during pit stop data copy to a USB stick is available as an option Mechanical Data Size 198 x 134 x 35 mm Weight 875 g Protection ...

Page 64: ...ogging performance of 3 GB partition 1 FULL_LOG_2 Enable full logging performance of 1 GB partition 2 I_O EXTENS Enable additional 12 analog inputs and 2 CAN channels Connectors and Wires Life connector AS 2 16 35 PN Mating connector AS 6 16 35 SN F 02U 000 466 01 Auxiliary connector AS 2 12 35 PN Mating connector AS 6 12 35 SN F 02U 000 443 01 Pin Configuration Life connector Pin Name Comment Sta...

Page 65: ...X_Telemetry Incl 31 Ethernet_1_TXP Incl 32 Sens_Gnd_2 fused Incl 33 Sens_Power_10V over current protected Incl 34 ANA_IN_8 3 01 kOhm switchable Opt 35 ANA_IN_10 3 01 kOhm switchable Opt 36 USB_Device_Gnd to Bosch USB stick Opt 37 USB_Device_DN to Bosch USB stick Opt 38 RS232_RX_Telemetry e g GSM telemetry Incl 39 Ethernet_1_TXN Incl 40 Sens_Gnd_1 fused Incl 41 ANA_IN_11 3 01 kOhm switchable Opt 42...

Page 66: ... Pin Name Comment Status 1 Unused 2 Unused 3 Unused 4 Unused 5 Unused 6 Unused 7 Unused 8 Unused 9 Ethernet_3_TXP Incl 10 Ethernet_3_RXP Incl 11 Ethernet_3_RXN Incl 12 CAN_4_H Opt 13 Unused 14 Unused 15 Unused 16 Unused 17 Unused 18 Ethernet_screen Incl 19 Ethernet_3_TXN Incl 20 CAN_4_L Opt 21 CAN_3_H Opt 22 CAN_3_L Opt ...

Page 67: ...Mechanical Drawing 10 Bosch Motorsport DDU 10 67 188 10 Mechanical Drawing ...

Page 68: ...Con by right clicking on the Page set in the project tree overview The priority of display elements placed on All Pages is higher than the priority of display elements placed on single pages Alarm Elements have the highest priority and are displayed in front of all other elements You can find alarm pages above All pages in the project tree Example A bar graph placed on All Pages is displayed on al...

Page 69: ...oolbox opens and you can configure the active element 2 Use the search bar in the Data window to search for a measurement channel 3 Drag the desired measurement channel from the Data window and drop it on the display element 4 Alternatively use Value channel in the Properties toolbox to define a measurement 5 To swap the active channel element click on the needed element 6 To perform a multi selec...

Page 70: ...bar Color gauge Defines the color of the gauge Color ticks Defines the color of the ticks Color border Defines the color of the border Background Defines the color of the background Image file Here you can select the image you want to display Scale image Enables the fitting of the image according to the box Keep aspect ratio Keeps the original ratio of the image State channel Defines the channel t...

Page 71: ...he value channel which will be monitored PopUp condition Defines the condition when the element will be visible on the dis play Display type Defines the type of information which will be displayed You can differ entiate between Value Gear and a type of time display Decimal places Defines the decimal places which will be displayed Fill style Defines the style of the bar filling You can choose betwe...

Page 72: ...when the hysteresis will be reset You can find more information about the hysteresis function in general in the chapter Hyster esis 42 Color value Defines the color when the value is above below the set threshold limit Color title Defines the new color of the title when the value is above below the set threshold limit Color box Defines the new color of the element when the value is above below the...

Page 73: ...e value changed Zoom percent Defines the percentage by which the box will zoom out Anchor point Defines the anchor point which will be fixed during the zoom event Value Init value Defines the value which will be shown in RaceCon during configuration or on the device if the channel has no link Allows testing the conditional formatting by entering a representative value ...

Page 74: ...11 3 Types of display elements RaceCon has two types of element styles the Classical elements and the Modern ele ments Both styles contain the same type of elements the difference is solely in appear ance Additionally there is the basic element collection which consists of elements without any style Some of these are also transparent and can be used in combination with other elements by layering t...

Page 75: ...Display Configuration 11 Bosch Motorsport DDU 10 75 188 Classic vertical bar Classic Gauge Large Classic Gauge Small Modern Box Modern horizontal Bar ...

Page 76: ...188 DDU 10 Bosch Motorsport Modern vertical Bar Modern Gauge Large Modern Gauge Small Basic Box Value Text Can be used as a simple value or text element which might be placed on top of another element like the classic gauge large ...

Page 77: ...s background images Alarm Icon Icon or Icons which can be linked to a conditional channel 11 4 Context menu The context menu appears when you click with the right mouse button on a display ele ment Manage overlapping elements Delete element 11 5 LEDs The LEDs are fully configurable to show for example the optimal shifting point They can also be configured to flash in case of a customized condition...

Page 78: ... to use gear de pending shift light You can configure the shift LEDs only in the LEDs Top 1 Double click on LEDs Top in the project tree You will find them under Display 2 Alternatively click on the Display tab and then click on the colored LEDs at the top of the display image Tab Display Tab LEDs 3 Click on the button Add shift lights Button Add shift lights ...

Page 79: ...gear information of a different control unit as the Bosch ECU e g a gearbox control unit use the Gear Lookup Table to translate numeric values to ASCII format For more information see chapter Converting a gear channel to ASCII representation f Click with the right mouse button on the LEDs to reconfigure the LED patterns 5 Click OK when done The configuration is displayed in the DDU 10 LED Configur...

Page 80: ...r the name and an optional description of the translated ASCII measurement channel e g gear ASCII 4 Click Ok when done A graphic shows the connection between the input and output channels You can now use the measurement channel in the shift LED configuration 11 5 3 Creating customized LED pattern You can create your own LED pattern with an individually created condition using the top LEDs and the ...

Page 81: ...tion channel Choose an existing condition d Check the box to show a demo of the LEDs Important to check blinking To create a LED that alternately blinks in two different colors choose Display on pattern and define the LEDs in the first color Then choose Display off pattern and define the LEDs in the second color The direction of the pattern changes for each side For the LEDs on the left side the p...

Page 82: ...utton to change the priority The pattern with the lowest number will have the highest priority 11 6 Page select Display brightness LED brightness Any event can be used to change the display and LED brightness or the display page Those events can be any input channel or an internal calculated channel In the following chapters you will find some examples on how to set up such a configuration 11 6 1 ...

Page 83: ...s can be switched with 6 positions In the display settings dialog you will find a chart for the 6 switch positions over the display brightness and the LED brightness the values are in percent If the channel value does not only consist of integers the pages will be switched as fol lows Switch 1 is shown with the value 1 5 Switch 2 is shown with 1 5 the value 2 5 Switch 3 is shown with 2 5 the value...

Page 84: ...osch Motorsport 3 Go to Measurement Sources in the toolbox and select the Characteristic Curve un der Analog sources Drag and drop it on the selected analog input channel in the project tree 4 Select Pull up value 3 01 kOhm and click on Next ...

Page 85: ...000 x R R 3010 5000 Sensor supply mV R Resistor for each Rotary switch position Ohm 3010 Pull up resistor Ohm The following screenshot and the data are an example for a Bosch switch 6 Define minimum and maximum Limit Select Output data type from 8 16 or 32 Bit Do not check Use adjustment value Choose the Measurement sheet and click on Finish ...

Page 86: ...11 Display Configuration 86 188 DDU 10 Bosch Motorsport 7 Define Name and Description and click on Ok 8 Click on the Display tab and select the Settings tab at the bottom ...

Page 87: ...above 11 Click the Download button at the top to download the configuration 12 If you want to check your configured channel ensure that the device status is green search for the configured channel in the Data window and double click on it You will see a graphical display with the raw and the physical value of the channel 11 6 3 Option 2 Up Down switches 1 Define either one signal for a wrap around...

Page 88: ...lay switch does wrap around or Display switch does not wrap around Display switch does wrap around goes from maximum position to minimum posi tion or the other way around by switching in a loop after the last page it starts again with the first page If you choose Display switch does not wrap around you need two switches to turn the pages in both directions 4 Define Name and Description and click o...

Page 89: ...guration 11 Bosch Motorsport DDU 10 89 188 5 In the project tree select Display and then Open 6 To use the channel as a Page Switch check the box Use a channel to switch pages and select the channel configured above ...

Page 90: ...ox Use a channel to switch brightness and select the channel configured above 8 In the project tree select Download configuration 9 If you want to check your configured channel reassure that the device status is green double click on the DDU 10 and select the Statistics tab The configured channel position opens ...

Page 91: ...uration 11 Bosch Motorsport DDU 10 91 188 11 6 4 Option 3 CAN input signal math channel or ANA_IN channel Define your CAN math or analog input channel 1 Select the Display tab and then the Settings tab at the bottom ...

Page 92: ...the channel as a brightness switch check the box Use a channel to switch brightness and select the channel configured above 3 To use a channel as a Page Switch check the box Use a channel to switch page and select the channel configured above 4 Click on the Download button in the upper left corner ...

Page 93: ...gn styles Classic and Modern For better readability both styles have a non transparent background An Alarm element can display either a text icon or a value or any combination of those separately 11 7 2 Alarm configuration To create an alarm perform the following steps 1 Click on the Display tab at the top 2 Click on the Alarm tab at the bottom The alarm configuration window opens Alarm areas Alar...

Page 94: ...ines if the alarm is resettable For more details see chapter Reset table Alarm 99 Blink mode Defines the blinking frequency of the alarm when displayed Min display time enable Enables the function min display time Min display time Defines the minimum time an alarm will be displayed Auto reset enable Enables the function Auto reset Auto reset after Defines the time after an alarm will be hidden eve...

Page 95: ...arance Font size Defines the size of the font Text alignment Defines the alignment of the text Color value Defines the color of the value inside the alarm box Color box Defines the color of the alarm box Format Text Defines the Text and or the value of the alarm ...

Page 96: ...ition Value channel Defines the value channel which may be displayed and is relevant for the conditional formatting Decimal places Defines the decimal places which should be displayed Icon Default icons Defines the alarm icon which should be displayed Default color Defines the color of the icon ...

Page 97: ... Defines the threshold limit Reset hysteresis Defines the value as off when the hysteresis should be reset You can find more information about the hysteresis function in general in the chapter Hyster esis 42 Color value Defines the color when the value is above below the set threshold limit Color box Defines the new color of the box when the value is above below the set threshold limit ...

Page 98: ... link Allows testing the conditional formatting by entering a representative value Size and position X Pos Defines the x position of the top left corner of the alarm message within the alarm area Y Pos Defines the y position of the top left corner of the alarm message within the alarm area Width Defines the width of the alarm message Height Defines the height of the alarm message ...

Page 99: ...larm when the condition becomes true To configure and use a resettable alarm perform the following steps 1 Click on the Display tab and then on the Settings tab to go to the DDU10 display settings 2 Select your Alarm reset channel which can be any boolean channel like any other conditional channel 3 Click on the Alarms tab to change to the alarm configuration window 4 Create an alarm or edit an ex...

Page 100: ... to avoid an unwanted UIM while driving i e with a condition RPM 300 4 Click Add menu page to create a new link to a new page on the selected page 5 Click Add menu item to create a new item on the selected page On a new page you can create new items or pages as needed 6 Define a name for your items and pages and define the settings for your items With a new item you can define either labels specia...

Page 101: ...reset Resets the best laptime Segment times reset Resets the best laptime segment times Menu Triggered Events With a menu triggered event you can define a new virtual Boolean channel which will jump to the condition true for 100 ms when selected through the UIM You can use such a channel for sensor calibration or any further custom calculation A UIM configuration to change the current outing count...

Page 102: ... Math Channel Follow the steps shown in the screenshot 1st Double click on Math Channels in the Project tree 2nd Click on Add channel The create edit math channel window appears Create Edit Math Channel Window 1 Define the math channel using the following configuration possibilities a b c d e f g h a Enter the name of the math channel b Enter a description of the math channel c Enter the formula d...

Page 103: ... 1st Double click on Math Channels in Project Tree 2nd Click on the dropdown arrow beside Add channel 3rd Choose Conditional function The create edit math channel window appears 2 Define the math channel using the following configuration possibilities a b c d e a Enter the name of the conditional function b Enter the If condition Click on the pencil symbol to open an editor to enter expressions c ...

Page 104: ...dition to set up the maximum front brake pressure is given on the next page The conditional function is displayed in the DDU 10 math channel window Example Setting up a condition for maximum front brake pressure 20 20 10 Max brake pressure of the variable front p_br_front_mx Reset value is used Hold max value Follow max value Reset value is used Time Time Condition p_br_front 20 Brake pressure fro...

Page 105: ...mx 30 the new value for p_br_front_mx is set to 40 As p_br_front falls below 20 the IF condition turns to FALSE Now the OTHERWISE condition is triggered Because the condition p_br_front_mx sets the value of p_br_front_mx and the value is already set to 40 nothing changes When p_br_front rises to 40 the IF condition changes to TRUE again and triggers the THEN condition Now the reset value 10 is use...

Page 106: ...itional Channel Logical operations on measurement channel s If Else structure with reset Logical result Result can be used as input source for alarm display elements and further calculations in the whole RaceCon project Creating a new Conditional Channel 1 Follow the steps shown in the screenshot The Create edit condition window appears ...

Page 107: ...he following configuration possibilities 3 Click Ok when done The conditional channel is displayed in the DDU 10 condition channel window Condition Combination Combination of several up to 16 conditional channels for more complex calculations Logical results All conditions can be used globally in the whole DDU 10 project ...

Page 108: ... channel condition conditional function math measurement channel with binary values to be compared Combine multiple conditions by adding AND or OR relations To negate a condition click with the right mouse button on the condition and select Negation Combine several up to 16 conditions 3 Click Next to go to the next page Choose the output setting of the result Constant TRUE FALSE Result is as a con...

Page 109: ...d packaging should be sorted for recycling in an environment friendly manner Do not dispose of this electronic device in your household waste Waste electronic equipment must be disposed of properly according to Electrical and Electronics Act ElektroG and the European WEE directive ...

Page 110: ...g and rebooting Main factors influencing the CPU load are Number and complexity of math channels Number and complexity of conditions CAN traffic on both CAN lines Display configuration especially displaying pictures Logger configuration total logging rate kB s conditional measurement rates To help respecting the limit of 85 CPU load the DDU 10 creates an error memory entry To trigger this error en...

Page 111: ...out put frequency and row counter are configurable CAN gateway functionality transfer from one bus to another 16 1 CAN bus trivia CAN message 11 Bit standard or 29 Bit extended identifier Up to 8 bytes of data payload CAN bus Needs termination resistors 60 Ohm in wiring harness All devices connected to the bus must use identical data rate Configuration of bus data rate in the CAN messages overview...

Page 112: ...eCon CAN configuration from file Display CAN bus properties Baudrate Create new CAN output message Export Vector CAN database DBC channel configuration 16 2 CAN input 16 2 1 Create new CAN Input channel 1 Double click on any CAN bus item to open the CAN messages overview 2 Select Add CAN IN and choose the desired CAN bus for the new input channel A CAN channel configuration window opens ...

Page 113: ...CAN Bus 16 Bosch Motorsport DDU 10 113 188 3 Insert the name and description of the channel 4 Click OK when done The channel is listed in the Data window ...

Page 114: ...otorsport CAN channel configuration Extracting data from CAN bus Representation Byte Some CAN devices need to be addressed by a byte represented CAN channel The ad dress can be assigned in this window and is illustrated by a bar graph ...

Page 115: ...eplacement values are used specify timeout period and raw value c If a multiplexer row counter is used check the box d Enter data position length and format e The bargraph shows assignment of the bytes Red colored fields show the assignment of the data bytes Orange colored fields show the assignment of the multiplexer bytes e ...

Page 116: ...t of the data bits Orange colored fields show the assignment of the multiplexer bits Conversion to physical values a b c d e f g a Enter factor gain for conversion to physical value b Enter offset for conversion to physical value c Select type of physical value d Select unit of physical value e Enter minimum physical limit of the channel for manual setup f Enter maximum physical limit of the chann...

Page 117: ... up an online measurement 46 16 2 2 Import a CAN database DBC file 1 Click with the right mouse button on any CAN bus item 2 Select Import CAN IN messages from DBC file from menu 3 A file browser opens 4 Select the DBC file to import and click Open when done 5 A channel import window opens 6 Select the desired channels on the left and use the Add button to add them to the import list 7 Click OK wh...

Page 118: ... for the new output channel The New CAN OUT message window opens 2 Enter name of message description CAN Id and Grid output interval Optionally specify a multiplexer Definition of CAN message Content of message 3 Click on Add channel or Add constant this opens the Add new CAN out channel window ...

Page 119: ...ant The Add new CAN Out constant window appears 3 Define the name of the constant the required value in hex and define the CAN chan nel settings 4 Click OK when done Click here 16 4 Multiplexer Row counter concept If certain channel messages are not time critical and can be imported or exported slowly you can use a multiplexer to put several channel messages on one message identifier Re use multip...

Page 120: ... box Use Multiplexer and configure the multiplexer for the new CAN IN channel 4 To configure the multiplexer for a CAN OUT channel select Add CAN OUT 5 Check the box Use Multiplexer and click on the button Add row to split the mes sage identifiers into several rows 6 Click on one row and select Add channel to assign a channel to the row The Add new CAN out channel dialog opens 7 Select a channel a...

Page 121: ...CAN Bus 16 Bosch Motorsport DDU 10 121 188 10 The channel message is assigned to the selected fields 11 Click OK when done Payload Area Row Counter Row Counter Payload Area Message Id ...

Page 122: ...tart conditions thresholds Up to 16 measurement conditions fast slow switches Telemetry Support for long range online telemetry Individual programmable team code Fast block slow block mechanism Programmable data rate Burst telemetry Support for burst telemetry BT 60 Programmable IP configuration BT 60 diagnosis via DDU 10 17 2 Configuration of Recordings 1 Expand the Logger list by clicking on in ...

Page 123: ... and statistics Variables can be grouped 1 To add a measurement channel to a recording select the wanted channel drag and drop it onto the measurement group Recording properties Drag measurement channels into group 1 To edit channel settings mark the channel s and click Edit Recording Channel s ...

Page 124: ...ined or the recording condition is false measurement channels are recorded at the value chosen in Rate If the condition is true measurement channels are recorded at the value chosen in True rate 2 Click OK when done 17 2 1 Adding a recording group Recording channels can be grouped These groups will also be visible in Darab and will help to get a better overview during the data analysis 1 To add a ...

Page 125: ...ition to start recording e Enter a password hint and a password optional f Setting for automatic fragmentation Do not change a b c d e f 17 2 3 Recording statistics The tab Statistics shows the channels allocation and their current data rate related to the transmission frequency of the DDU 10 and the whole transmission system The overview helps to detect bandwidth bottlenecks of channels Bandwidth...

Page 126: ...as been set up A measurement is not set up Either no recording configuration has been found or logger software upgrade is not activated 17 2 5 Displaying online recording diagnosis statectrl_ok 1 To add a Recording Diagnosis element to a measurement sheet drag a Bit LED ele ment from the Toolbox and drop it on measurement sheet 2 Drag channel statectrl_ok from the Data Area and drop it on the Bit ...

Page 127: ...8 17 3 Configuration of online Telemetry 17 3 1 Long range telemetry system FM 40 440 MHz band 25 KHz bandwidth 10 W max RF output 19 2 kBit s data rate unidirectional RS232 interface Full online track coverage on almost all tracks Link quality at Hockenheim ...

Page 128: ...B261 209 493 Control Module B 261 208 871 Pit Receiver Box1 for one car F 01T A20 451 01 Connecting Cable 50m B 261 209 481 optional Pit Receiver Box2 for two cars F 01T A20 455 01 Antenna Cable Kit B 261 209 490 Car Antenna B 261 208 888 FM 40 Transmitter B 261 208 898 RS232 DDU Rod Antenna 7dBi B 261 208 867 ...

Page 129: ...ing configuration is displayed in the Main Area 3 Click Edit channel s The Edit Recording Channels window appears 4 Choose between Fast Slow block transmission Using fast block slow block transmission DDU 10 telemetry uses available bandwidth of Telemetry Unit FM 40 19 200 baud ap prox 1 700 bytes s The bandwidth has to be divided into channel information to be transmitted high frequently and low ...

Page 130: ... 4 Telemetry channels with special functionality The FM40 allows the transmission of special information such as running distance of cur rent lap lap number of current lap and lap time fuel consumption of last lap completed You have to assign the channel type to the telemetry channel so that it is recognized ac curately by RaceCon Channel s names are e g distlap fuelcons lapctr laptime Different c...

Page 131: ... Exact lap time of lap completed The telemetry channels and their assigned channel types are displayed in the overview list 17 4 Configuration of Ethernet Telemetry The usage of ethernet telemetry requires the software upgrade ETHER_TELE Enable ether net telemetry 17 4 1 Hardware Setup You can use ethernet telemetry to connect a transmitter on an ethernet line of your device to send the data to a ...

Page 132: ...ne the settings as described below WDServer folder This is the folder where the INI files for the WDServer are stored Please make note of this folder path as this path will need to be refer enced by WDServer in order to enable telemetry live viewing and logging Project Key The project key is a data security function that is used by Darab to differentiate data from different users This key should a...

Page 133: ...ll be used as a part of the file name for WDServer s log of received tele metry data and will show up in WinDarab when searching for the telemetry stream in the Network folder You are now at the final step of configuring the telemetry stream In order for the data to be decrypted by WDServer two ini files must be referenced by WDServer After the configuration is sent to the logger these two differe...

Page 134: ... Telemetry tab 4 Under the UDP tab select the drop down menu and type in UDP 5 For the UDP Port type in the port number assigned to the device in RaceCon Each vehicle being read by a single receiver device must have a unique port number This information will be provided by Bosch upon delivery of the devices 6 Click OK to close the window 7 Select the button WDServer Settings ...

Page 135: ...n and can be used to help diagnose issues Under the Telemetry tab the first section requests a folder path for the DCP Config uration files This is the folder path where RaceCon stored the ini files required by WDServer 9 Click on the Change button next to this section and navigate to this folder A template can also be specified for the file nomenclature for logged telemetry as well as a save loca...

Page 136: ...files stored on removable media so best practice is to copy these files to the telemetry computer s hard drive 17 4 4 Loading the telemetry data The following is an example of a file name and data format for Car 91 File is typically located in WinDarab Config WDServer In the File Explorer click Open and navigate to the data set Under Network search for the car or cars that are required for viewing...

Page 137: ...ormat the USB device with the Bosch File System BFS do the following steps In RaceCon select Tools Extras and choose Format USB stick Press Format An USB device is recognized by Windows as a storage medium but it can only be initial ized with RaceCon and read with WinDarab 17 5 1 Recording data on a USB device 1 Plug an USB device to DDU 10 2 Prepare a recording configuration in RaceCon 3 Power on...

Page 138: ... on the internal memory and the USB device 6 Power off the system 7 Remove USB device from the vehicle 8 Start the WinDarab software 9 Click on the Import Export icon 10 Select Data logger CXX DDUX MSX and click OK when done The Read measure ment data dialog opens Click Import Export 11 Click on Settings tab and select the option Flash Card USB Stick ...

Page 139: ...e import manually Measurement files are stored automatically in the base folder 15 Click Close when transmission has finished NOTICE Refer to the WinDarab V7 manual for instructions on how to use the Data Logger Import dialog and for more detailed descriptions and instructions 16 Click on the Start button and choose Open measurement file 17 Select the measurement files from the storage folder 18 C...

Page 140: ...ng the USB device If the USB device is unplugged while recording is active parts of the measurement data may be missing If the USB device is unplugged and re inserted for 4 s while the DDU 10 is powered up the DDU 10 still records data If the USB device is unplugged and re inserted for 4 s while the DDU 10 is powered up or a different USB device is plugged in the DDU 10 restarts In this case the D...

Page 141: ... and is operational idle This does not imply that recording data is written 3 Stop Device unplugged The USB device has been removed The DDU 10 performs a restart when an USB device is re plugged in 4 Ok Media access Data is currently read from written to the USB device 5 Error Media error The communication to the USB device broke down The USB device is defect The USB device is not supported by DDU...

Page 142: ...ces onto the Com puted Channels This will open the configuration wizard 3 Select eamb as input channel 4 Assign the lowest lux value to the highest possible brightness switch setting 6 and the highest lux value to the lowest switch position 1 This will generate a linear change of the switch If needed you can include additional points to change the linear behavior 5 Click Next when all points are d...

Page 143: ...mputed chan nel If the deviation is within a certain range it allows sending of the new value to the device This formula only works correctly if it is used as the brightness switch channel 10 Assign a suiting name to the new channel and click OK 11 Go to Display Settings and define the created math channel as the brightness switch channel 12 Define the percentagewise brightness of the display and ...

Page 144: ...o the following conditions The above copyright notice and this permission notice shall be included in all copies or substantial portions of the Software THE SOFTWARE IS PROVIDED AS IS WITHOUT WARRANTY OF ANY KIND EXPRESS OR IMPLIED INCLUDING BUT NOT LIMITED TO THE WARRANTIES OF MERCHANTABILITY FITNESS FOR A PARTICULAR PURPOSE AND NONINFRINGEMENT IN NO EVENT SHALL THE AUTHORS OR COPYRIGHT HOLDERS B...

Page 145: ...ion unless otherwise stated in the file in its original unmodified form as distributed in the original archive If you are unsure whether or not a particular file is covered by this license you must contact us to verify this The FreeType Project is copyright C 1996 2000 by David Turner Robert Wilhelm and Werner Lemberg All rights reserved except as specified below 1 No Warranty THE FREETYPE PROJECT...

Page 146: ...license 19 4 Lua License The Lua engine http www lua org provides a script interface for manipulating content in a Graphic application Applies To libgre plugin lua dll libgre plugin lua a The Lua Graphic Engine plugin License for Lua 5 0 and later versions Copyright 1994 2008 Lua org PUC Rio Permission is hereby granted free of charge to any person obtaining a copy of this software and associated ...

Page 147: ... WARRANTIES OF MERCHANTABILITY AND FITNESS FOR A PARTICULAR PURPOSE ARE DISCLAIMED IN NO EVENT SHALL THE REGENTS OR CONTRIBUTORS BE LIABLE FOR ANY DIRECT INDIRECT INCIDENTAL SPECIAL EXEMPLARY OR CONSEQUENTIAL DAMAGES INCLUDING BUT NOT LIMITED TO PROCUREMENT OF SUBSTITUTE GOODS OR SER VICES LOSS OF USE DATA OR PROFITS OR BUSINESS INTERRUPTION HOWEVER CAUSED AND ON ANY THEORY OF LIABILITY WHETHER IN...

Page 148: ...bGLESv2 dll The Graphic Runtime engines used on all Windows platforms win32 that use the OpenGL bindings include the Imagination libraries The MIT License MIT Copyright c Imagination Technologies Ltd Permission is hereby granted free of charge to any person obtaining a copy of this soft ware and associated documentation files the Software to deal in the Software without restriction including witho...

Page 149: ...everal binary link libraries several modules associated interface defini tion files and scripts used to control its compilation and installation Pthreads win32 is distributed in the hope that it will be useful but WITHOUT ANY WAR RANTY without even the implied warranty of MERCHANTABILITY or FITNESS FOR A PAR TICULAR PURPOSE See the GNU Lesser General Public License for more details A copy of the G...

Page 150: ...d from code written by Dave Butenhof for his book Pro gramming With POSIX R Threads The original code was obtained by free download from his website http home earthlink net anneart family Threads source html and did not contain a copyright or author notice It is assumed to be freely distributable In all cases one may use and distribute these exception files freely And because one may freely distri...

Page 151: ...t the GNU General Public Licenses are intended to guarantee your freedom to share and change free software to make sure the software is free for all its users This license the Lesser General Public License applies to some specially designated soft ware packages typically libraries of the Free Software Foundation and other authors who decide to use it You can use it too but we suggest you first thi...

Page 152: ...eedom The Lesser General Public License permits more lax criteria for linking other code with the library We call this license the Lesser General Public License because it does Less to protect the user s freedom than the ordinary General Public License It also provides other free soft ware developers Less of an advantage over competing non free programs These disad vantages are the reason we use t...

Page 153: ...ary is not re stricted and output from such a program is covered only if its contents constitute a work based on the Library independent of the use of the Library in a tool for writing it Whether that is true depends on what the Library does and what the program that uses the Library does 1 You may copy and distribute verbatim copies of the Library s complete source code as you receive it in any m...

Page 154: ...se so that they refer to the ordinary GNU General Public Li cense version 2 instead of to this License If a newer version than version 2 of the or dinary GNU General Public License has appeared then you can specify that version in stead if you wish Do not make any other change in these notices Once this change is made in a given copy it is irreversible for that copy so the ordin ary GNU General Pu...

Page 155: ...among them as well as a reference direct ing the user to the copy of this License Also you must do one of these things a Accompany the work with the complete corresponding machine readable source code for the Library including whatever changes were used in the work which must be distributed under Sections 1 and 2 above and if the work is an executable linked with the Library with the complete mach...

Page 156: ... such parties remain in full compliance 9 You are not required to accept this License since you have not signed it However nothing else grants you permission to modify or distribute the Library or its derivative works These actions are prohibited by law if you do not accept this License There fore by modifying or distributing the Library or any work based on the Library you indicate your acceptanc...

Page 157: ...is License which applies to it and any later version you have the option of following the terms and conditions either of that version or of any later version published by the Free Software Foundation If the Library does not specify a license version number you may choose any version ever published by the Free Software Foundation 14 If you wish to incorporate parts of the Library into other free pr...

Page 158: ... restric tions 1 The origin of this software must not be misrepresented you must not claim that you wrote the original software If you use this software in a product an acknowledgment in the product documentation would be appreciated but is not required 2 Altered source versions must be plainly marked as such and must not be misrepres ented as being the original software 3 This notice may not be r...

Page 159: ...t high precision limited reliability RF microwave based high precision high reliability IR and RF based Systems consists of Transmitter trackside unit Receiver in vehicle unit Lap Trigger Receiver Lap Trigger Transmitter 20 1 1 Electrical trigger signal In DDU 10 all sources of measurement channels can be used as trigger signal Analog input Digital input CAN input Signal measurement channel proper...

Page 160: ...he device and a detec tion point with a detection range has to be defined in RaceCon The GPS detection point is defined by the latitude and longitude The easiest way to get the latitude and longitude of a finishing line is due to a web mapping program such as google maps With google maps simply left klick on the spot where you want to set the detection point The information about the latitude and ...

Page 161: ...ccurring vehicle speed near the detection point 20 1 3 Prevention of false triggers Race track topology and transmitter location frequently cause false triggers Software functionality prevents acceptance of false triggers Minimum vehicle speed for acceptance of trigger prevents false triggers while vehicle is stationary in the pits Time based re trigger protection prevents false triggers due to si...

Page 162: ...rd window opens Choose the device which receives the trigger signal Choose the signal channel for the trigger signal Choose the source for the vehicle speed Enter the distance of the racetrack 3 Click Finish to complete the operation A pre configured lap trigger window opens ...

Page 163: ... protection and Distance based forced trigger for details g Define settings for main trigger See chapter Lap timing for details h Define settings for counddown timer See chapter Countdown timer for details i Define settings for sub trigger See chapter Segment timing for details j Define settings for a GPS lap trigger See chapter GPS lap trigger for details Only applicable if the signal source is s...

Page 164: ... applicable with a GPS lap trigger Define settings for countdown timer Define settings for segment timing Only applicable for a GPS Laptrigger Define the latitude and longitude of the GPS detection point Define the detection range around the detection point Define the channel sources for Longitude Latitude Direction and Speed ...

Page 165: ...t_dls A diagnosis window opens in Main Area Button to reset lap distance to 0 Button to reset lap counter Button to reset outing counter Button to generate trigger signal Button to reset best lap time Button to reset best lap time and distance based segmentation Lap trigger diagnosis scheme 20 1 7 Lap trigger presettings When the reset buttons on the diagnosis page are activated these values are u...

Page 166: ...valid lap not by forced lap trigger was recorded Lap Leaving the pits to lap trigger Lap trigger to lap trigger Enforced lap trigger see Distance based forced trigger 168 Fragment Test bench operation Power cycle on track or box e g engine stalled File fragmentation size MB time sec Channels for display To display counters use the following channels Channel Function Laptrigger_outcnt_dls Outing co...

Page 167: ...me Laptrigger_laptime_best_dls Laptime of best lap Laptrigger_laptimeold_dls Laptime of last lap completed Laptrigger_laptimeseg_dls Segment time of last segment Laptrigger_lapctr_dls Number of completed laps 20 3 1 Time based retrigger protection Trigger is locked for 5 s after main trigger was received To deactivate time based retrigger protection set Retrigger lock time to 0 ms Define settings ...

Page 168: ...issed main trigger a forced trigger is inserted if the configured max distance i e 120 4800 m of the track distance i e 4000 m has been reached In this case the channel Laptrigger_distlap_dls starts at the delta between the max distance and the track distance i e 800 m To deactivate distance based forced triggers uncheck box Change signal for vehicle speed if desired Enter minimum speed for trigge...

Page 169: ...d lap and last lap Laptrigger_lapdiffb Time difference between finished lap and best lap Laptrigger_lapseg_dlast Difference of lap segment time compared to last lap Laptrigger_lapseg_dbest Difference of lap segment time compared to best lap 20 4 1 Sub trigger mode Using main trigger 20 ms pulse at Start Finish Line 3 sub triggers 40 ms pulse posi tioned at 1 000 m 2 000 m and 3 000 m To deactivate...

Page 170: ... To deactivate distance mode set Mode to None Define settings for segment timing Main Trigger 2000m 3000m 0 0s 0 1s 0 2s 0 2s 0 2s 0 1s 0 1s 0 1s 0 2s 1000m 0 3s 0 1s 0 1s 20 5 Countdown timer Some race classes require a minimum time spent in the pits An additional lap trigger Tx is configured as a segment trigger positioned at pit entry The trigger signal starts a timer countdown The current valu...

Page 171: ...ease enter those values into input field The values can also be copied and pasted to the input field from an excel sheet as a normal text In the inter mediate trigger you just need to set the expected time the driver takes to reach the seg ment trigger NOTICE Please note that the segment time and length is always measured from the start line or where the main lap trigger is set 21 2 Functionality ...

Page 172: ...ce baud rate must match DDU 10 interface baud rate DDU 10 Baud rate can be set with the GPS_BAUDRATE characteristic Data format DDU 10 expects 8 data bits no par ity bit 1 stop bit 8N1 22 2 Protocol DDU 10 expects NMEA Protocol ASCII The following messages are decoded Message Function GGA GPS fix information GSA Overall satellite data GSV Detailed satellite data RMC Recommended minimum data for GP...

Page 173: ...of charge Navilock offers a USB connec tion cable for the sensor In U Center click View Configuration View to start the configuration The follow ing 3 points have to be changed Transfer Rate Click on PRT Ports Change the baud rate to a fix value this value needs to meet the setting of RaceCon For a good signal quality we recommend 115 200 baud Click on Send to store the new setting in U Center Cli...

Page 174: ...tellite System Click on GNSS GNSS Config Set the ticks as shown in the following picture Click on Send to store the new setting in U Center As during configuration step 1 click on CFG Configuration Click on Send to save the new setting on the sensor ...

Page 175: ...ation step 1 click on CFG Configuration Click on Send to save the new setting on the sensor NOTICE Sensor needs reception for visible signal It takes time to start the sensor 22 4 Measurement labels The decoded NMEA messages are copied to these DDU 10 measurement labels Measurement label Function gps_PDOP Position Dilution Of Precision gps_HDOP Horizontal Dilution Of Precision gps_VDOP Vertical Di...

Page 176: ...ement labels are arrays where the indexed element points to the same satellite E g gps_info_satsigstrength 3 tells the receiving signal strength of satellite 3 Satellite 3 has the SAT ID given in gps_info_satid 3 Measurement label Function gps_info_satid Satellite PRN number gps_info_satinuse Used in position fix gps_info_satelevation Elevation in degrees 90 maximum gps_info_satazimuth Azimuth deg...

Page 177: ...sor complete its initial start up procedure This may take up to 20 min A correct reception is indicated when gps_fix is showing 3D Fix GPS sensor values are frozen Does the sensor has lost its reception The old values will be kept if the reception is lost The gps_smask channel shows which NMEA sentence is received ...

Page 178: ...PWM display configuration recording telemetry configuration Calibration data Characteristic curves and offsets created by online calibration at the vehicle Recorded data Measurement data recorded during vehicle operation 23 2 Firmware update The scheme shows the process during each connection between RaceCon and DDU 10 23 2 1 Performing the firmware update Firmware update is only possible if the D...

Page 179: ...DU 10 and choose Synchronize then Update firmware A pop up menu opens 2 Select the destination of the firmware archive PST You can find the latest firmware for the device at the Bosch Motorsport homepage 3 Click OK when done The firmware update starts The DDU 10 displays the message Updating firmware Do not switch off the car s ignition or interrupt the power supply of the DDU 10 ...

Page 180: ... 188 DDU 10 Bosch Motorsport When the firmware update is complete the DDU 10 displays the message Updating firmware finished Do a powercycle Switch the car s ignition off and on again to cycle the power of the DDU 10 ...

Page 181: ...vice This can be useful for copying specific data like sensor offset calibration to a spare unit for a specific car Create a clone file 1 Open the Tools window and click on the Clone button in the Extras menu 2 Select Extract from the dropdown menu 3 Choose the hardware device which should be cloned 4 Define destination and filename 5 Click OK to start procedure ...

Page 182: ...DU 10 Bosch Motorsport Change the device 1 Click Clone apply in Extras menu 2 Choose clone file 3 Click Ok Please remember that following properties are not stored into the clone Lifetime of device Serial number Upgrade features ...

Page 183: ...uel Consumption Calculation 25 1 Setting up fuel consumption calculation and tank management 1 Select Measurement Sources in Toolbox 2 Drag Fuel element and drop it on the vehicle in System Overview Do not drop it on the DDU 10 Drag Drop A fuel consumption wizard opens ...

Page 184: ...ining laps with fuel in tank if desired using fuel consumption of last lap completed using target lap consumption entered in the field Target lap consumption g Choose values to initiate a reset of fuel consumption if desired Manually using RaceCon On power down assuming that the tank is filled each time the ignition is turned off By signal source as input channel e g a switch connected to input pi...

Page 185: ...ction Fuel_fuelcons_dls Running fuel consumption starting at 0 Fuel_fuelrem_dls Remaining fuel in tank starting at tank capacity Fuel_fuellap_dls Fuel consumption for current lap starting at 0 Fuel_fuellapold_dls Fuel consumption of last lap completed Fuel_laprem_dls Remaining laps with fuel in tank ...

Page 186: ...rt measurement CTRL F9 Start recording F10 or Alt Go to menu bar F11 Toggle display to fullscreen Race Mode F12 Enlarge main screen CTRL Tab Switch between opened windows Project Tree Plus at numeric pad or right cursor Expand selected node Minus at numeric pad or left cursor Close selected node Star at numeric pad Open all nodes DEL Delete seleted object Display page measurement page Cursor Move ...

Page 187: ...Bosch Motorsport DDU 10 187 188 ...

Page 188: ...Bosch Engineering GmbH Motorsport Robert Bosch Allee 1 74232 Abstatt Germany www bosch motorsport com ...

Reviews: