background image

DX4020-EXP | 

Installation Guide | 2.   Overview


EN 

| 3 


Bosch Security Sys | 8/04 | F01U002192B 


2.  

Overview 

2.1 Specifications 

Table 1:  DX4020 Specifications 


Dimensions 

7.6 cm x 12.7 cm (3 in. x 5 in.) 

Current Draw 

84 mA max, 80 mA nominal 10 Base-T 
110 mA max, 100 mA nominal 100 Base-T 

Operation 
Voltage 

12 VDC Nominal


Control 
Panel 

Option/Data Bus Terminal 
Strip 

Connectors 

LAN/WAN 

RJ-45 Modular Jack 
(Ethernet) 

Category 3 or better unshielded twisted 
pair 

Ethernet 
Cable 

Max Length 

100 m (328 ft)  

Interface 

IEEE 802.3 

Control Panel 

Firmware 

D9412G, D7412G, 
D7212G, D9412, D9112, 
D7412, D7212 

6.3 or later 

DS7240V2, DS7220V2 

2.xx or later 

Compatibility 

DS7400xi 

4.10 or later 

Default IP 
Address 

0.0.0.0 (DHCP mode) 


2.2 System 

Overview 

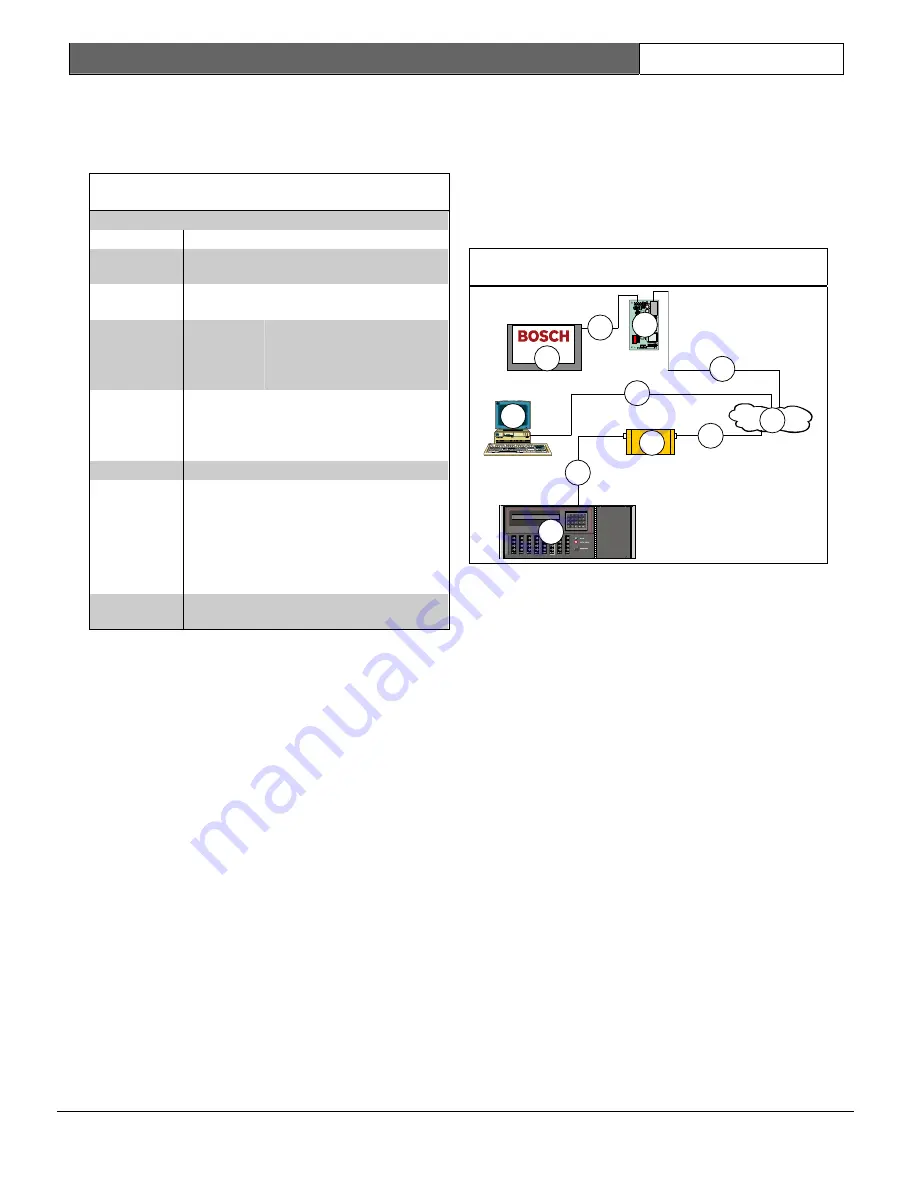
See Figure 2 for a general system connection of the 
following devices: a compatible Bosch Security Systems 
control panel, a DX4020 Network Interface Module, a 
D6600 Receiver, and a D6680 Network Adapter. 

Figure 2:  System Connections Overview 

7

3

4

6

1

2

5

7

8

9

9

10


1 -  Compatible Bosch  Control Panel 

2 -  DX4020 Network Interface Module – Ethernet 

3 -  Host PC running D6200 Programming 

Administrative Software 

4 -  Ethernet network 

5 -  D6680 Network Adapter 

6 -  D6600 Central Station Receiver 

7 -  Connection – Compatible Bosch Control Panel 

Data Bus to DX4020 Data Bus terminals 

8 -  Connection – Ethernet network to Host PC 

Ethernet Network Interface Card (NIC 

9 -  Connection – Ethernet network to D6680 

10 -  Connection – D6680 to D6600 COM4 Port 


Summary of Contents for DX4020-EXP

Page 1: ...EN Installation Guide Network Interface Module DX4020 EXP ...

Page 2: ...ations over Ethernet networks Typical uses include PC front end software packages such as PC9000 Remote Programming Software RPS connection for control panel programming diagnostic troubleshooting D6600 Central Station Receiver CSR reporting and or history retrieval Figure 1 DX4020 Network Interface Module 1 3 2 4 5 6 1 Lantronix Xport NIM 2 EPROM 3 Data Bus 4 DIP Switches 5 Serial Bus LEDs 6 P2 J...

Page 3: ...ter Compatibility DS7400xi 4 10 or later Default IP Address 0 0 0 0 DHCP mode 2 2 System Overview See Figure 2 for a general system connection of the following devices a compatible Bosch Security Systems control panel a DX4020 Network Interface Module a D6600 Receiver and a D6680 Network Adapter Figure 2 System Connections Overview 7 3 4 6 1 2 5 7 8 9 9 10 1 Compatible Bosch Control Panel 2 DX4020...

Page 4: ...ation for complete mounting instructions Figure 3 DX4020 Mounting Holes 1 1 DX4020 Mounting Holes 3 2 DX4020 Wiring Wiring connections are made from the DX4020 s data bus terminals to the compatible control panel s data bus terminals See the control panel s documentation for complete wiring instructions Figure 4 one column wide figure This figure box is saved as a AutoText entry called Figure Colu...

Page 5: ...5 6 7 8 1 2 1 OPEN UP Position 2 CLOSED DOWN Position Figure 7 DIP Switch Settings for Address 88 OPEN 1 2 3 4 5 6 7 8 1 2 1 OPEN UP Position 2 CLOSED DOWN Position 4 2 DIP Switch Address Settings for the DS7240V2 DS7220V2 Control Panels The DS7240V2 and DS7220V2 control panels require firmware revision 2 xx or later for network communication Set the DX4020 s DIP Switch address to 134 when using t...

Page 6: ...le jumper on or disable jumper off LED operation Figure 11 DX4020 Ethernet Serial LEDs 1 3 4 2 1 Ethernet Serial LED Location 2 P2 Jumper Location 3 LED Enable Jumper On Position 4 LED Disable Jumper Off Position Table 2 DX4020 Bus Serial Status LED Functions LED Name Color Function 1 BUS XMIT Red Flashes when the data bus sends a message 2 BUS RCV Red Flashes when the data bus receives a message ...

Page 7: ...plex Activity 6 IP Programming Use this section to set up the initial IP address so that the DX4020 can be set with a Network IP address The setup consists of using resident commands and programs such as the commands ARP and Ping and the program Telnet available in the Microsoft Windows operating system The IP MAC address and port number used here are for demonstration only A working knowledge of ...

Page 8: ...ke sure there is power to the DX4020 and the Ethernet Network RJ 45 connection is in place To telnet into the configuration program the PC used to configure the DX4020 and the DX4020 itself must both be on the same gateway the device that connects the LAN to the WAN Use telnet to communicate with the DX4020 and establish its communications configuration parameters Once the DX4020 is configured and...

Page 9: ...ress The third line of the table in Figure 15 shows that the arp contains a MAC address of 00 20 4a 51 19 8c temporarily linked to IP address 172 17 10 70 The network uses this table to identify devices and route signals The number of devices and other types like dynamic depends on the network and the number and type of devices that this PC has corresponded with You must identify the MAC address o...

Page 10: ...Mode you are disconnected If you are disconnected the following message displays 8 If you pressed ENTER within 5 seconds of seeing the Press Enter to go into Setup Mode message you should see the following screen 9 Press 0 then ENTER to set up the basic Server configuration If the DX4020 Network Interface Module was programmed with an IP address in the past it is displayed in parentheses as shown ...

Page 11: ... 0 9 255 255 254 0 25 254 0 0 0 10 255 255 252 0 26 252 0 0 0 11 255 255 248 0 27 248 0 0 0 12 255 255 240 0 28 240 0 0 0 13 255 255 224 0 29 224 0 0 0 14 255 255 192 0 30 192 0 0 0 15 255 255 128 0 31 128 0 0 0 16 255 255 0 0 12 If using DHCP the following appears If you want to assign a name for this device for use on a LAN type Y and enter up to 16 characters and ENTER Otherwise just press ENTE...

Page 12: ...IP address 22 Enter the same port number that was used for the D6680 23 To enable encryption select 6 Security from the main menu and follow the next steps If encryption is enabled on the DX4020 it must be enabled at the D6680 E120 with the same key The software revision of the Network Interface Module attached to the DX4020 must be 1 5d or greater To check the version telnet the unit and the vers...

Page 13: ...rt menu by selecting Start Run 2 Type COMMAND and click OK at the Run dialog box A command prompt window appears The colors have been inverted here for clarity The normal prompt window appears with white text on black 3 Type in telnet and press ENTER at the C prompt 4 Type open space IP ADRESS space PORT NUMBER at the Microsoft Telnet prompt For example open 172 17 10 70 1 The connection fails the...

Page 14: ...h Security Sys 8 04 F01U002192B 7 Control Panel Programming See the control panel s documentation for DX4020 to control panel programming 8 Listings and Approvals The DX4020 Network Interface Module is listed for the following FCC Part 15 Radiated Conducted Emissions CE ...

Page 15: ...DX4020 EXP Installation Guide Notes EN 15 Bosch Security Sys 8 04 F01U002192B Notes ...

Page 16: ... 2004 Bosch Security Systems Bosch Security Systems 130 Perinton Parkway Fairport NY 14450 9199 Customer Service 800 289 0096 Technical Support 888 886 6189 F01U002192B ...

Reviews: