DX4020-EXP |
Installation Guide | 4. DX4020 DIP Switch Settings
EN
| 5
Bosch Security Sys | 8/04 | F01U002192B
4.
DX4020 DIP Switch
Settings
Use the following DIP Switch settings for network
communication when using the DX4020.
4.1
DIP Switch Address Settings for the
D9412G/D9412, D7412G/D7412,
D7212G, D9112, D7212 Control
Panels
The D9412G/D9412, D7412G/D7412,
D7212G, D9112, D7212 control panels
require firmware revision 6.3 or later for
network communication.
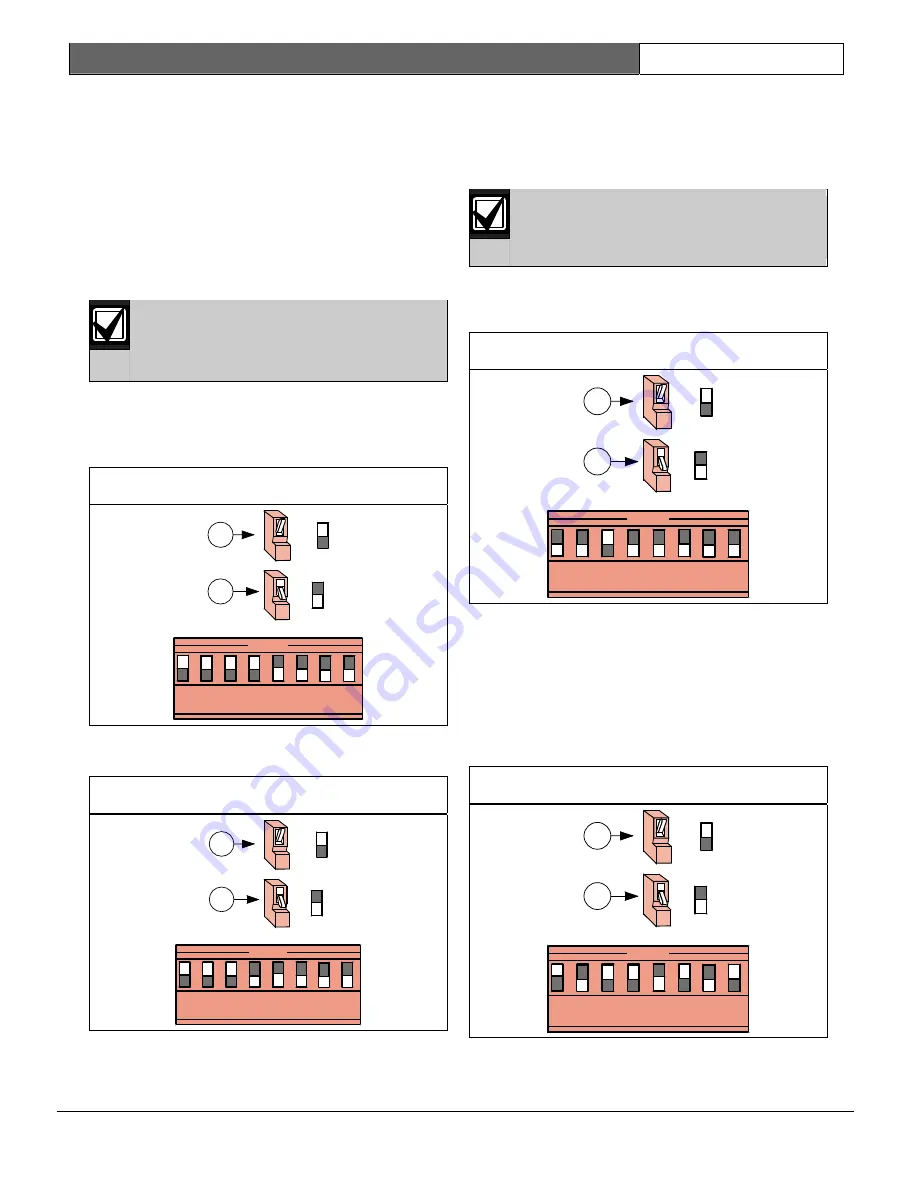
Use SDI Bus Address 80 when using the DX4020 in
conjunction with PC9000.
Use SDI Bus Address 88 when using the DX4020 in
conjunction with RPS, or for network communication.
Figure 6: DIP Switch Settings for Address 80
OPEN
1 2 3 4 5 6 7 8
1
2
=
=
1 - OPEN (UP) Position
2 - CLOSED (DOWN) Position
Figure 7: DIP Switch Settings for Address 88
OPEN
1 2 3 4 5 6 7 8
1
2
=
=
1 - OPEN (UP) Position
2 - CLOSED (DOWN) Position
4.2
DIP Switch Address Settings for the
DS7240V2/DS7220V2 Control
Panels
The DS7240V2 and DS7220V2 control
panels require firmware revision 2.xx or
later for network communication.
Set the DX4020’s DIP Switch address to 134 when
using the DX4020 on either a DS7240V2 or
DS7220V2 for network communication.
Figure 8: DIP Switch Settings for Address 134
OPEN
1 2 3 4 5 6 7 8
=
=
1
2
1 - OPEN (UP) Position
2 - CLOSED (DOWN) Position
4.3
DIP Switch Address Settings for the
DS7400Xi Control Panel
Use Option Bus addresses 13 and 14 to send reports.
Use Option Bus address 13 to connect to RPS for
remote programming.
Figure 9: DIP Switch Settings for Address 13
OPEN
1 2 3 4 5 6 7 8
1
2
=
=
1 - OPEN (UP) Position
2 - CLOSED (DOWN) Position


