English |
7
is discharged, the power tool is switched off by means of a
protective circuit: The application tool no longer rotates.
u
Do not continue to press the on/off switch after the
heating elements have been automatically switched
off.
This can damage the battery.
Inserting and Removing the Battery
(see figures A1−A2)
u
Do not use force to insert the battery.
The battery is de-
signed in such a way that it can only be inserted into the
battery adapter when it is in the right position.
To
insert
the battery
(7)
, push it all the way into the battery
adapter
(2)
.
To
remove
the battery
(7)
, press the release buttons
(8)
on
the battery and pull it out of the battery adapter
(2)
.
Connecting Heating Elements
(see figures B1–B2)
Plug the connector plug
(4)
into the socket
(9)
on the bat-
tery adapter. The on/off switch
(1)
lights up briefly when the
battery is charged.
Slide the battery adapter
(2)
into the pocket
(5)
provided in
the garment or attach the battery adapter to your belt using
the belt clip
(10)
.
Using the Garment
Switching the Heating Function on/off
(see figure C)
Ensure that the battery
(7)
is charged and correctly inserted
into the battery adapter
(2)
, and that the heating elements
(3)
are connected.
To
heat
, press the on/off switch
(1)
until the LED of the on/
off switch lights up red.
Note
: The highest heating level is always set when the heat-
ing is switched on.
To
switch off
, press and hold the on/off switch
(1)
until the
LED goes out.
Setting the Heating Level
The heating level is indicated by the colour of the LED on the
on/off switch
(1)
.
LED
Thermal output
Red
High
Green
Medium
Blue
Low
Repeatedly press the on/off switch
(1)
until the LED displays
the required heating level.
u
Set the lowest heating level (blue) for continuous op-
eration.
In the event of overheating, there is a risk of gar-
ment malfunction and of injury.
Charging External USB Devices (see figure D)
You can use the USB port on the battery adapter to increase
the battery runtime of various battery-operated USB
devices, e.g. mobile phones or MP3 players. This can also be
done whilst the garment is being heated.
u
Ensure that your external USB device can be charged
using the USB port on the battery adapter. Refer to
the specifications related to this topic in "Technical
data".
Connect the charging cable of your USB device to the USB
socket
(11)
on the battery adapter
(2)
.
Press the activation button
(12)
for approx. three seconds.
The connected USB device will be charged.
To save energy, the USB port is automatically deactivated
after approx. 2 hours. If no charging cable is connected, the
USB port is automatically deactivated after 30 seconds.
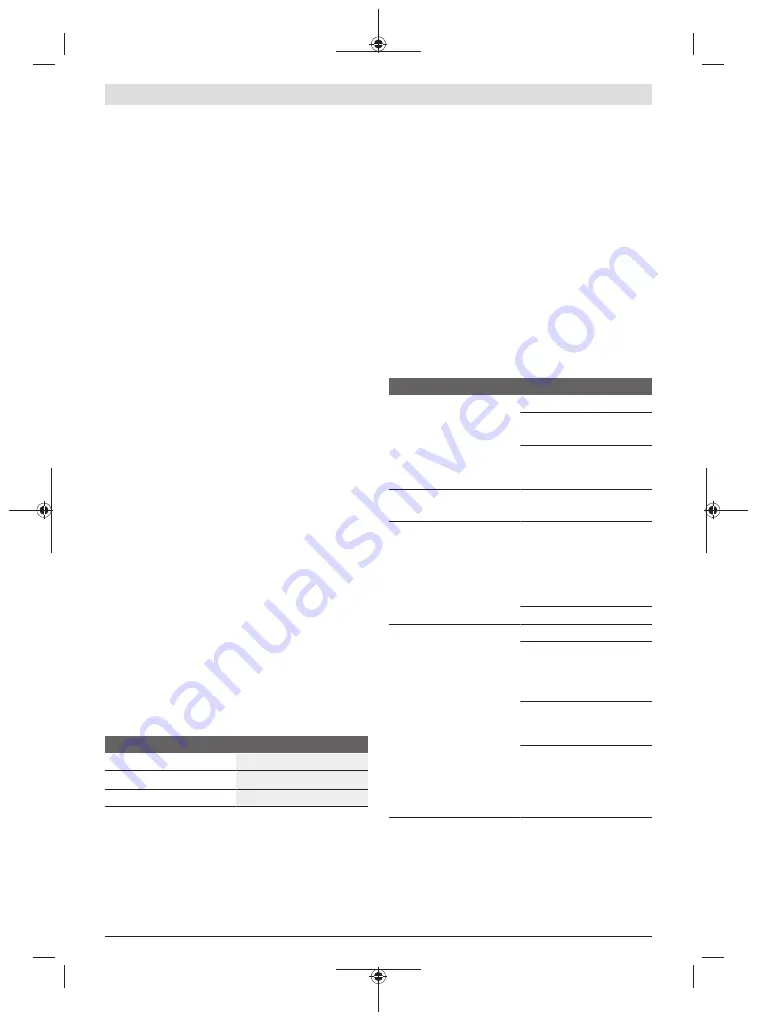
Rectifying Faults
Problem
Corrective measures
Garment is not being heated. Charge the battery.
Connect the connector plug
(4)
correctly.
Press and hold the on/off
switch
(1)
until the LED
lights up red.
One or more heating ele-
ments are not heating up.
Contact the garment retailer.
Garment switches itself off
automatically.
Overheating protection is ac-
tivated: Press the on/off
switch
(1)
to switch off the
heating elements and leave
garment to cool down for ap-
prox. 30 minutes.
Contact the garment retailer.
External USB device cannot
be charged using the USB
port.
Charge the battery.
Connect the charging cable
of the external USB device to
the USB socket
(11)
on the
battery adapter
(2)
.
Press the activation button
(12)
for approx. three
seconds.
The external USB device can-
not be charged using the
USB port on the battery ad-
apter (refer to specifications
in "Technical data"
A)
).
A) Some external USB devices cannot be charged with this battery
adapter despite being consistent with the technical data.
Bosch Power Tools
1 609 92A 5CB | (07.08.2019)


