background image

20

 | English 

1 609 92A 3PX | (2.6.17)

Bosch Power Tools

ations in temperature, allow the measuring tool to adjust to 
the ambient temperature before putting it into operation. 
In case of extreme temperatures or variations in tempera-
ture, the accuracy of the measuring tool can be impaired.

Avoid heavy impact to or falling down of the measuring 
tool. 

After severe exterior effects to the measuring tool, it 

is recommended to carry out an accuracy check (see “Ac-
curacy Check of the Measuring Tool”, page 21) each time 
before continuing to work.

Switch the measuring tool off during transport. 

When 

switching off, the levelling unit is locked. Else it can be 
damaged in case of intense movement.

Switching On and Off

To 

switch on

 the measuring tool, slide the On/Off switch 

16


to the 

On”

 position (when working without automatic lev-

elling) or to the 

On”

 position (when working with auto-

matic levelling). Immediately after switching on, the measur-
ing tool sends laser beams out of the exit openings 

1

.

Do not point the laser beam at persons or animals and 
do not look into the laser beam yourself, not even from 
a large distance.

To 

switch off

 the measuring tool, slide the On/Off switch 

16


to the 

“Off”

 position. When switching off, the levelling unit is 

locked.

Do not leave the switched-on measuring tool unattend-
ed and switch the measuring tool off after use. 

Other 

persons could be blinded by the laser beam.

When exceeding the maximum permitted operating tempera-
ture of 40 °C, the measuring tool switches off to protect the 
laser diode. After cooling down, the measuring tool is ready 
for operation and can be switched on again.
If the temperature of the measuring tool is approaching the 
maximum permissible operating temperature, the laser lines 
will gradually become dimmer.

Deactivating the Automatic Shut-off

When no button on the measuring tool is pressed for approx. 
120 minutes, the measuring tool automatically switches off 
to save the batteries.
To switch the measuring tool back on after automatic shut-off, 
you can either slide the On/Off switch 

16

 to the 

“Off”

 position 

first and then switch the measuring tool back on, or press either 
the laser mode button 

7

 or the receiver mode button 

5

 once.

To deactivate the automatic shut-off function, hold down the 
laser mode button 

7

 for at least 3 s (with the measuring tool 

switched on). If the automatic shut-off function is deactivat-
ed, the laser beams will flash briefly as confirmation.
To activate the automatic shut-off, switch the measuring tool 
off and then on again.

Deactivating the Signal Tone

After the measuring tool has been switched on, the audio sig-
nal is always activated.
To deactivate or activate the audio signal, simultaneously 
press the laser mode button 

7

 and the receiver mode button 

5

 and hold them down for at least 3 s.

The audio signal activation and deactivation are both con-
firmed by three short beeps.

Operating Modes

The measuring tool has several operating modes between 
which you can switch at any time. These are for:
– Generating a horizontal laser plane,
– Generating a vertical laser plane,
– Generating  two  vertical laser planes,
– Generating a horizontal laser plane as well as two vertical 

laser planes.

After you switch it on, the measuring tool generates a horizon-
tal laser plane. To change the operating mode, press the laser 
mode button 

7

.

All operating modes can be selected both with and without au-
tomatic levelling.

Receiver mode

Receiver mode must be activated to work with the laser re-
ceiver 

26

 – regardless of which operating mode is selected.

In receiver mode the laser lines flash at very high frequency, 
enabling them to be detected by the laser receiver 

26

.

To switch on receiver mode, press button 

5

. Indicator 

6

 will 

light up green. 
When receiver mode is switched on, the laser lines are less 
visible to the human eye. For this reason, switch receiver 
mode off by pressing button 

5

 again to work without a laser re-

ceiver. Indicator 

6

 will extinguish.

Automatic Levelling

Working with Automatic Levelling

Position the measuring tool on a level and firm support, attach 
it to the holder 

24

 or to the tripod 

30

.

When working with automatic levelling, push the On/Off 
switch 

16

 to the 


On”

 position. 

After switching on, the levelling function automatically com-
pensates irregularities within the self-levelling range of ±4°. 
The levelling is finished as soon as the laser beams do not 
move any more.
If automatic levelling is not possible, e.g. because the surface 
on which the measuring tool stands deviates by more than 4° 
from the horizontal plane, the laser lines begin to flash rapidly. 
When the audio signal is activated, a fast-beat signal sounds.
Set up the measuring tool in level position and wait for the 
self-levelling to take place. As soon as the measuring tool is 
within the self-levelling range of ±4°, all laser beams light up 
continuously and the audio signal is switched off.
In case of ground vibrations or position changes during opera-
tion, the measuring tool is automatically levelled in again. To 
avoid errors, check the position of the horizontal and vertical la-
ser line with regard to the reference points upon re-levelling.

Working without Automatic Levelling

For work without automatic levelling, slide the on/off switch 

16

 to the 

On”

 position. When automatic levelling is 

switched off, the indicator 

4

 lights up red and the laser lines 

continuously flash slowly.
When automatic levelling is switched off, you can hold the 
measuring tool freely in your hand or place it on an inclined 
surface. The laser lines no longer necessarily run perpendicu-
lar to each other.

OBJ_BUCH-3106-001.book  Page 20  Friday, June 2, 2017  10:18 AM

Heruntergeladen von


manualslib.de


Handbücher-Suchmachiene


Summary of Contents for GLL Professional 3-80 C

Page 1: ......

Page 2: ...6 17 Bosch Power Tools 1 2 3 4 5 6 9 8 7 10 16 17 18 19 20 11 15 12 14 13 13 1 1 GLL 3 80 C GLL 3 80 CG OBJ_BUCH 3106 001 book Page 3 Friday June 2 2017 10 18 AM Heruntergeladen von manualslib de Handbücher Suchmachiene ...

Page 3: ...1 609 92A 3PX 2 6 17 Bosch Power Tools 4 F E D C B A OBJ_BUCH 3106 001 book Page 4 Friday June 2 2017 10 18 AM Heruntergeladen von manualslib de Handbücher Suchmachiene ...

Page 4: ...A 3PX 2 6 17 Bosch Power Tools GBA 12V GBA 10 8V AA1 1 608 M00 C1B GAL 12 CV AL 11 CV 21 22 23 G OBJ_BUCH 3106 001 book Page 5 Friday June 2 2017 10 18 AM Heruntergeladen von manualslib de Handbücher Suchmachiene ...

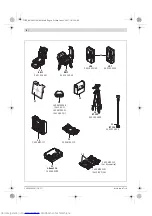
Page 5: ...9 J00 LR 6 0 601 069 H00 33 24 BM 1 0 601 015 A01 31 BT 350 0 601 015 B00 26 1 608 M00 C1W GLL 3 80 C CG 1 608 M00 C1X GLL Accessories 27 25 RM 3 0 601 015 D00 32 L Boxx 136 1 600 A00 1RR 33 1 608 M00 C20 32 1 608 M00 C1Y OBJ_BUCH 3106 001 book Page 6 Friday June 2 2017 10 18 AM Heruntergeladen von manualslib de Handbücher Suchmachiene ...

Page 6: ...nden Im Mess werkzeug können Funken erzeugt werden die den Staub oder die Dämpfe entzünden Beim Betrieb des Messwerkzeugs ertönen unter be stimmten Bedingungen laute Signaltöne Halten Sie deshalb das Messwerkzeug vom Ohr bzw von anderen Personen fern Der laute Ton kann das Gehör schädigen Bringen Sie das Messwerkzeug die Laser Zieltafel 27 und die universelle Halterung 24 nicht in die Nähe von Her...

Page 7: ...n Vorsicht Bei der Verwendung des Messwerkzeugs mit Bluetooth kann eine Störung anderer Geräte und An lagen Flugzeuge und medizinischer Geräte z B Herz schrittmacher Hörgeräte auftreten Ebenfalls kann eine Schädigung von Menschen und Tieren in unmittel barer Umgebung nicht ganz ausgeschlossen werden Verwenden Sie das Messwerkzeug mit Bluetooth nicht in der Nähe von medizinischen Geräten Tank stell...

Page 8: ... iOS 7 und höher Bluetooth 4 0 Low Energy 3 Android 4 3 und höher iOS 7 und höher Gewicht entsprechend EPTA Procedure 01 2014 mit Akku mit Batterien 0 90 kg 0 86 kg 0 90 kg 0 86 kg Maße Länge x Breite x Höhe 162 x 84 x 148 mm 162 x 84 x 148 mm Schutzart IP 54 staub und spritzwassergeschützt IP 54 staub und spritzwassergeschützt erlaubte Umgebungstemperatur beim Laden beim Betrieb5 bei Lagerung 0 C...

Page 9: ... Entriegelungstasten 13 der Verschlusskappe 14 undziehendieVerschlusskappeab AchtenSieda bei darauf dass die Batterien nicht herausfallen Halten Sie das Messwerkzeug dazu mit dem Akku schacht 10 nach oben gerichtet Entnehmen Sie die Batterien Um die innen liegende Hülle 11 aus dem Akku schacht 10 zu entfernen greifen Sie in die Hülle und ziehen diese bei leichtem Druck auf die Seitenwand aus dem M...

Page 10: ...Position Off schieben und das Mess werkzeug dann wieder einschalten oder Sie drücken einmal die Taste Laser Betriebsart 7 oder die Taste Empfänger modus 5 Um die Abschaltautomatik zu deaktivieren halten Sie bei eingeschaltetem Messwerkzeug die Taste Laser Betriebsart 7 mindestens 3 s lang gedrückt Ist die Abschaltautomatik deaktiviert blinken die Laserstrahlen kurz zur Bestätigung Um die automatis...

Page 11: ...chtet Die Bluetooth Verbindung kann wegen zu großer Distanz oder Hindernissen zwischen Messwerkzeug und mobilem Endgerät sowie durch elektromagnetische Störquellen unter brochen werden In diesem Fall blinkt die Bluetooth Anzeige Bluetooth ausschalten UmBluetooth fürdieFernsteuerungauszuschalten drücken Sie die Bluetooth Taste 9 oder schalten Sie das Messwerk zeug aus Kalibrierwarnung CAL guard Die...

Page 12: ...B Punkt II Platzieren Sie das Messwerkzeug ohne es zu drehen nahe der Wand B schalten Sie es ein und lassen Sie es ein nivellieren RichtenSiedasMesswerkzeuginderHöhesoaus mithilfe des Stativs oder gegebenenfalls durch Unterlegen dass der Kreuzungspunkt der Laserlinien genau den zuvor mar kierten Punkt II auf der Wand B trifft Drehen Sie das Messwerkzeug um 180 ohne die Höhe zu verändern Richten Si...

Page 13: ...Zieltafel27verbessertdie Sichtbarkeit der Laserlinie durch die transparente Hälfte ist die Laserlinie auch von der Rückseite der Laser Zieltafel er kennbar Arbeiten mit dem Stativ Zubehör Ein Stativ bietet eine stabile höheneinstellbare Messunter lage Setzen Sie das Messwerkzeug mit der 1 4 Stativauf nahme 17 auf das Gewinde des Stativs 30 oder eines han delsüblichen Fotostativs Für die Befestigun...

Page 14: ... Sie online Ersatzteile bestellen Tel 01 797222010 Fax 01 797222011 E Mail service elektrowerkzeuge at bosch com Schweiz Unter www bosch pt com ch de können Sie online Ersatzteile bestellen Tel 044 8471511 Fax 044 8471551 E Mail Aftersales Service de bosch com Luxemburg Tel 32 2 588 0589 Fax 32 2 588 0595 E Mail outillage gereedschap be bosch com Transport DieverwendbarenLi Ionen Akkusunterliegend...

Page 15: ...ol Therefore keep the measuring tool away from your ear or other per sons The loud audio signal can cause hearing damage Keep the measuring tool the laser target plate 27 and the universal holder 24 away from cardiac pacemakers The magnets in side the measuring tool the laser target plate and the universal holder generate a field that can impair the function of cardiac pacemakers Keep the measurin...

Page 16: ...cannot be completely excluded Do not use the measuring tool with Bluetooth in the vicinity of medi cal devices petrol stations chemical plants areas where there is danger of explosion and areas subject to blasting Do not use the measuring tool with Blue tooth inairplanes Avoidoperationindirectvicinityof the body over longer periods Product Description and Specifications Pleaseunfoldthefold outpage...

Page 17: ...bove iOS 7 and above Bluetooth 4 0 Low Energy 3 Android 4 3 and above iOS 7 and above Weight according to EPTA Procedure 01 2014 with battery pack with batteries 0 90 kg 0 86 kg 0 90 kg 0 86 kg Dimensions length x width x height 162 x 84 x 148 mm 162 x 84 x 148 mm Degree of protection IP 54 dust and splash water protected IP 54 dust and splash water protected Permitted ambient temperature during c...

Page 18: ...ith the bat tery port 10 facing upward Remove the batteries To remove the inside cover 11 from the battery port 10 reach into the cover and pull it out of the measuring tool by applying light pressure to the side wall Always replace all batteries at the same time Only use batter ies from one brand and with the identical capacity Removethebatteriesfromthemeasuringtoolwhennot using it for extended p...

Page 19: ...ceiver mode button 5 and hold them down for at least 3 s The audio signal activation and deactivation are both con firmed by three short beeps Operating Modes The measuring tool has several operating modes between which you can switch at any time These are for Generating a horizontal laser plane Generating a vertical laser plane Generating two vertical laser planes Generating a horizontal laser pl...

Page 20: ...ange Themeasuringtoolsufferedasevereshock e g impacton the floor after a fall You can refer to the Levelling Remote App to see which of the three events triggered the calibration warning Without the app the cause cannot be identified as the CAL guard indi cator the CAL guard indicator 3 lighting up indicates merely that the levelling accuracy needs to be checked Oncethewarninghasbeentriggered theC...

Page 21: ...tical Lines For this check a door opening is required with at least 2 5 m of space on a firm surface to each side of the door Position the measuring tool on a firm level surface not on atripod 2 5 mawayfromthedooropening Switchonthe measuring tool to operation with automatic levelling Se lect an operating mode in which a vertical laser plane is generated in front of the measuring tool Mark the cen...

Page 22: ...Receiver mode page 20 Laser Viewing Glasses Accessory The laser viewing glasses filter out ambient light This enhanc es the laser visibility for the eye Do not use the laser viewing glasses as safety goggles The laser viewing glasses are used for improved visualisa tionofthelaserbeam buttheydonotprotectagainstlaser radiation Donotusethelaserviewingglassesassunglassesorin traffic The laser viewing ...

Reviews: