background image

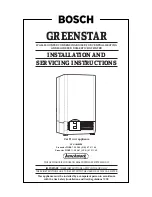
GREENSTAR

WALL MOUNTED CONDENSING BOILER FOR CENTRAL HEATING

AND MAINS FED DOMESTIC HOT WATER

INSTALLATION AND

SERVICING INSTRUCTIONS

GC NUMBERS

Greenstar ZWBR 7-25 A23 (N.G.) 47 311 44 

Greenstar ZWBR 11-25 A31 (L.P.G.) 47 311 45

THIS APPLIANCE IS FOR USE ON SEALED PRIMARY SYSTEMS ONLY

IMPORTANT:  

THESE INSTRUCTIONS APPLY IN THE UK ONLY

THESE INSTRUCTIONS ARE TO BE LEFT WITH THE USER OR AT THE GAS METER

This appliance must be installed by a competent person in accordance

with the Gas Safety (Installation and Use) Regulations 1998

Cat II

appliance

2H 3P


SSupp

em

em

m

Summary of Contents for Greenstar ZWBR 11-25 A31

Page 1: ...Greenstar ZWBR 11 25 A31 L P G 47 311 45 THIS APPLIANCE IS FOR USE ON SEALED PRIMARY SYSTEMS ONLY IMPORTANT THESE INSTRUCTIONS APPLY IN THE UK ONLY THESE INSTRUCTIONS ARE TO BE LEFT WITH THE USER OR AT THE GAS METER This appliance must be installed by a competent person in accordance with the Gas Safety Installation and Use Regulations 1998 Cat II appliance 2H 3P S S u p p e m e m m ...

Page 2: ... in a cupboard or compartment Do not block the specified space left for servicing An electrical supply failure will stop the appliance Normal operation will resume upon the restoration of the supply A standard 100mm flue system is available for horizontal flues upto 2m Multi directional flue systems are available up to 10m horizontally and 8m vertically A twin pipe system is available An integral ...

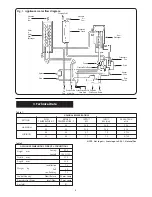
Page 3: ...URE C TEMPERATURE C kW kW Net m3 h MAXIMUM 80 60 23 0 24 0 2 54 50 30 25 3 24 0 2 54 MINIMUM 80 60 6 7 7 2 0 762 50 30 7 7 7 2 0 762 Table 1 3 Technical Data Fig 1 Appliance water flow diagram Automatic Air Vent Water to Water Heat Exchanger Automatic Air Vent Charging Point Expansion Vessel Heat Exchanger Condensate Trap Drain Diverter Valve Flow Switch Siphon Drain Pump Pressure Relief Valve Dom...

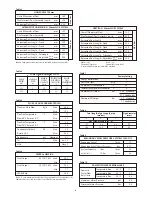
Page 4: ...5 C 9 5 Rate l min Temperature Rise 40 C 8 4 Maximum Mains Pressure bar 8 0 Minimum Mains Pressure bar 0 2 Table 10 Factory Setting Pump Control Mode 2 Anti Cycle Time min 3 Maximum CH Temperature C 80 ThermostatTemperature Differential C 8 Maximum CH Output kw 23 0 standard 25 3 condensing Minimum CH Output kw 6 7 standard 7 7 condensing Table 7 HORIZONTAL 100mm Overall Diameter of Duct mm 100 Fl...

Page 5: ... the appliance after installation The only flue systems that may be used are those sold by Worcester Heat Systems The flue system must be installed in accordance with the requirements of BS5440 1 Standard 100mm flue system The standard concentric flue system provides for a horizontal length of upto 2m Full instructions for fitting this flue are in Section 12 Installation Alternative 125mm diameter...

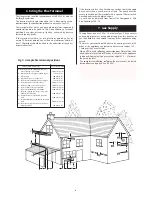
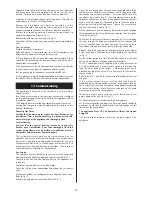
Page 6: ...he meter governor should deliver a dynamic pressure of 20 mbar at the appliance equivalent to a pressure of about 18 5 19mbar at the gas valve inlet 7 Gas Supply 6 Siting the Flue Terminal L L K K F F G A M E J F HI D G A B C 6 Fig 5 Acceptable terminal positions TERMINAL POSITION MIN DISTANCE A Directly below an openable window or other opening e g air brick 300 mm 12 in B Below gutters soil pipe...

Page 7: ...cal water company All connections in the system must be capable of withstanding a pressure of up to 3 bar and the radiator valves conform to the requirements of BS 2767 10 If Thermostatic Radiator Valves are fitted then it is recommended that one radiator is left open Repeated venting probably indicates a leak and this must be rectified to ensure the proper operation of the appliance No galvanised...

Page 8: ... appliance provided that it is in accordance with the requirements of the local water company The outlet s should be shrouded and unable to have any temporary hand held spray attached No anti syphonage arrangements are necessary In exceptionally hard water areas a device to prevent scale formation may be fitted or alternatively the maximum temperature reset to about 45 C which may reduce the risk ...

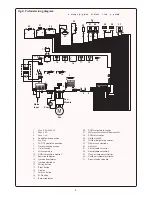
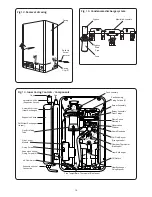
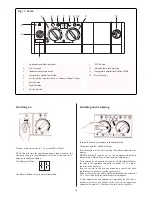
Page 9: ...0 DHW temperature control 11 Power on indicator 12 Ignition transformer 13 Ignition electrodes 14 Setting button 15 Reset button 16 Display 17 Service button 18 ECO button 19 Burner indicator 20 DHW temperature sensor 21 Water pressure switch flow switch 22 DHW inlet sensor 23 Air flow switch 24 CH flow temperature sensor 25 Flame sense electrode 26 Gas valve 27 Gas solenoid valve No 1 28 Gas sole...

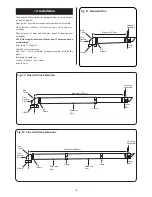
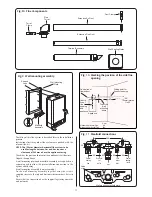
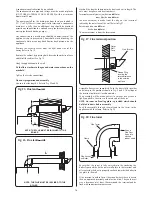
Page 10: ...ise Flue turret _ Flue turret clamp _ Terminal assembly _ Wall sealing plates Extension kit comprises Air duct _ Flue duct _ Duct clamp Refer to Fig F4 10 12 Installation Fig F1 Standard Flue Flue Turret Flue Sample Point Clamp No Clamp Maximum 670mm Terminal Assembly Outer Wall Fig F2 Flue with One Extension Maximum 1620mm Flue Turret Flue Sample Point Clamp No Clamp Clamp Terminal Assembly Outer...

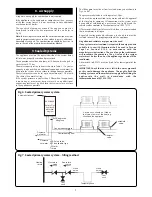
Page 11: ... supplied to secure the top and bottom cross members Refer to Fig 9 Ensure that the top section has the support lugs facing upwards and outwards 11 Fig 9 Wall mounting assembly Fig 11 Manifold connections Central heating flow Valve clips Wall mounting manifold plate Domestic hot water Cold water inlet Central heating return Gas 30 20 10 200 65 65 65 65 Support Lugs Manifold Assembly Wall Mounting ...

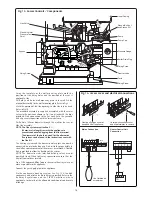
Page 12: ...t Red Leads Heat Exchanger CH Return Flue Temperature Thermostat Red Leads Air Flow Switch Gas Control Module Gas Air Mixing Tube Expansion Vessel Automatc Air Vent Expansion Vessel Cap Automatic Air Vent Heat Exchanger Cap Fig 12 Removal of casing Casing Security Screw remove Casing Clip 2 Syphon Syphon Drain Pipe Drain Manifold Assembly Expansion Vessel Connection Expansion Vessel Fixing Screws ...

Page 13: ...m the flue terminal The diameter of the hole required for the alternative flue system can be found in the instructions sent with the flue kit The heating system and the domestic water pipes can now be connected if not already done so Do not fix the pipes rigidly to the wall as some movement of them must be retained A flexible link is provided to allow the flushing of the system NOTE The domestic w...

Page 14: ... at the terminal indicating the outer face of the wall Refer to Fig F7 Extension air duct L 70mm flue duct L 50mm The measurement is from the formed end Assemble flue system completely Push the ducts fully together and clamp in the positions shown in Fig 2 and 3 The slope of the terminal outlet must face downwards The assembly will be made easier if a solvent free grease is lightly applied i e Vas...

Page 15: ...ee Gas Service The complete system including the meter must be inspected and tested for soundness and purged as described in BS 6891 Check that the gas and electrical supplies to the appliance are turned off Check that any controls are in the off position Check that all the water connections throughout the system are tight Remove the cabinet by unclipping the two clips and lifting away Refer to Fi...

Page 16: ...stem bypass If after conversion the appliance is operating on LPG then a dynamic pressure of 37mbar at the inlet to the appliance equivalent to aout 34 5 35mbar at the inlet to the gas valve Turn on the power switch to I The green LED will light NOTE The first time the appliance operates and whenever the electricity supply is re established it will run at low rate for 15 minutes to check the sipho...

Page 17: ...ost Protection Room Temperature Control Optional Junkers control Set the temperature control knob to the required setting Set the outside temperature control unit if fitted to the appropriate heating curve and mode Refer to the instructions sent with the controler NOTE A proprietary room thermostat can be connected Refer to Fig Turn the control knob to set the discharge temperature between 40 C Mi...

Page 18: ...r temperature control knob fully anti clockwise until the buttons flash 18 Changing the Maximum Heating Output Pump Anti Seizure Device If the pump has not operated for 24 hours then it will be switched on for a period of 5 minutes to prevent seizure The central heating flow temperature can be adjusted between 35 C and 80 C It can be set to give a maximum of 75 C i e setting E Prise off the yellow...

Page 19: ...h Press the service button until appears The maximum central heating flow temperature is stored Return the temperature control knobs to the original settings Record the change in the Commissioning Record Turn the hot water temperature control knob clockwise until the required output level is reached Display Heat Heating Output Level Input kw Output kw MAX NET Non condensing Mode 99 24 23 85 20 6 1...

Page 20: ...c hot water only Turn the central heating temperature control knob to E Press the service button until appears on the display Release the button 4 6 will appear for 5 seconds followed by 0 0 or 0 1 The service button will light 20 Changing the Control Mode for Heating Operation Turn the central heating temperature control anti clockwise until 2 2 appears after 5 seconds the mode setting of 2 facto...

Page 21: ... law that any service work is carried out by competent engineers such as British Gas or CORGI registered engineers Pre Service Inspection Check that the flue terminal and terminal guard are clear and undamaged If the appliance is in a cupboard compartment check that the specified service spaces are clear Refer to Fig 2 and 3 Check the connections in the system and remake any which show signs of le...

Page 22: ...Refer to the diagram and table below 22 Fig S2 Fig S3 Service Function How to read out Pump control mode 2 2 Anti Cycle time 2 4 Maximum heating flow 2 5 temperature Heating temperature 2 6 switching differential Maximum heating 5 0 output Press 1 and 2 until display 4 shows Wait until 4 shows 0 0 or 0 1 Press 1 and 2 until display 4 shows Wait until 4 shows 0 Turn 3 until display 4 shows 2 2 Wait...

Page 23: ... by unscrewing the two extended screws Unscrew the rear fixing screw remove the split pins and unscrew and remove the front fixings Remove burner casing Lift out the burner skin and seal Refer to Fig 20 Lightly brush the exposed flueways Remove the yellow siphon trap drain plug and the grey condensate drain cap Refer to Fig 31 Pour clean water through the heat exchanger and into the condensate tra...

Page 24: ... Lower to the horizontal position and push firmly upwards at the side location points to release Remove the panel b Cabinet Release the clips at the rear of each side of the appliance and lift off Refer to Fig 9 c Facia Assembly Unplug the spark and electrode connection Unscrew the screws at each end of the facia and lower assembly Refer to Fig 15 d Inner Case Cover Unscrew the four screws and rem...

Page 25: ...ce the control board and or transformer remove the cover panel Release the four clips to remove the control board and transformer Refer to Fig 14 Air Flow Switch Remove the Control Module Carefully pull off plastic tube to unclip the switch Carefully remove the assembly and remove the connectors Refer to Fig 14 Spark Electrode Remove the inner case cover Pull off the leads to the electrodes Unscre...

Page 26: ... and unscrew the insert from the body Refer to Fig 15 Refill vent and re pressurise the appliance Prime the siphon Expansion Vessel Drain the appliance Remove the inner case cover Remove the control module Release the union connection at the base of the expansion vessel Unscrew the two screws fixing the vessel Refer to Fig 14 In the unlikely event of a failure of the expansion vessel it is accepta...

Page 27: ...ct the union connections Refer to Fig 24 Unscrew the four screws securing the valve to the mounting plate and remove he valve by firmly pulling it from the connections Refill vent and re pressurise the appliance Prime the siphon Pump Drain the appliance Unplug the electrical connections at the facia Lower the facia and remove the cross brace Refer to Fig 15 and 24 Remove the plastic side facia pan...

Page 28: ... 1 8 729 000 2420 14 Expansion vessel 1 8 715 407 176 0 15 Relief valve 1 8 717 401 012 0 16 Spark electrode 1 8 718 107 064 0 17 Electrode lead 1 8 714 401 878 0 18 Flame Sense electrode 1 8 718 107 064 0 19 Pump 1 8 717 204 264 0 20 Pressure gauge 1 8 717 208 061 0 21 Inspection glass assembly 1 8 729 000 176 0 22 Sensor DHW flow temp 1 8 714 500 054 0 23 Burner skin seal 1 8 711 004 168 0 24 Tr...

Page 29: ...ding Display A5 A7 AC b1 C1 C4 C6 CC d3 E0 E2 E9 Condition Circuit break or short circuit in the constant hot water temperature sensor Circuit break or short circuit in the dhw temperature sensor No electrical connection between the controller TA211E and the control board Code plug Air pressure switch contacts open when appliance is operating or fan speed to slow Air pressure switch contacts do no...

Page 30: ...ame sense current remains after normal shut down i e burner does not go off Action Check that the gas cock is open and for sufficient gas pressure Check power to the gas valve Check spark and flame sense electrodes and leads Check electrode and lead for splits or cracks Check gas valve wiring and solenoids State 4 4 4 ...

Page 31: ...31 ...

Page 32: ...in the interests of continued improvement All goods sold are subject to our official Conditions of Sale a copy of which may be obtained on application PUBLICATION 6 720 610 096 99 07 EXCELLENCE COMES AS STANDARD Worcester Heat Systems Limited Cotswold Way Warndon Worcester WR4 9SW Telephone 01905 754624 Fax 01905 754619 Bosch Care Call 0990 266241 ...

Reviews: