English |
31
Bosch Power Tools
2 610 A12 916 | (4.3.10)
Accuracy Check of the Measuring Tool
Apart from exterior influences, device-specific
influences (such as heavy impact or falling
down) can lead to deviations. Therefore, check
the accuracy of the measuring tool each time be-
fore starting your work.
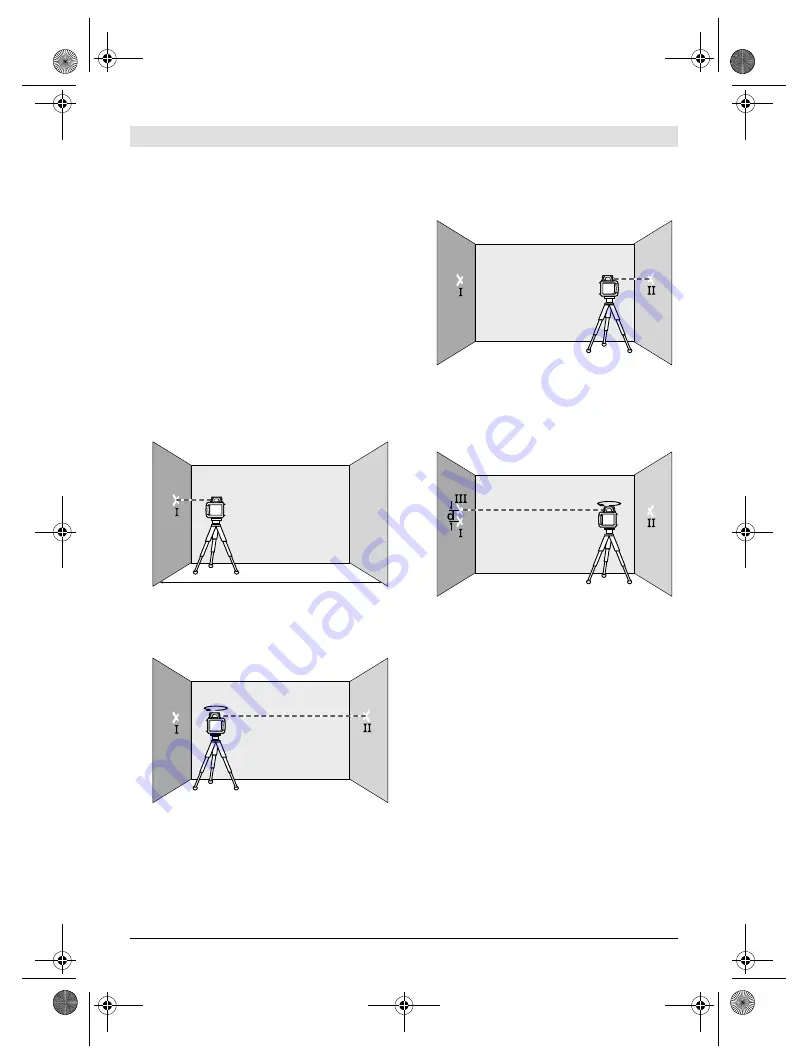
For the accuracy check, an unobstructed meas-
uring distance of 20 m on firm ground between
two walls A and B is required. With the measur-
ing tool in the horizontal position, a transit
measurement is to be carried out across both
axes X and Y (both positive and negative) (alto-
gether 4 complete measurements).
– Mount the measuring tool in the horizontal po-
sition onto a tripod
26
(accessory) or place it
on a firm and level surface near wall A. Switch
the measuring tool on.
– After levelling, direct the laser beam in point
operation onto the close wall A. Mark the
centre point of the laser beam on the wall
(point
I
).
– Turn the measuring tool around by 180°, allow
it to level in and mark the centre point of the
laser beam on the opposite wall B (point
II
).
– Without turning the measuring tool, position
it close to wall B. Switch the measuring tool
on and allow it to level in.
– Align the height of the measuring tool (using
the tripod or by underlaying, if required) in
such a manner that the centre point of the la-
ser beam is projected exactly against the pre-
viously marked point
II
on wall B.
– Rotate the measuring tool by 180° without
changing the height. Allow it to level in and
mark the centre point of the laser beam on
wall A (point
III
). Take care that point
III
is as
vertical as possible above or below point
I
.
– The difference
d
of both marked points
I
and
III
on wall A amounts to the actual deviation
of the measuring tool for the measured axis.
Repeat the measuring procedure for the other
three axes. For this, turn the measuring tool
prior to each measuring procedure by 90°.
On the measuring section of 2 x 20 m = 40 m, the
maximum allowable deviation is:
40 m x
±
0.1 mm/m =
±
4 mm.
Consequently, the difference
d
between points
I
and
III
for each of the four individual measure-
ments may not exceed 4 mm max.
If the measuring tool should exceed the maxi-
mum deviation in anyone of the four measuring
procedures, have it checked at a Bosch after-
sales service agent.
A
B
20 m
A
B
180°
A
B
A
B
180°
OBJ_BUCH-757-005.book Page 31 Thursday, March 4, 2010 1:50 PM


