-28-
Checking the leveling accuracy in a horizon-
tal position
For a reliable and precise result, it is recom-
mended that you check the accuracy (per-
form the check) on a free measuring distance
of 100 ft in front of a wall. Carry out a com-
plete measuring procedure for each of the
two axes.
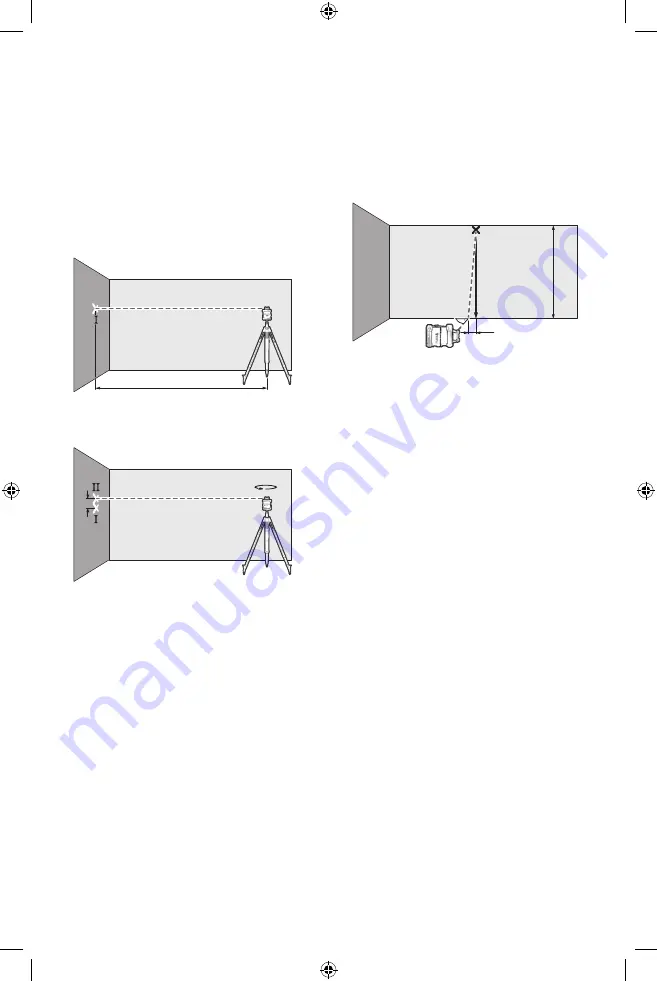
– Mount the laser level in a horizontal posi-
tion 100 ft from the wall on a tripod, or
place it on a firm, level surface. Switch on
the laser level.
100 ft (30 m)
– Once leveling is complete, mark the center
of the laser beam on the wall (point I).
180°
d
– Rotate the laser level 180° without adjust-
ing the height. Allow it to level in and mark
the center point of the laser beam on the
wall (point II). Note that point II should
preferably be positioned vertically above or
below point I.
The discrepancy d between the two marked
points I and II on the wall reveals the actual
height deviation of the laser level for the axis
being measured.
Repeat the measuring process for the other
axis. To do this, turn the laser level through
90° before beginning the measurement.
The maximum permitted deviation on the
100 ft measuring distance is as follows: 100
ft (30 m) is ±1/16 in (±1.5mm). The discrep-
ancy d between points I and II must therefore
amount to no more than 1/8 in (3 mm) for
each of the two measuring processes.
Checking the leveling accuracy in the
vertical position
For this check, you will need a free measuring
distance on firm ground in front of a 30 ft (10
m) tall wall. Fix a plumb line to the wall.
– Position the laser level in the vertical po-
sition on a firm, level surface. Switch the
laser level on and allow it to level in.
30 ft (10 m)
d
– Set up the laser level so that the laser beam
meets the plumb line at the exact center of
the upper end. The discrepancy d between
the laser beam and the plumb line at the
lower end of the line reveals the laser lev-
el’s deviation from the vertical.
For a 30 ft tall measuring distance, the maxi-
mum permitted deviation is as follows:
30 ft
(10 m) is
±
3/64 in (
±
1mm)
. The discrepancy d
must therefore be no more than 3/64 in.
Calibrating the laser level
User Calibration - uCAL
The following tasks should be performed only
by well-trained and qualified persons. The le-
galities with regard to performing an accuracy
check or calibration of a laser level must be
known.
u
Perform calibration of the laser level with
extreme precision or have the laser level
checked by a Bosch customer service
agent. Inaccurate calibration leads to incor-
rect measuring results.
u
Only start the calibration if you have to
perform a calibration of the laser level.
As soon as the laser level is in calibration
mode, you must perform the calibration
meticulously to the end in order to ensure
that no incorrect measuring results are pro-
duced afterwards.
Check the leveling accuracy after every cali-
bration (see “Accuracy Check of the Laser
level”, page 27). If the deviation is outside the
maximum permitted limits, have the laser level
checked by a Bosch customer service agent.
GRL4000-90CHVG 10-21.indd 28
10/20/21 3:24 PM


