background image

Installation and connection       

en

9

Positioning and levelling

Positioning the appliance

When installing the appliance, make sure that there is 

enough space in the final installation location to pull the 

appliance forwards for cleaning and maintenance work.
The ground underneath must be hard and firm. The wall 

immediately behind the appliance must be made from 

non-flammable material, e.g. tiles.
If you need to move the appliance in order to position it, 

make sure that the adjustable feet are fully screwed in.

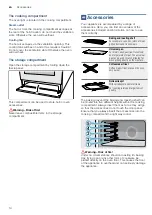
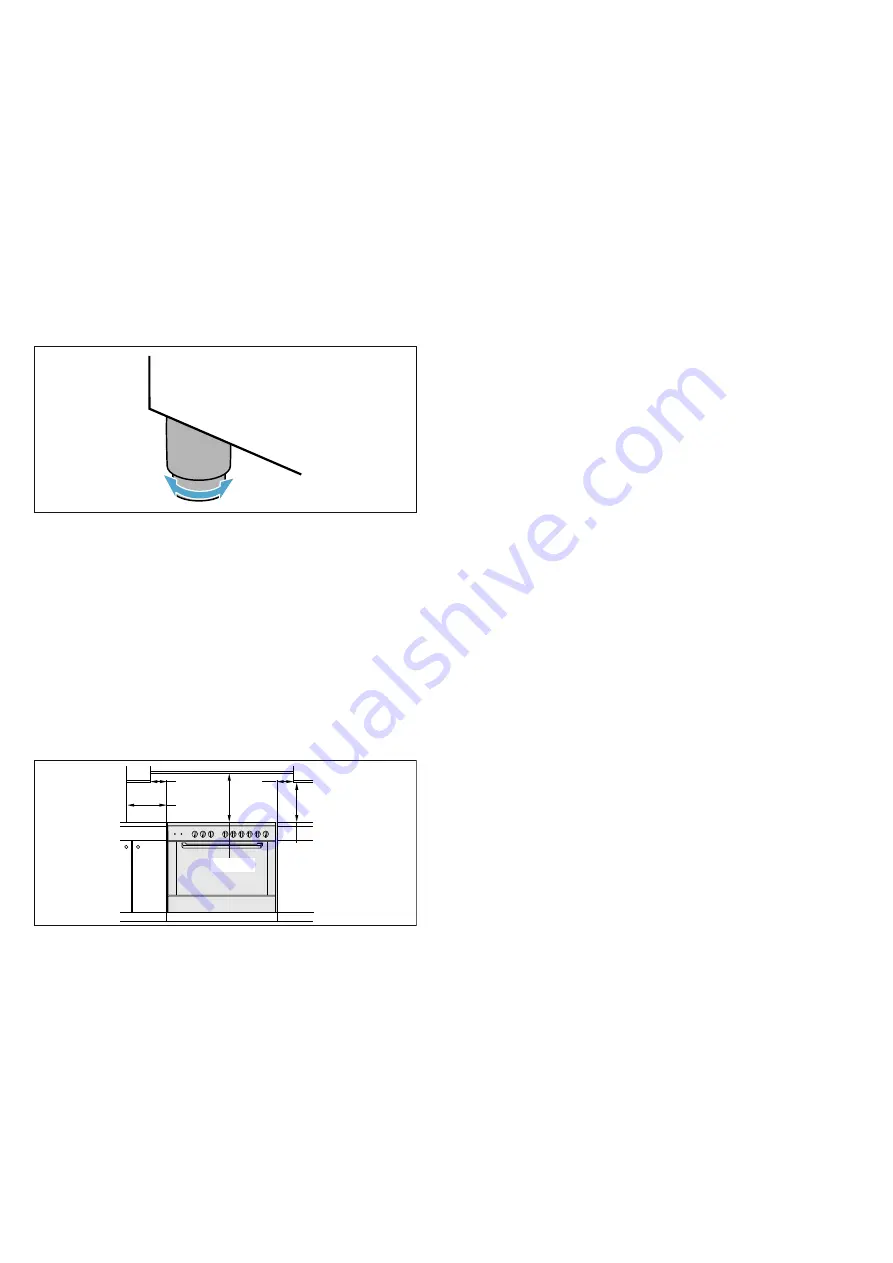
Aligning the appliance

Turn the adjustable feet to align the appliance.

Note: 

Do not align the appliance until all other work has 

been completed.

The adjustable feet can be used to elevate the 

appliance by a maximum of 50 mm.

Check the alignment of the appliance once it has been 

installed in the intended place.
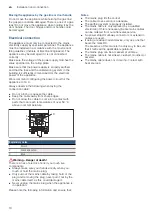
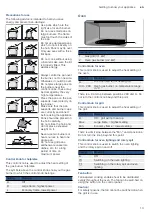
Adjacent units

Any adjacent units must not be made of flammable 

materials. The fronts of any adjacent units must be heat-

resistant up to at least 90 °C. If the appliance is 

installed very close to any other units, the minimum 

clearances given in the figure must be maintained.
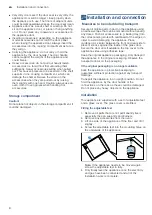
Wall fixing

To prevent the cooker from tipping over, you must fix it 

to the wall using the enclosed bracket. Please observe 

the installation instructions for fixing the oven to the 

wall. 

Gas connection

Installation must only be performed by an approved 

expert or a licensed after-sales service engineer in 

accordance with the instructions specified under "Gas 

connection and conversion to a different gas type".

For the licensed expert or after-sales service

Caution!

The settings for configuring this appliance can be 

found on the rating plate.

Before setting up the appliance, check the grid 

access conditions (gas type and gas pressure) and 

ensure that the gas setting of the appliance meets 

these conditions. If the appliance settings have to be 

changed, follow the instructions in the section "Gas 

connection and conversion to a different gas type".

This appliance is not connected to a waste gas 

main. It must be connected and commissioned in 

accordance with the installation conditions. Do not 

connect the appliance to a waste gas main. All 

ventilation regulations must be observed.

The gas connection must be made via a fixed, i.e. 

not mobile connection (gas line) or via a safety 

hose. 

If using the safety hose, ensure that the hose is not 

trapped or crushed. The hose must not come into 

contact with hot surfaces.

The connection must have an easily accessible 

locking device.

Flexible hoses

For flexible hoses, observe the following points:

Do not pinch or squeeze hoses.

Do not subject the hoses to twisting or pulling 

forces.

Keep the hoses away from sharp edges.

Do not let the hoses come into contact with parts 

that may reach a temperature higher than 70 °C 

above room temperature. 

Make sure that the full length of the hoses is 

accessible for inspection.
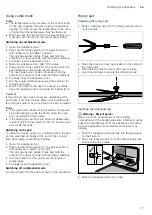
Checking for leaks

After connecting the gas line, check the connections for 

leaks using soapy water.

Initial use

Switch the appliance on as described in the instructions 

for use. Light all the burners and check that the flames 

remain stable at both the high and low settings.

Faults in the gas installation/smell of gas

If you notice a smell of gas or faults in the gas 

installation, you must

immediately shut off the gas supply and/or close the 

gas cylinder valve

immediately extinguish all naked flames and 

cigarettes

switch off electrical appliances and lights

open windows and ventilate the room

call the after

­

sales service or the gas supplier

PLQ

PLQ

PLQ

PLQ

PLQ

Summary of Contents for HGJ1A8Q59M

Page 1: ...3FHJTUFS RXU QHZ GHYLFH RQ 0 RVFK QRZ DQG JHW IUHH EHQHILWV CPTDI IPNF DPN XFMDPNF en Instruction manual Free standing cooker Free standing cooker HGJ1A8Q59M ...

Page 2: ......

Page 3: ...e hob 12 Oven 13 The cooking compartment 14 The storage compartment 14 _ Accessories 14 K Before using for the first time 15 Baking out the oven 15 Cleaning the burner caps and cups 15 Cleaning the accessories 15 1 Operating the appliance 15 Hob 15 Oven 16 Using combi mode 17 Rotary spit 17 D Cleaning 19 Cleaning agents 19 Detaching and refitting the rails 21 Keeping the appliance clean 21 q Appli...

Page 4: ...sture and products of combustion in the room in which it is installed Ensure that the kitchen is well ventilated especially when the appliance is in use keep natural ventilation holes open or install a mechanical ventilation device mechanical extractor hood Prolonged intensive use of the appliance may call for additional ventilation for example opening of a window or more effective ventilation for...

Page 5: ...ce Risk of fire Never place flammable objects on the burners or store them in the cooking compartment Never open the appliance door if there is smoke inside Switch off the appliance Pull out the mains plug or switch off the appliance at the circuit breaker in the fuse box Shut off the gas supply Risk of fire The surfaces of the plinth drawer may become very hot Only store oven accessories in the d...

Page 6: ...he gas supply Contact the after sales service Risk of injury Faults or damage to the appliance are dangerous Never switch on a faulty appliance Unplug the appliance from the mains or switch off the circuit breaker in the fuse box Shut off the gas supply Contact the after sales service Risk of injury Unsuitable pan sizes damaged or incorrectly positioned pans can cause serious injury Observe the in...

Page 7: ... use roasting dishes if they must be heated using two burners This will cause heat accumulation The appliance could be damaged Cooking on gas burners releases extra heat and moisture Adjacent units may become damaged over time For long cooking times switch on the cooker hood or ventilate the room Observe the manufacturer s instructions when using special ovenware Aluminium foil and plastic contain...

Page 8: ...g transport Secure all mobile parts in and on the appliance using an adhesive tape that can be removed without leaving any traces Push all accessories e g baking tray into the corresponding slots with cardboard at the edges in order to avoid damaging the appliance Place cardboard or similar between the front and rear side to prevent knocks against the inside of the glass door Secure the door and i...

Page 9: ...the appliance check the grid access conditions gas type and gas pressure and ensure that the gas setting of the appliance meets these conditions If the appliance settings have to be changed follow the instructions in the section Gas connection and conversion to a different gas type This appliance is not connected to a waste gas main It must be connected and commissioned in accordance with the inst...

Page 10: ... sharp edges Do not allow the cable to come into contact with parts that can reach temperatures of over 50 C above room temperature Warning Danger of death There is a risk of electric shock if you touch live components Always make sure your hands are dry when you touch or hold the mains plug Only pull out the mains cable by taking hold of the plug and removing the plug never pull it out by the mai...

Page 11: ...ze for your food A larger less full saucepan requires a lot of energy Always place a suitable lid on the saucepan The gas flame must always be in contact with the base of the saucepan Environmentally friendly disposal Dispose of packaging in an environmentally friendly manner Getting to know your appliance GettingtoknowyourapplianceIn this section we will explain the indicators and controls You wi...

Page 12: ...of appliances with a hob cover the burners in the oven must also only be switched on if the hob cover is open Types of gas burner Description 1 Fan button 2 Timer selector 3 Selector for the oven gas grill 4 Selector for the oven 5 Selector for oven light and rotary spit grilling 6 Selector for gas hotplates Position Meaning Û Off 10 100 Cooking time in minutes Description 1 High output burner 2 9...

Page 13: ...ll pans on large burners The flame must not touch the sides of the pan Do not use damaged pans which do not sit evenly on the hob Pans may tip over Only use pans with a thick flat base Do not cook without using a lid and make sure the lid is properly fitted This wastes energy Always centre the pan over the burner not to one side Otherwise it could tip over Do not place large pans on the burners ne...

Page 14: ...ion on how to use them correctly The baking tray and the baking and roasting shelf can be moved into five different heights within the cooking compartment Always insert them as far as they will go so that the accessories do not touch the door panel Ensure that you always insert the accessories into the cooking compartment the right way round Warning Risk of fire Under no circumstances should a roa...

Page 15: ...Operating the appliance OperatingtheapplianceYou have already learnt about the controls and how they work Now we will explain how to set your appliance You will learn about what happens when you switch the appliance on and off and how to select the operating mode Hob Switching on the gas burner Notes Appliances with a hob cover must only be switched on if the hob cover is open The burner caps must...

Page 16: ...l knob to the Û position Press and hold the control knob while doing this Operating the grill The appliance door must be closed during grilling Note When using the grill a cooking time of 60 minutes must not be exceeded 1 Open the appliance door 2 Press and hold the control knob for the grill and turn it to the Max position The gas burner will ignite 3 Press and hold the control knob for a few sec...

Page 17: ...stop attempting to ignite the flame open the oven door and wait for 60 seconds If the flame goes out but you have not deliberately turned it off turn the selector to the Û position and wait for 60 seconds Switching on the grill To achieve an extra gold top on certain dishes the grill can be switched on briefly at the end of the cooking time when using conventional heating 1 Open the appliance door...

Page 18: ...surfaces of the cooking compartment or the heating elements Children must be kept at a safe distance from the appliance at all times Open the appliance door carefully Hot steam may escape Warning Risk of burns Never directly touch the rotisserie spit or other accessories when they are hot Always use a pot holder or wear oven gloves to handle accessories when they are hot 1 Open the appliance door ...

Page 19: ...e model Control panel Hot soapy water Clean with a dish cloth and dry with a soft cloth Do not use glass cleaner or glass scrap ers for cleaning Upper glass cover depending on appli ance model Glass cleaner Clean with a soft cloth You can remove the upper glass cover for cleaning To find out how to do this please refer to the section Upper glass cover Rotary knobs Do not remove Hot soapy water Cle...

Page 20: ... the cooking compartment is cold Please use the self cleaning function to clean self cleaning surfaces To find out how to do this please refer to the section Self cleaning Caution Never use oven cleaner on self clean ing surfaces Glass cover for the oven light Hot soapy water Clean with a dish cloth Shelf Hot soapy water Clean with a dish cloth or a brush You can remove the shelves for cleaning To...

Page 21: ...he upper holes Now move the rail down slowly and carefully and hook it into the lower holes 3 Hook both rails into the side walls of the oven Keeping the appliance clean Always keep the appliance clean and remove dirt immediately so that stubborn deposits of dirt do not build up Warning Risk of fire Loose food remnants fat and meat juices may catch fire Before using the appliance remove the worst ...

Page 22: ...d they snap shut with great force Ensure that the locking levers are always fully closed or when detaching the oven door fully open Detaching the door 1 Open the oven door fully 2 Fold up the two locking levers on the left and right figure A 3 Close the oven door as far as the limit stop With both hands grip the door on the left and right hand sides Close the door a little further and pull it out ...

Page 23: ...n light bulb with one of the same type Voltage 230 V Power 25 W Thread E14 Temperature resistance 300 C 6 Put the glass cover for the oven light bulb back on 7 Remove the tea towel and switch the circuit breaker back on or plug the mains plug in again 8 Switch on the oven light and check that it is working correctly Fault Possible cause Remedy information The appliance is not working The circuit b...

Page 24: ...at we can provide you with the correct advice The rating plate containing these numbers can be found on the right hand side of the oven door You can make a note of the numbers of your appliance and the telephone number of the after sales service in the space below to save time should it be required Please note that there will be a fee for a visit by a service technician in the event of a malfuncti...

Page 25: ...6 ...

Page 26: ...6 ...

Page 27: ...6 ...

Page 28: ...QQMJBODFT 4FSWJDF UHH DQG HDV UHJLVWUDWLRQ DOVR RQ PRELOH SKRQHV XXX CPTDI IPNF DPN XFMDPNF PPLJOH GPS IFMQ PV MM GJOE JU IFSF SHUW DGYLFH IRU RXU RVFK KRPH DSSOLDQFHV QHHG KHOS ZLWK SUREOHPV RU D UHSDLU IURP RVFK H SHUWV LQG RXW HYHU WKLQJ DERXW WKH PDQ ZD V RVFK FDQ VXSSRUW RX XXX CPTDI IPNF DPN TFSWJDF POUBDU EBUB PG BMM DPVOUSJFT BSF MJTUFE JO UIF BUUBDIFE TFSWJDF EJSFDUPSZ 3PCFSU PTDI BVTHFSÉ...

Reviews: