background image

Page 1

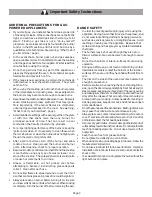
APPLIANCE SAFETY

• This appliance must be properly installed and grounded by

a qualified technician. Connect only to properly grounded

outlet. Refer to Installation Instructions for details.  Have

the installer show you where the gas shut-off valve is.

• This is a high-tech appliance. Service should only be

performed by an authorized service technician who has

undergone training for this specific type of unit.  Unauthorized

service technicians may not be familiar with the sophisticated

workings of this appliance, and may therefore cause damage

to the unit or create a hazard.   Contact the nearest authorized

service center for examination, repair or adjustment.

• Do not repair or replace any part of the range unless

specifically recommended by an authorized service technician.

• Do not operate this appliance if it is not working properly

or if it has been damaged, until an authorized servicer has

examined it.

• Use this appliance only for its intended use as described in

this manual. If you have any questions, contact the

manufacturer.

• Do not cover or block any openings on this appliance.

• Do not use corrosive chemicals, vapors, flammables or

nonfood products in this appliance.  This type of range is

specifically designed to heat or cook food.  It is not designed

for industrial or laboratory use. The use of corrosive

chemicals in heating or cleaning will damage the appliance

and could result in injury.

• In the event that personal clothing or hair catches fire,

DROP AND ROLL IMMEDIATELY

 to extinguish flames.

• Do not allow children to use this appliance unless closely

supervised by an adult. Children and pets should not be left

alone or unattended in the area where the appliance is in

use. They should never be allowed to sit or stand on any

part of the appliance or to play in its vicinity, whether or not

the appliance is in use.

Please read all instructions before using this appliance.

Important Safety Instructions

WARNING

ALL RANGES CAN TIP.

INJURY TO PERSONS COULD

RESULT.

INSTALL ANTI-TIP DEVICE

PACKAGED WITH RANGE.

SEE INSTALLATION INSTRUCTIONS.

„

Do not store or use combustible

materials, gasoline or other flammable

vapors and liquids in the vicinity of this

or any other appliance.

„

WHAT TO DO IF YOU SMELL GAS:

ƒ

Do not try to light any appliance.

ƒ

Do not touch any electrical switch.

ƒ

Do not use any phone in your building.

ƒ

Immediately call your gas supplier

from a neighbor’s phone. Follow the

gas supplier’s instructions.

ƒ

If you cannot reach your gas supplier,

call the fire department.

Installation and service must be performed by

a qualified installer, authorized service agency

or the gas supplier.

If the information in this manual is not followed

exactly, a fire or explosion may result causing

property damage, personal injury or death.

WARNING

PERSONAL SAFETY

WARNING

To reduce the risk of injury to persons, in the event of a

grease fire, observe the following:

• Use an extinguisher ONLY IF:

• You know you have a Class ABC extinguisher, and you already

know how to operate it.

• The fire is small and contained in the area where it started.

• The fire department is being called.

• You can fight the fire with your back to an exit.

 • In the event of a grease fire, SMOTHER FLAMES with a close-

fitting lid, cookie sheet, or other metal tray, then turn off the

elements. BE CAREFUL TO PREVENT BURNS. If the flames do

not go out immediately, EVACUATE AND CALL THE FIRE

DEPARTMENT.

 • Do not use water, including wet dishcloths or towels, on grease

fires. A violent steam explosion may result.

 • SMOTHER FLAMES from other types of food fires with baking

soda. NEVER use water on cooking fires.

 • NEVER PICK UP A FLAMING PAN. You may be burned.

 • ALWAYS have a working SMOKE DETECTOR near the kitchen.

 • LEAVE THE HOOD VENTILATOR ON when flambéing food.

This range is intended for residential use only. It is not

approved for outdoor use.

CAUTION

Items of interest to children should not be stored

in the range, in cabinets above the range or on the

backsplash of the range.  Children climbing on the

range to reach items could be seriously injured.

Summary of Contents for HGS24

Page 1: ...Care Manual Guide d utilisation et d entretien Guide d utilisation et d entretien Guide d utilisation et d entretien Guide d utilisation et d entretien Guide d utilisation et d entretien Manual de uso y cuidado Manual de uso y cuidado Manual de uso y cuidado Manual de uso y cuidado Manual de uso y cuidado for Models beginning with HGS PLEASE READ ENTIRE INSTRUCTIONS BEFORE PROCEEDING IMPORTANT Sav...

Page 2: ...ully before using this range These precautions will reduce the risk of burns electric shock fire and injury to persons Do not operate the oven or cooktop controls if the glass is broken Food splatter or cleaning solution may penetrate a broken control panel and create a risk of electric shock Contact a qualified technician immediately should your glass control panel become broken When using kitche...

Page 3: ... Operation 11 The Oven Oven Modes and Features 12 Oven Modes and Features Bake and Convection Bake 13 Oven Modes and Features Broil 14 Oven Modes and Features Convection Roast 15 Oven Modes and Features Dehydrate HDS24 and HDS25 models only 16 Selecting the Oven Mode 17 Using the Timer s 18 Using Timed Cook 19 Using the Probe HDS25 models only 20 The Warming Drawer HDS24 and HDS25 models only 21 C...

Page 4: ...etyInstructions WARNING ALL RANGES CAN TIP INJURY TO PERSONS COULD RESULT INSTALL ANTI TIP DEVICE PACKAGED WITH RANGE SEE INSTALLATION INSTRUCTIONS Do not store or use combustible materials gasoline or other flammable vapors and liquids in the vicinity of this or any other appliance WHAT TO DO IF YOU SMELL GAS Do not try to light any appliance Do not touch any electrical switch Do not use any phon...

Page 5: ...units or heating elements and may cause severe burns Do not allow anyone to climb stand lean or sit on any part of the oven nor to hang on the oven door warming drawer or storage drawer This can damage the range and the unit may tip over potentially causing severe injury Have the installer show the location of the gas shutoff valve and the circuit breaker or fuse Mark the circuit breaker or fuse f...

Page 6: ...cool before attempting to handle it Avoid letting grease deposits collect Clean after each use Do not allow flames to spread around or over the rim of pan that contains grease A grease fire could be ignited Always place pan on burner before turning it on Be sure you know which knob controls which burner When cooking is complete turn the burner off before removing the pan In order to prevent possib...

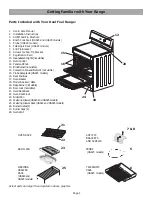
Page 7: ...els 16 Rack Positions 17 Oven Gasket 18 Model Serial Plate 19 Bake Burner not visible 20 Door Lock not visible 21 Oven Rack Back 22 Oven Rack Front 23 Broiler Pan 24 Warming Drawer HGS24 and HGS25 models 25 Warming Drawer Rack HGS24 and HGS25 models 26 Burner Grates 2 27 Burner Caps 4 28 Oven Vent Getting Familiar with Your Range OVEN RACK TELESCOPIC RACK HGS25 models PROBE HGS25 models WARMING DR...

Page 8: ... models PROBE INDICATOR HGS25 models Indicates the probe is installed in oven The internal temperature of the meat is displayed in place of the preheat temperature START Touch pad to complete an entry TEMPERATURE Touch pad to select cooking temperature TIME Touch pad to set time of day and or timer Other Indicators and Features BEEP Signals that more information must be entered or confirms the rec...

Page 9: ...Turn knob Set minutes 4 Touch TIME and the clock is now set Changing the Clock Time 1 Touch Time TIMER 1 will flash in display 2 Turn knob to select CLOCK 3 Touch TIME again and hour digits will flash 4 Turn knob to change hours 5 Touch TIME again and minute digits will flash 6 Turn knob clockwise or counter clockwise to change minutes 7 Touch TIME again and the clock is set Note To switch to a 24...

Page 10: ...cale to Fahrenheit or Celsius TIME FORMAT 12 hr or 24 hr LOCKKEYS ovencontrolpadlockout LANGUAGEOPTION fordisplay selectEnglish Spanish or French CLOCK DISPLAY yes or no OVEN TEMPERATURE OFFSET used to calibrate the oven temperature DEMO MODE used by appliance stores RESET DEFAULTS change all function settings back to original factory settings SABBATH FEATURE forreligiousfaithswith no work require...

Page 11: ...until LANGUAGE OPTION is displayed 3 TouchSTART 4 Turn knob clockwise to select language 5 Touch START to accept a language change Changingthebeepvolume 1 Access SELECT FUNCTION Menu 2 Turnknob clockwise slowly until VOLUMEis displayed 3 Touch START 4 Turn knob to select volume level Low Medium or High 5 Touch START BEEP VOLUME Thevolumeofthecontrolbeepcanbechanged from LOW softest to HIGH loudest...

Page 12: ...H OPTION appears 3 Touch START BAKE will show in display and temperature will flash 4 Turn knob to set oven temperature 5 Turn oven light on if desired touch LIGHT Note The light cannot be changed after this point It will stay on or off as selected during the entire Sabbath mode 6 Touch START Oven starts after 5 seconds Note The probe CANNOT be used during the Sabbath mode Whilebaking inSabbathmod...

Page 13: ...may not burn completely or correctly Burner Grates Yourcooktophastwo grates onefortheleftsideofthecooktop and one for the right side of the cooktop Position them as shown in the figure below Do not operate the burner without a pan on the grate Use this chart as a guide for heat settings HeatSettings Uses Bringing water to a boil High Pan frying sauteing browning meat deep fat frying Medium High Mo...

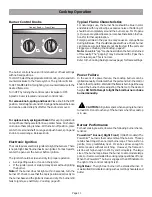
Page 14: ...s center the pan over the burner before ignition To replace knob spring and bezel Place spring and knob on top of bezel being careful to line up center holes Push down on knob so that spring is tense With knob in off position place center hole around shaft on range and push bezel spring and knob in toward range Release knob Control Knobs Front View The burner controls have an infinite number of he...

Page 15: ...ts or poultry RACK 1 lowest position Use for angel food cake large roasts turkey Multiple Rack Cooking When using multiple racks follow the placement recomendations below Two rack For cakes use rack positions 2 and 5 Three rack for convection bake Use positions 1 3 and 6 Pan Placement Baking results are better if pans are placed in the center of the oven If baking more than one pan on a rack allow...

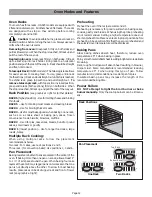
Page 16: ...sheets without sides Center baking pans side to side on the oven rack The Convection Bake mode is well suited for baking large quantities of food on multiple racks It can be used to prepare cookies pies cupcakes pastries breads snack foods and appetizers among other items Bakingiscookingwithdry heatedair Thelowerburnercycles to maintain the oven temperature The Bake mode can be used to prepare a v...

Page 17: ...ramic dishes such as Corningware Never use heat proof glass Pyrex it cannot tolerate the high temperature ALWAYS BROIL WITH THE DOOR CLOSED Broil Chart d n a d o o F s s e n k c i h T k c a R n o i t i s o P l i o r B g n i t t e S l a n r e t n I p m e T F e m i T 1 e d i S n i m e m i T 2 e d i S n i m f e e B 1 4 3 k a e t S e r a R m u i d e M m u i d e M l l e W 1 4 3 s r e g r u b m a H l l ...

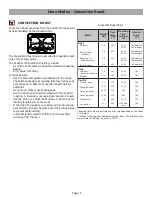
Page 18: ...Convection Roast Convection Roast Chart s t a e M t h g i e W b l n e v O p m e T F g n i t s a o R e m i T r e p n i m b l l a n r e t n I p m e T F f e e B t s a o R b i R t s a o R e y E b i R s s e l e n o b p i T e y E p m u R s s e l e n o b n i o l r i s t s a o R n i o l r e d n e T 6 4 6 4 6 3 3 2 5 2 3 5 2 3 5 2 3 5 2 4 2 3 5 2 2 3 8 2 2 3 4 2 2 3 7 2 0 3 5 2 2 3 8 2 5 2 5 1 e r a r d e ...

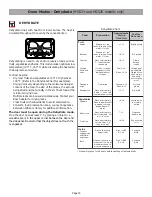
Page 19: ...k s k c i h t d e c i l S k c a r n o n w o d e d i s t u o 5 1 1 1 5 1 0 1 5 1 0 1 4 2 s l e e P 6 1 2 1 s e c i l S 3 1 9 d e n n a C 2 1 8 h s e r F 7 1 2 1 e l b a i l p y l t h g i l S e l b a i l p t f o S e l b a i l P y r e h t a e l y w e h c l e e p e g n a r O e l t t i r b d n a y r d s e c i l s e g n a r O y r d e r a s n i k s e l t t i r b d n a y l t h g i l s s i t i u r f t s i ...

Page 20: ... cooking touch Temperature Turn the knob to select new Temperature and press START 9 Once cooking has been completed touch OFF to turn off oven Oven Operation Time The oven will automatically shut off after 12 hours 24 hours if the time format is set for 24 hour in the SELECTFUNCTION section HELPFUL TIP Selecting OFF when not in a mode menu will stop oven function To back out of a current mode pus...

Page 21: ...on CLEAR TIMER 1 CLEAR TIMER 1 CLEAR TIMER 1 CLEAR TIMER 1 CLEAR TIMER 1 0 00 0 00 0 00 0 00 0 00 TIMER 1 TIMER 1 TIMER 1 TIMER 1 TIMER 1 0 00 00 00 00 00 AM 5 Turn knob to the right to increase by 1 hour increments or left to decrease by 1 hour increments until desired hours are displayed 6 Touch TIME again The TIMER is now set If TIME or START is not touched display will beep and timer will flas...

Page 22: ... cooking time counts down by the minute 7 At the end of the programmed cooking time the oven will automatically turn off Display will show TIME COOK END and the oven will beep Note Removefoodfromovenimmediatelyaftercyclehas finished to prevent overcooking Food left in the oven will continue to cook even after the cycle is complete To check the cooking time and stop time after a delay has been set ...

Page 23: ...commended when using the probe A hot oven will impair your ability to easily connect the probe to the receptacle and to insert it into the meat Oven temperature can be set for 100 F up to 450 F 38 C up to 232 C INSERTING THE PROBE Insert the probe tip into the food item For meats insert the probe tip into the thickest part and do not touch bone fat or gristle For large poultry products and turkeys...

Page 24: ...ace and Utensil Sizes Drawer Interior 25 W x 17 D x5 H Utensil sizes 2 9 x 13 Pyrex 3 quart dishes side by side 2 9 1 2 x 15 Pyrex 4 quart dishes side by side 4 10 1 2 plates single or stacked 3 11 plates single or stacked Large 14 pizza in box PackagedInsideDrawer Reversible Rack Low Medium High WARMING DRAWER RACK 3 2 1 The warming drawer has three settings Low Meduim and High The icons below ar...

Page 25: ...d in cooking utensil or heat safe serving dishes Foodmaybekepthotinitscookingcontainerortransferred to a heat safe serving dish Aluminum foil may be used to cover food Warming drawer settings are Low Medium and High Refer to the chart at right for recommended settings To keep several different foods hot set the temperature to the food needing the highest setting Place item needing the highest sett...

Page 26: ...The grates are heavy use care when lifting Place on a protected surface Blisters crazing chips are common due to the extreme temperatures on grate fingers and rapid temperature changes Acidic and sugar laden spills deteriorate the enamel Remove soil immediately Abrasive cleaners used too vigorously or too often can eventually mar the enamel Nonabrasive cleaners Hot water and de tergent Fantastic F...

Page 27: ...dclean gasket DO hand clean frame areaoutside gasket DO hand clean door area outside gasket DO hand clean 1 1 2 from rack guides to front of oven cavity Bosch ovens feature a self cleaning function that eliminates the manual labor involved with cleaning your oven During self cleaning the oven uses a very high temperature to burn away food soil and grease It is common to see smoke and or an occasio...

Page 28: ...ode the door latch is automatically activated at the beginning of the cycle The door lock symbol will appear in the display at this point The oven lights do not operate in the Self Clean mode NOTE After Self Cleaning 1 At the end of the programmed cleaning time the oven will automatically turn off SELF CLEAN END appears in the display Press OFF to clear Note To cancel or stop while the mode is ope...

Page 29: ...09 to remove grease spatters and stubborn stains Painted Clean with hot sudsy water or apply Fantastik or Formula 409 to a clean sponge or paper towel and wipe clean Avoid using powdered cleansers steel wool pads and oven cleaners Porcelain Immediately wipe up acid spills like fruit juice milk and tomatoes with a dry towel Do not use a moistened sponge towel on hot porcelain When cool clean with h...

Page 30: ...ware based on the following characteristics Aluminum or copper bottomed pans conduct heat evenly Steel pans if not combined with other metals may cook unevenly Cast iron cookware absorbs heat slowly and cooks more evenly at low to medium settings Flat heavy bottom pans provide even heat and stability DO NOT USE pans that are thin warped dented or ridged as they heat unevenly Use a wok with a flat ...

Page 31: ...oward you see Figure A 4 Close the door to approximately halfway open 5 Holding the door firmly on both sides using both hands pull the door straight out of the hinge slots Hold firmly the door is heavy See Figure B 6 Place the door in a convenient and stable location for cleaning Removing the Door Make sure the oven and lights are cool and power to the oven has been turned off before replacing th...

Page 32: ...it breaker and reset if necessary Check and or replace fuse With the cooktop turned off and cool remove burner caps Use a stiff nylon bristle toothbrush to push debris through burner ports Verify that burner caps are properly positioned over burners Check ignitor for moisture If wet allow to air dry before using Check for burned on food or grease See cleaning recommendations page 23 Burner will no...

Page 33: ...re not working properly Electical power to range has been interrupted The oven door is locked and will not release even after cooling Oven door latch needs to be reset Oven is not heating Oven is not receiving proper electrical power Oven temperature is not selected Verify that correct temperature has been selected Oven does not cook evenly food is undercooked or food is overcooked Incorrect rack ...

Page 34: ...ore quickly PROBLEM POSSIBLE CAUSE S SOLUTION S Self Help Oven Cont d General Range Troubleshooting Tips 1 Verify that gas shut off valve is in the ON position and the gas supply to the house is not shut off 2 Verify that the burner caps are positioned and the burner ports are not clogged Clear ports with a stiff nylon bristle toothbrush if clogged 3 Verify that the igniters are clean and dry 4 Ve...

Page 35: ... are scratches and damages on external surfaces and exposed parts of Range on which the serial numbers have been altered defaced of removed To the extent allowed by law this warranty sets out your exclusive remedies with respect to products covered by it whether the claim arises in contract or tort including strict liability and negligence or otherwise THE FOREGOING REPRESENTS THE TOTAL EXTENT OF ...

Reviews: