background image

19

Energy and environment tips

Here you can find tips on how to save energy when baking and 

roasting in the oven and when cooking on the hob, and how to 

dispose of your appliance properly.

Saving energy with your oven

Only preheat the oven if this is specified in the recipe or in 

the operating instruction tables.

Use dark, black lacquered or enamelled baking tins. They 

absorb the heat particularly well.

Open the oven door as infrequently as possible while 

cooking, baking or roasting.

It is best to bake more than one cake, one after the other. 

The oven is still warm. This reduces the baking time for the 

second cake. You can also place two loaf tins next to each 

other.

For longer cooking times, you can switch the oven off 

10 minutes before the end of the cooking time and use the 

residual heat to finish cooking.

Saving energy with the gas hob

Always use a saucepan which is the correct size for your 

food. A larger, less full saucepan requires a lot of energy.

Always place a suitable lid on the saucepan.

The gas flame must always be in contact with the base of the 

saucepan.

Environmentally-friendly disposal

Dispose of packaging in an environmentally-friendly manner.

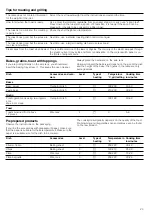
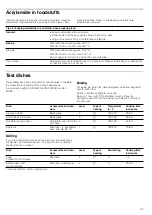
Tested for you in our cooking studio

Here you will find a selection of dishes and the ideal settings for 

them. We will show you which type of heating and which 

temperature are best suited for your dish. You can find 

information about suitable accessories and the height at which 

they should be inserted. There are also tips about cookware 

and preparation methods.

Notes

The values in the table always apply to dishes placed into the 

cooking compartment when it is cold and empty.
Only preheat the appliance if the table specifies that you 

should do so. Do not line the accessories with greaseproof 

paper until after they have been preheated.

The times specified in the tables are guidelines only. They will 

depend on the quality and composition of the food.

Use the accessories supplied. Additional accessories may be 

obtained as special accessories from specialist retailers or 

from the after-sales service.
Before using the oven, remove any unnecessary accessories 

and ovenware from the cooking compartment.

Always use oven gloves when taking hot accessories or 

ovenware out of the cooking compartment.

Cakes and pastries

Baking tins

It is best to use dark-coloured metal baking tins.
Baking times are increased when light-coloured baking tins 

made of thin metal or glass dishes are used, and cakes do not 

brown so evenly.
If you wish to use silicone baking tins, use the information and 

recipes provided by the manufacturer as a guide. Silicone 

baking tins are often smaller than normal tins. The amount of 

mixture and recipe instructions may differ.

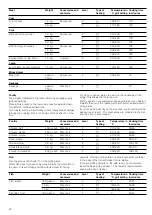
Tables

The tables show the ideal type of heating for the various cakes 

and pastries. The temperature and baking time depend on the 

amount and composition of the mixture. This is why 

temperature ranges are given in the tables. You should try the 

lower temperature first, since a lower temperature results in 

more even browning. You can increase the temperature next 

time if necessary.
If you preheat the oven, the baking time is shortened by 5 to 10 

minutes.
Additional information can be found in the 

Baking tips

 section 

following the tables.

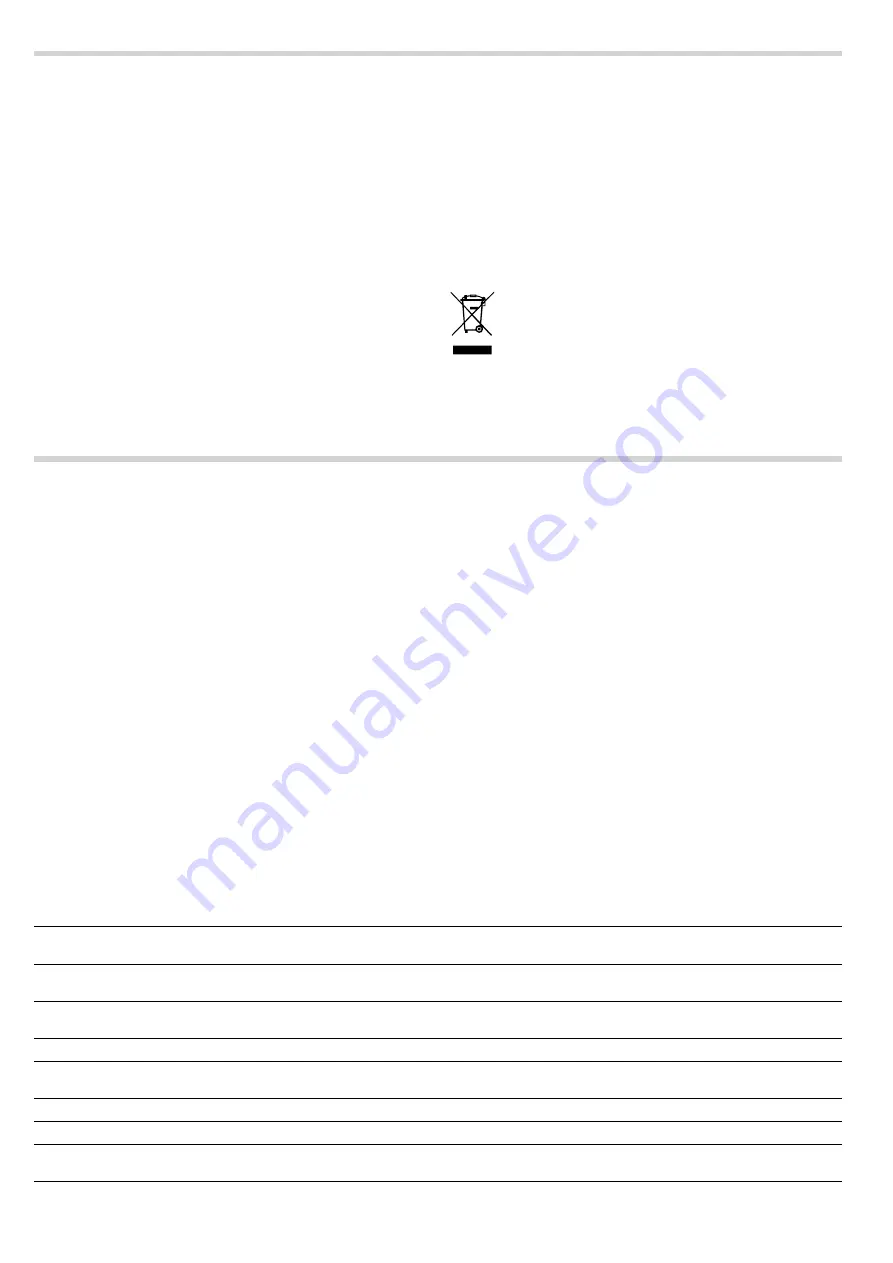
This appliance is labelled in accordance with European 

Directive 2012/19/EU concerning used electrical and 

electronic appliances (waste electrical and electronic 

equipment - WEEE). The guideline determines the 

framework for the return and recycling of used 

appliances as applicable throughout the EU.

Cake in a mould

Tin

Level

Type of 

heating

Temperature in 

°C

Cooking time 

in minutes

Simple, dry cake

Springform cake tin with 

tube sheet/fruit loaf tin

2

%

170-190

50-60

Simple, dry cake, delicate

Springform cake tin with 

tube sheet/fruit loaf tin

2

%

150-170

60-70

Sponge flan base

Flan-base cake tin

2

%

150-170

20-30

Fruit flan, simple dough

High springform cake tin 

with tube sheet

2

%

160-180

50-60

Sponge cake

Springform cake tin

2

%

160-180

30-40

Sponge flan base

Springform cake tin

1

%

170-190

25-35

Fruit tart or cheesecake, shortcrust pas-

try*

Springform cake tin

1

%

170-190

70-90

* Allow cakes to cool in the appliance for approx. 20 minutes.

Summary of Contents for HGV423224R

Page 1: ... en Instruction manual Free standing cooker HGV423224R ...

Page 2: ......

Page 3: ...b 13 Igniting the gas burners 13 Table Cooking 14 Setting the oven 14 Types of heating and temperature 14 Care and cleaning 15 Upper glass cover 15 Cleaning agents 15 Detaching and refitting the rails 16 Detaching and attaching the oven door 16 Removing and installing the door panels 17 Troubleshooting 18 Malfunction table 18 Replacing the bulb in the oven ceiling light 18 Glass cover 18 After sal...

Page 4: ...ion with an external timer or by remote control This appliance may be used by children over the age of 8 years old and by persons with reduced physical sensory or mental capabilities or by persons with a lack of experience or knowledge if they are supervised or are instructed by a person responsible for their safety how to use the appliance safely and have understood the associated hazards Childre...

Page 5: ...s Keep children at a safe distance Risk of burns During operation the surfaces of the appliance become hot Do not touch the surfaces when they are hot Keep children away from the appliance Risk of burns Empty cookware becomes extremely hot when set on a gas hotplate that is in operation Never heat up empty cookware Risk of burns The appliance becomes hot during operation Allow the appliance to coo...

Page 6: ...ter sales engineers If the appliance is faulty unplug the mains plug or switch off the fuse in the fuse box Contact the after sales service Risk of electric shock and serious injury The cable insulation on electrical appliances may melt when touching hot parts of the appliance Never bring electrical appliance cables into contact with hot parts of the appliance Risk of electric shock Do not use any...

Page 7: ... cookware or accessories on the appliance door Inserting accessories depending on the appliance model accessories can scratch the door panel when closing the appliance door Always insert the accessories into the cooking compartment as far as they will go Carrying the appliance do not carry or hold the appliance by the door handle The door handle cannot support the weight of the appliance and could...

Page 8: ...his appliance must only be connected to an earthed connection If the safety earth terminal does not comply with regulations safety against electrical hazards is not guaranteed You must use a H 05 W F type cable or equivalent for the appliance connection Levelling the cooker Always place the cooker directly on the floor 1 Pull out the plinth drawer and lift it up and out There are adjustable feet a...

Page 9: ...tting of the hotplates using the four burner knobs There is a limit stop at the end of the settings area Do not turn the timer beyond this Ignition button This button activates the electronic ignition system When you press the button all igniters ignite at the same time Explanations 1 Hob cover 2 Hob 3 Hotplate knob 4 Function and temperature selector 5 Appliance cooling 6 Oven door 7 Plinth drawe...

Page 10: ...ccessories can be pulled out approximately halfway without tipping This allows meals to be taken out easily When placing the accessories into the oven check that the indentation is at the back They can only lock correctly in place in this position Note Heat may cause the accessories to deform As soon as the accessories cool down they regain their original shape Their function is not adversely affe...

Page 11: ...use the grill tray with the universal pan Grilling on the grill tray only shelf positions 1 2 and 3 can be used The grill tray as a splash guard the universal pan is inserted together with the grill tray under the wire rack Baking stone HEZ327000 The baking stone is perfect for preparing home made bread bread rolls and pizzas which require a crispy base The baking stone must always be preheated to...

Page 12: ... the first time clean them thoroughly with hot soapy water and a soft dish cloth Advance cleaning of burner cup and cap Clean the burner cap 1 and cup 2 with water and washing up liquid Dry the individual parts carefully Place the burner cup and cap back on the burner shell 5 Ensure that the igniter 3 and flame safety pin 4 are not damaged The nozzle 6 must be dry and clean Always position the bur...

Page 13: ... 6 If the flame goes out again repeat the process from step 2 Burner electric hot plate Minimum pan diameter Maximum pan diam eter Electric hotplate 14 5 cm 14 5 cm Wok burner 3 6 kW 24 cm 28 cm High output burner 3kW 24 cm 28 cm Standard burner 1 7 kW 18 cm 24 cm Economy burner 1 kW 12 cm 18 cm Option for models with an electric hotplate Option for models with a wok burner Use pans which are the ...

Page 14: ...the oven Here you can find out how to set the oven Types of heating and temperature Example in the picture 190 C Top bottom heating 1 Use the function selector to select the required type of heating 2 Use the temperature selector to set the temperature or the grill setting The oven heats up Switching off the oven Turn the function selector to the off position Changing the settings The type of heat...

Page 15: ...ss steel fronts can be polished using a special care product Follow the manufacturer s instructions You can purchase special stainless steel cleaner from our after sales service or from specialist retailers Enamel surfaces and lacquered surfaces Clean with some washing up liquid and a damp cloth Dry with a soft cloth Burners and steel grid of the gas burn ers Do not clean in the dishwasher Remove ...

Page 16: ... snap shut with great force Ensure that the locking levers are always fully closed or when detaching the oven door fully open Detaching the door 1 Open the oven door fully 2 Fold up the two locking levers on the left and right figure A 3 Close the oven door as far as the limit stop With both hands grip the door on the left and right hand sides Close the door a little further and pull it out figure...

Page 17: ...g down 2 Pull off the cover at the top of the oven door Press in the tabs on the left and right using your fingers fig A 3 Lift the top panel up and pull it out fig B 4 Lift the panel up and pull it out fig C Clean the panels with glass cleaner and a soft cloth Risk of injury Scratched glass in the appliance door may develop into a crack Do not use a glass scraper sharp or abrasive cleaning aids o...

Page 18: ...n in order to avoid unnecessary visits from a service technician E number and FD number When calling us please give the product number E no and the production number FD no so that we can provide you with the correct advice The rating plate containing these numbers is found on the side of the oven door To save time you can make a note of the number of your appliance and the telephone number of the ...

Page 19: ... as special accessories from specialist retailers or from the after sales service Before using the oven remove any unnecessary accessories and ovenware from the cooking compartment Always use oven gloves when taking hot accessories or ovenware out of the cooking compartment Cakes and pastries Baking tins It is best to use dark coloured metal baking tins Baking times are increased when light colour...

Page 20: ...C Cooking time in minutes Allow cakes to cool in the appliance for approx 20 minutes Bread and rolls Accessories Level Type of heating Temperature in C Cooking time in minutes Yeast bread with 1 2 kg flour Baking tray 2 270 200 8 35 45 Sourdough bread with 1 2 kg flour Baking tray 2 270 200 8 40 50 Bread rolls e g rye bread rolls do not preheat Baking tray 4 200 220 20 30 You want to bake accordin...

Page 21: ...nt can be damaged when removing it The grill element switches on and off continually This is normal The grill setting determines how frequently this will happen Meat Turn pieces of meat halfway through the cooking time When the roast is ready turn off the oven and allow it to rest for an additional 10 minutes This allows better distribution of the meat juices After cooking wrap sirloin in aluminiu...

Page 22: ...ing the oven cleaner Veal Joint of veal 1 0 kg Uncovered 2 190 210 110 2 0 kg 2 170 190 120 Pork without rind e g neck 1 0 kg Uncovered 2 210 230 110 1 5 kg 2 200 220 130 2 0 kg 2 190 210 150 with rind e g shoulder 1 0 kg Uncovered 2 210 230 130 1 5 kg 2 200 220 160 2 0 kg 2 190 210 180 Smoked pork on the bone 1 0 kg Covered 2 210 230 70 Lamb Leg of lamb boned medium 1 5 kg Uncovered 2 170 190 120...

Page 23: ...poon If it feels firm it is ready If the spoon can be pressed in it needs to be cooked for a little longer The roast is too dark and the crackling is partly burnt Check the shelf height and temperature The roast looks good but the juices are burnt Next time use a smaller roasting dish or add more liquid The roast looks good but the juices are too clear and watery Next time use a larger roasting di...

Page 24: ...the jars on it so that they do not touch each other 2 Pour litre of hot water approx 80 C into the universal pan 3 Close the oven door 4 Set Bottom heating 5 Set the temperature to between 170 and 180 C Preserving Fruit After approx 40 to 50 minutes small bubbles begin to form at short intervals Switch off the oven After 25 to 35 minutes of residual heat remove the preserving jars from the cooking...

Page 25: ...eparing food General Keep cooking times to a minimum Cook meals until they are golden brown but not too dark Large thick pieces of food contain less acrylamide Baking With top bottom heating max 200 C With 3D hot air or hot air max 180 C Biscuits With top bottom heating max 190 C With 3D hot air or hot air max 170 C Egg or egg yolk reduces the production of acrylamide Oven chips Spread evenly over...

Page 26: ......

Page 27: ......

Page 28: ...01 081193 9000949501 9000949501 Robert Bosch Hausgeräte GmbH Carl Wery Straße 34 81739 München Germany www bosch home com ...

Reviews: