background image

21

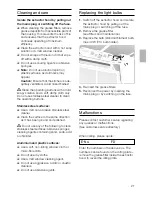
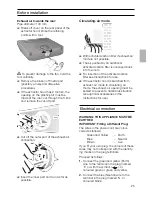
Replacing the light bulbs

1.

Switch off the extractor hood and isolate

the extractor hood by pulling out the

mains plug or switching off the fuse.

2.

Remove the grease filter 

(see Filters and maintenance).

3.

Replace the bulb (standard filament bulb,

max 40 W, E14 bulb holder).

4.

Re-insert the grease filters.

5.

Reconnect the power by inserting the

mains plug or by switching on the fuse.

Cleaning and care

Isolate the extractor hood by pulling out

the mains plug or switching off the fuse.

When cleaning the grease filters, remove

grease deposits from accessible parts of

the housing. This prevents the risk of fire

and ensures that the extractor hood

continues operating at maximum 

efficiency.

Clean the extractor hood with a hot soap

solution or a mild window cleaner.

Do not scrape off dried-on dirt but wipe

off with a damp cloth.

Do not use scouring agents or abrasive

sponges.

Note: 

Do not use alcohol (spirit) on 

plastic surfaces, as dull marks may

appear.

Caution: 

Ensure that the kitchen is ade-

quately ventilated. Avoid naked flames!

!

Clean the operating buttons with a mild

soapy solution and a soft, damp cloth only.

Do not use stainless-steel cleaner to clean

the operating buttons.

Stainless steel surfaces:

Use a mild non-abrasive stainless steel

cleaner.

Clean the surface in the same direction

as it has been ground and polished.

!

Do not use any of the following to clean

stainless steel surfaces: abrasive sponges,

cleaning agents containing sand, soda, acid

or chloride!

Aluminium and plastic surfaces:

Use a soft, non-linting window cloth or

micro-fibre cloth.

Do not use dry cloths.

Use a mild window cleaning agent.

Do not use aggressive, acidic or caustic

cleaners.

Do not use abrasive agents.

Malfunctions

Please contact customer service regarding

any queries or malfunctions. 
(See customer-service directory).

When calling, please quote:

E-No.                       FD

Enter the numbers in the above box. The

numbers can be found on the rating plate –

remove the grease filter inside the extractor

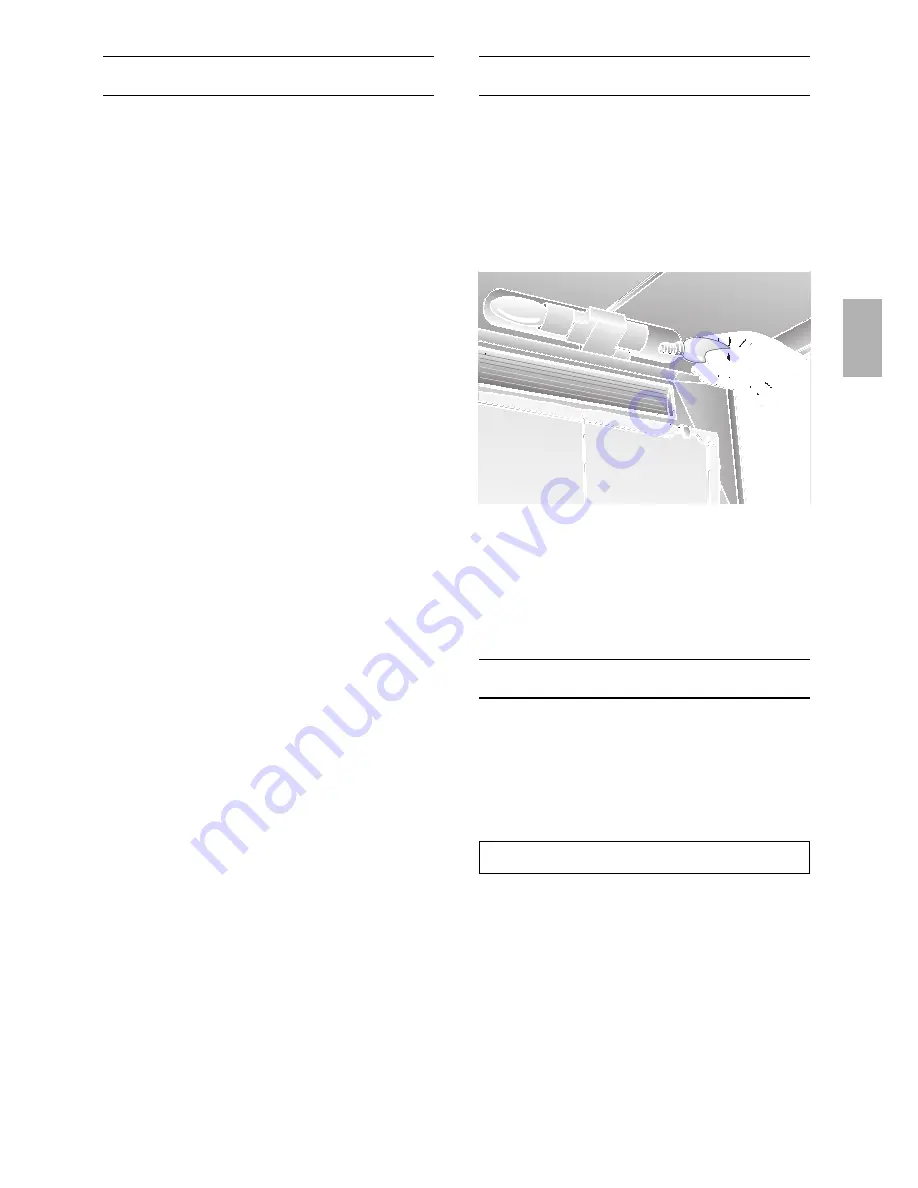
hood to reveal the rating plate.

Summary of Contents for Household Appliance

Page 1: ...bruiksaanwijzing en montagevoorschrift it Istruzioni d uso e per il montaggio es Instrucciones de uso y de montaje pt Instruções de serviçio e de montagem ru Instrukciä po qkspluatacii Rukovodstvo po montaøu vytäønogo kolpaka a Internet http www bosch hausgeraete de Bosch Info Team de Tel 01 80 5 30 40 50 E 0 12 Min DTAG ...

Page 2: ...2 Abb 1 de Seite 03 15 en page 16 28 fr page 29 41 nl pagina 42 54 it pagina 55 067 es página 68 080 pt página 81 093 ru stranica 94 107 ...

Page 3: ... the room An air intake exhaust air wall box by itself is no guarantee that the limiting value will not be exceeded Note When assessing the overall requirement the combined ventilation system for the entire household must be taken into consideration This rule does not apply to the use of cooking appliances such as hobs and ovens Unrestricted operation is possible if the extractor hood is used in r...

Page 4: ...ltaneously Before using your appliance for the first time please read these Instructions for Use carefully They contain important information concerning your personal safety as well as on use and care of the appliance Please retain the operating and installation instructions for a subsequent owner Do not use the appliance if damaged The appliance is not intended for use by young children or infirm...

Page 5: ...sy residue increases flammability and the function of the extractor hood may be impaired Important Replace the fleece grease filter in good time otherwise there is a risk of fire from the heat which accumulates during deep fat frying or roasting Replacing the fleece grease filter During normal operation daily 1 to 2 hours the fleece grease filter must be replaced every 8 to 10 weeks Replace printe...

Page 6: ...ncreases flammability and the function of the extractor hood may be impaired Important Replace the metal grease filter in good time otherwise there is a risk of fire from the heat which accumulates during deep fat frying or roasting Cleaning the metal grease filter During normal operation daily 1 to 2 hours the metal grease filter must be replaced every 8 to 10 weeks The metal grease filter can be...

Page 7: ...2 Using a screwdriver or similar tool press the two lugs on the housing inwards required only during the initial installation 3 Insert the activated carbon filter at the rear fold up and lock into position on the left and right with the wing nuts The lugs on the left and right sides of the activated carbon filter are folded in for the 50 cm wide extractor hood They must be folded up for the 60 cm ...

Page 8: ...ol spirit on plastic surfaces as dull marks may appear Caution Ensure that the kitchen is ade quately ventilated Avoid naked flames Clean the operating buttons with a mild soapy solution and a soft damp cloth only Do not use stainless steel cleaner to clean the operating buttons Stainless steel surfaces Use a mild non abrasive stainless steel cleaner Clean the surface in the same direction as it h...

Page 9: ...pliance render it unusable You received your new appliance in a protective shipping carton All packaging materials are environmentally friendly and recyclable Please contribute to a better environment by disposing of packaging materials in an environmentally friendly manner Please ask your dealer or inquire at your local authority about current means of disposal The extractor hood can be used in e...

Page 10: ... other technical procedures such as reciprocal interlocking This can be achieved if the combustion air is able to flow through non lockable openings e g in doors windows and in conjunction with an air supply air intake wall box or by other technical procedures such as reciprocal interlocking If the air intake is inadequate there is a risk of poisoning from combustion gases which are drawn back int...

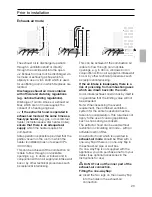
Page 11: ... equivalent to round pipes with an inner diameter of 100 120 mm There should be no sharp bends 100 m dia approx 178 cm2 125 m dia approx 113 cm2 If pipe diameters differ Insert sealing strip Ensure an adequate air supply for exhaust air mode If the exhaust air is conveyed through the exterior wall a telescopic wall box should be used Exhaust air upwards Pipe diameter 100 or 120 mm Break off cover ...

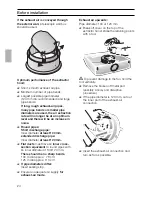
Page 12: ... filter is conveyed back into the room For insertion of the activated carbon filter see Instructions for use If the extractor hood is switched from exhaust air mode to circulating air mode the exhaust air opening must be sealed to prevent a hazardous situation see optional accessories in the Instructions for use Electrical connection WARNING THIS APPLIANCE MUST BE EARTHED IMPORTANT Fitting a Diffe...

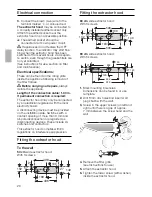
Page 13: ...hood may only be connected by an electrician registered with the local electricity board A disconnecting device must be provided on the installation side Switches with a contact opening of more than 3 mm and all pole disconnection are regarded as disconnecting devices These include LS switches and contactors This extractor hood complies with EU regulations on interference suppression Fitting the e...

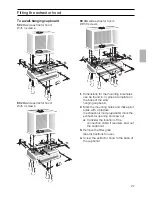
Page 14: ...oreholes can be found in or place a template on the base of the wall hanging cupboard 2 Mark the mounting holes and make pilot holes with a bradawl In exhaust air mode upwards mark the exhaust air opening and saw out Consider the location of the connection cable if required saw out the cupboard 3 Remove the filter grille see Instructions for use 4 Screw the extractor hood to the base of the cupboa...

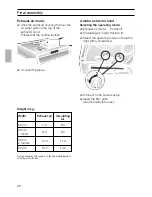
Page 15: ...erating mode Exhaust air mode Position 1 Circulating air mode Position 2 Select the operating mode on the left or right with a screwdriver Connect to the power supply Insert the filter grille see Instructions for use 1 2 Weight in kg Exhaust air Width Circulating air 50 cm 60 cm 1 motor 60 cm 2 motors 7 0 8 0 10 0 8 0 9 0 11 0 90 cm Design changes with respect to technical development shall remain...

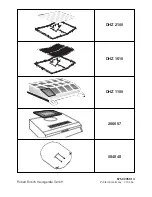
Page 16: ...5750 205 314 Printed in Germany 0704 Es Robert Bosch Hausgeräte GmbH DHZ 1100 DHZ 1610 DHZ 2100 266657 084848 ...

Reviews: